OPERATING INSTRUCTIONS
OPERATING INSTRUCTIONS
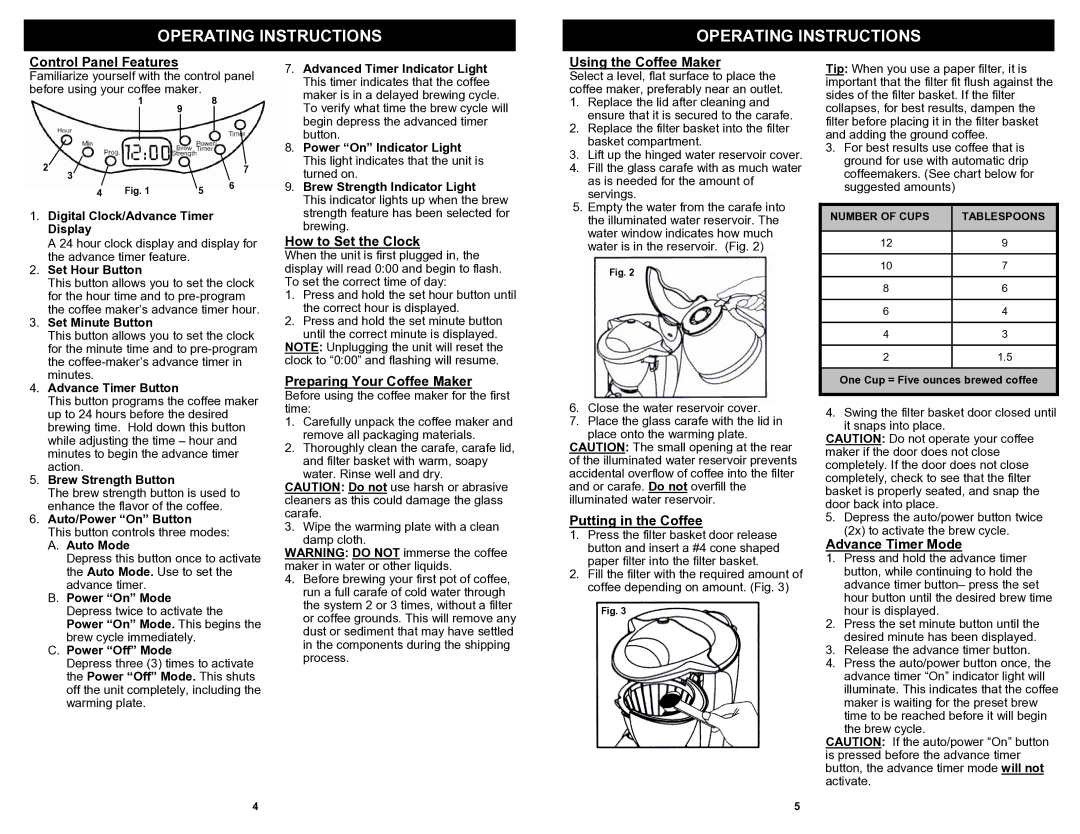
Control Panel Features
Familiarize yourself with the control panel before using your coffee maker.
18
9
2 |
|
| 7 | |
3 |
|
| 6 | |
4 | Fig. 1 | 5 | ||
|
1.Digital Clock/Advance Timer Display
A24 hour clock display and display for the advance timer feature.
2.Set Hour Button
This button allows you to set the clock for the hour time and to
3.Set Minute Button
This button allows you to set the clock for the minute time and to
4.Advance Timer Button
This button programs the coffee maker up to 24 hours before the desired brewing time. Hold down this button while adjusting the time – hour and minutes to begin the advance timer action.
5.Brew Strength Button
The brew strength button is used to enhance the flavor of the coffee.
6.Auto/Power “On” Button
This button controls three modes:
A.Auto Mode
Depress this button once to activate the Auto Mode. Use to set the advance timer.
B.Power “On” Mode Depress twice to activate the
Power “On” Mode. This begins the brew cycle immediately.
C.Power “Off” Mode
Depress three (3) times to activate the Power “Off” Mode. This shuts off the unit completely, including the warming plate.
7.Advanced Timer Indicator Light This timer indicates that the coffee maker is in a delayed brewing cycle. To verify what time the brew cycle will begin depress the advanced timer button.
8.Power “On” Indicator Light This light indicates that the unit is turned on.
9.Brew Strength Indicator Light
This indicator lights up when the brew strength feature has been selected for brewing.
How to Set the Clock
When the unit is first plugged in, the display will read 0:00 and begin to flash. To set the correct time of day:
1.Press and hold the set hour button until the correct hour is displayed.
2.Press and hold the set minute button
until the correct minute is displayed. NOTE: Unplugging the unit will reset the clock to “0:00” and flashing will resume.
Preparing Your Coffee Maker
Before using the coffee maker for the first time:
1.Carefully unpack the coffee maker and remove all packaging materials.
2.Thoroughly clean the carafe, carafe lid, and filter basket with warm, soapy water. Rinse well and dry.
CAUTION: Do not use harsh or abrasive cleaners as this could damage the glass carafe.
3.Wipe the warming plate with a clean damp cloth.
WARNING: DO NOT immerse the coffee maker in water or other liquids.
4.Before brewing your first pot of coffee, run a full carafe of cold water through the system 2 or 3 times, without a filter or coffee grounds. This will remove any dust or sediment that may have settled in the components during the shipping process.
Using the Coffee Maker
Select a level, flat surface to place the coffee maker, preferably near an outlet.
1.Replace the lid after cleaning and ensure that it is secured to the carafe.
2.Replace the filter basket into the filter basket compartment.
3.Lift up the hinged water reservoir cover.
4.Fill the glass carafe with as much water as is needed for the amount of servings.
5.Empty the water from the carafe into the illuminated water reservoir. The water window indicates how much water is in the reservoir. (Fig. 2)
Fig. 2
6.Close the water reservoir cover.
7.Place the glass carafe with the lid in
place onto the warming plate. CAUTION: The small opening at the rear of the illuminated water reservoir prevents accidental overflow of coffee into the filter and or carafe. Do not overfill the illuminated water reservoir.
Putting in the Coffee
1.Press the filter basket door release button and insert a #4 cone shaped paper filter into the filter basket.
2.Fill the filter with the required amount of coffee depending on amount. (Fig. 3)
Fig. 3
Tip: When you use a paper filter, it is important that the filter fit flush against the sides of the filter basket. If the filter collapses, for best results, dampen the filter before placing it in the filter basket and adding the ground coffee.
3.For best results use coffee that is ground for use with automatic drip coffeemakers. (See chart below for suggested amounts)
| NUMBER OF CUPS | TABLESPOONS |
|
|
|
|
|
| 12 | 9 |
|
|
|
|
|
| 10 | 7 |
|
|
|
|
|
| 8 | 6 |
|
|
|
|
|
| 6 | 4 |
|
|
|
|
|
| 4 | 3 |
|
|
|
|
|
| 2 | 1.5 |
|
|
|
|
|
One Cup = Five ounces brewed coffee
4.Swing the filter basket door closed until it snaps into place.
CAUTION: Do not operate your coffee maker if the door does not close completely. If the door does not close completely, check to see that the filter basket is properly seated, and snap the door back into place.
5.Depress the auto/power button twice (2x) to activate the brew cycle.
Advance Timer Mode
1.Press and hold the advance timer button, while continuing to hold the advance timer button– press the set hour button until the desired brew time hour is displayed.
2.Press the set minute button until the desired minute has been displayed.
3.Release the advance timer button.
4.Press the auto/power button once, the advance timer “On” indicator light will illuminate. This indicates that the coffee maker is waiting for the preset brew time to be reached before it will begin
the brew cycle.
CAUTION: If the auto/power “On” button is pressed before the advance timer button, the advance timer mode will not activate.
4
5