OPERATING INSTRUCTIONS cont.

OPERATING INSTRUCTIONS cont.

Filling the Stainless Steel

Container With Oil

Warning: Never plug in the Deep Fryer before filling with oil to specified level. Always make sure control panel is securely in place in the body and the heating element is inside the oil in the container before plugging in.

Use blended vegetable oil, pure corn oil or canola (rapeseed) oil. Do not use olive oil, margarine, lard or drippings.

The oil level must always be maintained between the minimum and the maximum levels marked inside the oil container. Check the oil level before each use. For best results, keep the oil close to the maximum level (14 cups/3.5 liters). Fig. 3

Never mix different oils and fats together. Do not mix old and new oil.

Installing the “Control Panel With the Heating Element” Into Place

Lift up the Control Panel with Heating Element.

Insert the "Guide Edges" on the Control Panel into the "Guide Rails" mounted on the metal body.

Slide the "Guide Edges" down till the end.

Important Notice: The Automatic Safety Switch ensures that the unit will not operate unless the Control Panel has been inserted into the "Guide Rails" on the metal body correctly.

Guide Rails

Back of Main Body

Pre-Heating

Warning: Never plug in the Deep Fryer before filling with oil. (See "Filling" instructions on page 4.) Always unplug the appliance when not in use.

Make sure the oil level in the oil container is between the "minimum " and " maximum " lines inside the oil container.

The frying basket should not be immersed in the oil during the pre- heating.

Replace the lid cover.

Plug the appliance into a 120-volt outlet.The unit beeps .

Press the power button. The unit beeps and the power indicator light comes on . It’s showing that the power on. The upper screen display 320 °F and the lower screen displays _ _: _ _ . It’s in constant boiling status.

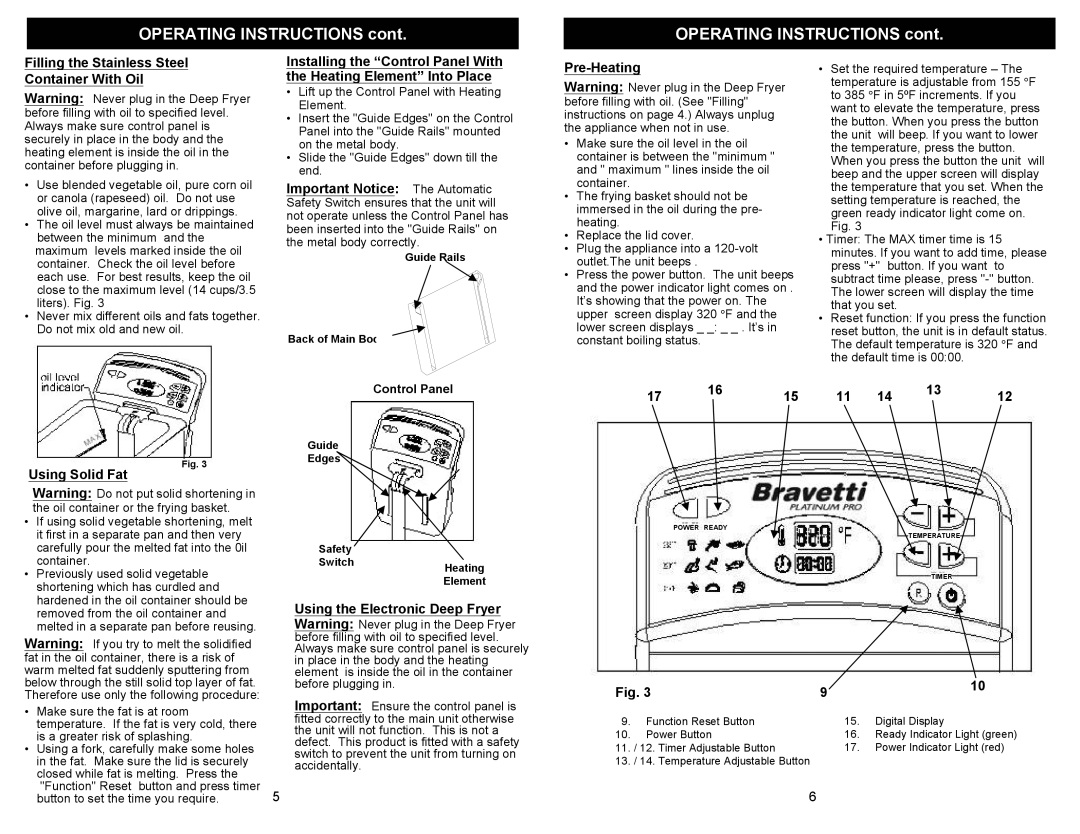
Set the required temperature – The temperature is adjustable from 155 °F to 385 °F in 5ºF increments. If you want to elevate the temperature, press the button. When you press the button the unit will beep. If you want to lower the temperature, press the button. When you press the button the unit will beep and the upper screen will display the temperature that you set. When the setting temperature is reached, the green ready indicator light come on. Fig. 3

Timer: The MAX timer time is 15 minutes. If you want to add time, please press "+" button. If you want to subtract time please, press "-" button. The lower screen will display the time that you set.

Reset function: If you press the function reset button, the unit is in default status. The default temperature is 320 °F and the default time is 00:00.

Control Panel

17

16

15

11

14

13

12


Using Solid Fat

Fig. 3

Guide Edges

Warning: Do not put solid shortening in the oil container or the frying basket.

If using solid vegetable shortening, melt it first in a separate pan and then very carefully pour the melted fat into the 0il container.

Previously used solid vegetable shortening which has curdled and hardened in the oil container should be removed from the oil container and melted in a separate pan before reusing.

Warning: If you try to melt the solidified fat in the oil container, there is a risk of warm melted fat suddenly sputtering from below through the still solid top layer of fat. Therefore use only the following procedure:

Make sure the fat is at room temperature. If the fat is very cold, there is a greater risk of splashing.

Using a fork, carefully make some holes in the fat. Make sure the lid is securely

closed while fat is melting. Press the


"Function" Reset button and press timer

5

button to set the time you require.

Safety

SwitchHeating

Element

Using the Electronic Deep Fryer Warning: Never plug in the Deep Fryer

before filling with oil to specified level. Always make sure control panel is securely in place in the body and the heating element is inside the oil in the container before plugging in.

Important: Ensure the control panel is fitted correctly to the main unit otherwise the unit will not function. This is not a defect. This product is fitted with a safety switch to prevent the unit from turning on accidentally.

POWER READY

TEMPERATURE

TIMER

Fig. 3


9

10


9.

Function Reset Button

15.

Digital Display

10.

Power Button

16.

Ready Indicator Light (green)

11.

/ 12.

Timer Adjustable Button

17.

Power Indicator Light (red)

13.

/ 14.

Temperature Adjustable Button


6

Page 6
Image 6
Bravetti F1065D owner manual Filling the Stainless Steel Container With Oil, Pre-Heating, Using Solid Fat

F1065D specifications

The Bravetti F1065D is a sophisticated kitchen appliance that combines functionality with modern design, catering to the needs of culinary enthusiasts and busy households alike. This versatile product is primarily a food processor, capable of handling a wide array of tasks that streamline meal preparation.

One of the standout features of the Bravetti F1065D is its powerful motor. Equipped with a robust 600-watt motor, this food processor can easily tackle tough ingredients, from dense vegetables to hearty nuts. The power ensures a smooth and efficient operation, allowing users to accomplish tasks in a fraction of the time it would typically take with manual methods.

Versatility is another strong suit of the F1065D. The appliance comes with a variety of attachments and blades that enable users to perform multiple functions such as chopping, slicing, shredding, and even kneading dough. The stainless steel slicing and shredding discs are designed for durability and precision, ensuring consistent results every time.

The Bravetti F1065D also embraces user-friendly technology. Its easy-to-use control panel features multiple speed settings, allowing for customized processing based on the specific task at hand. Whether a recipe calls for coarsely chopped vegetables or finely shredded cheese, the user can easily adjust the speed to achieve the desired outcome.

Safety is a priority in the design of the F1065D. The unit is equipped with a safety lock feature that ensures the lid is securely in place before the processor can operate, preventing any accidental spills or injuries. Additionally, the non-slip base provides stability during use, allowing users to chop and mix ingredients without worrying about the appliance moving around.

Another characteristic that sets the Bravetti F1065D apart is its compact design. It takes up minimal counter space, making it an excellent choice for kitchens of all sizes. Its sleek aesthetic also adds to the decor, allowing it to blend seamlessly with contemporary kitchen styles.

In conclusion, the Bravetti F1065D stands out in the crowded food processor market due to its powerful performance, versatility, user-friendly controls, safety features, and modern design. It is a valuable addition to any kitchen, simplifying meal preparation and enabling cooks to explore their culinary creativity without the fuss.