
BTA840XL specifications
The Breville BTA840XL, also known as the Die-Cast 4-Slice Smart Toaster, stands out in the crowded market of kitchen appliances with its sleek design and advanced functionality. Catering to the needs of modern consumers, this toaster incorporates several features and technologies that enhance the breakfast experience.One of the most notable characteristics of the Breville BTA840XL is its robust die-cast metal construction, which not only provides a premium look but also durability. The sleek exterior is both stylish and easy to clean, making it a seamless addition to any kitchen countertop.
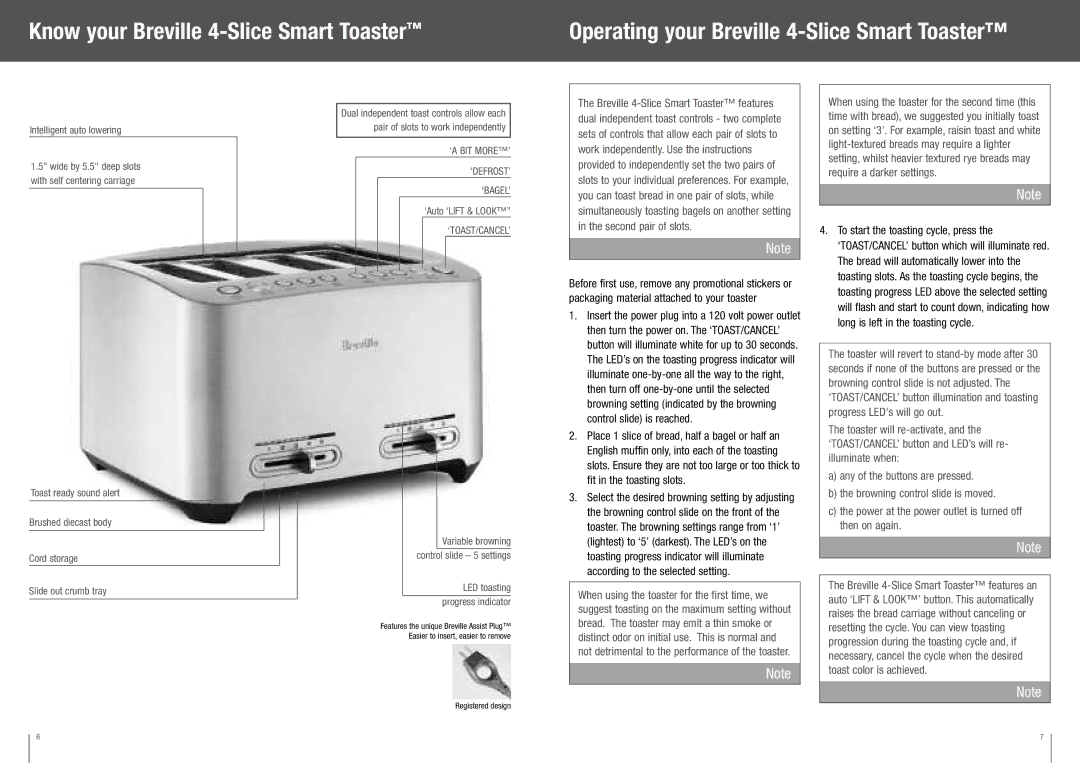
This toaster is equipped with an impressive 4-slice capacity, allowing families or households with multiple members to toast bread efficiently. It caters to various types of bread, from thick artisanal slices to frozen waffles, thanks to its extra-wide slots. This versatility ensures that each slice is toasted evenly on both sides.
The BTA840XL features innovative "A Bit More" functionality. If you find your toast is not quite to your liking, this unique feature allows you to give it an extra toasting time without having to reset the whole process. This eliminates the guesswork involved in achieving the perfect shade of golden brown.
Another highlighted technology is the "Lift and Look" option, which enables users to lift the toast during the toasting cycle for a quick inspection. This means you can ensure your bread is not overcooked without interrupting the toasting process.
Additionally, the toaster includes a "Toast Cancel" button, allowing for immediate cessation of toasting at any point, which is a helpful feature when your toast reaches the desired crispness unexpectedly.
With a variety of browning settings, the Breville BTA840XL allows users to customize their toasting experience. Whether you prefer a light, medium, or dark toast, adjusting the settings is simple and intuitive, providing flexibility that caters to individual tastes.
The integrated crumb tray makes cleaning hassle-free, as it can easily be removed and is dishwasher safe, ensuring your countertop remains tidy without much effort.
In summary, the Breville BTA840XL is not just a toaster; it's a smart kitchen appliance that combines style with state-of-the-art technology. With its robust construction, user-friendly features, and capacity to produce perfectly toasted bread, it is a worthy investment for anyone seeking to elevate their breakfast routine.