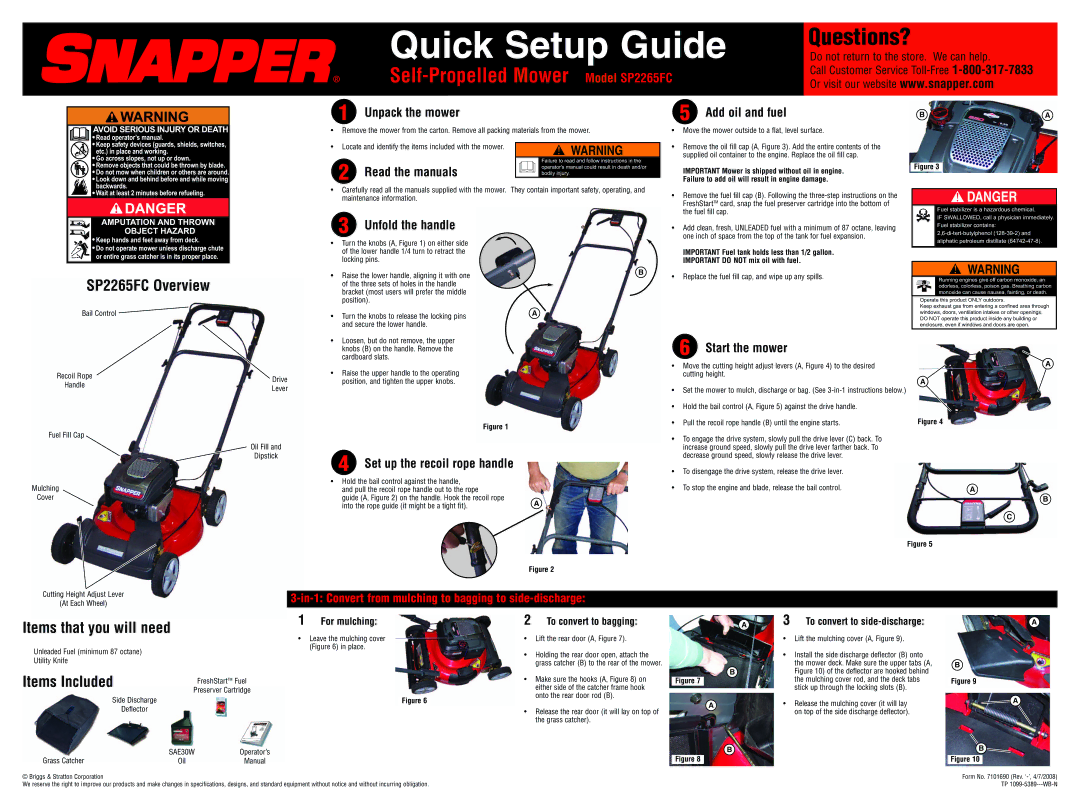
SP2265FC Overview
Bail Control
Quick Setup Guide | Questions? |
Do not return to the store. We can help. | |
| Call Customer Service |
Or visit our website www.snapper.com | |
|
|
1 | Unpack the mower |
|
|
|
| 5 | Add oil and fuel | B | A | |||||
• Remove the mower from the carton. Remove all packing materials from the mower. | • Move the mower outside to a flat, level surface. |
|
|
|
|
| ||||||||
• Locate and identify the items included with the mower. |
|
|
|
| • Remove the oil fill cap (A, Figure 3). Add the entire contents of the |
|
|
|
|
| ||||
|
|
|
|
|
|
|
|
| ||||||
|
|
|
|
|
|
|
|
| ||||||
|
|
|
|
|
|
| supplied oil container to the engine. Replace the oil fill cap. |
|
|
|
|
| ||
2 |
|
|
|
| Failure to read and follow instructions in the |
|
|
|
|
|
|
|
| |
Read the manuals |
|
| operator's manual could result in death and/or |
|
|
| Figure 3 |
|
| |||||
|
| bodily injury. |
|
|
|
|
|
|
| |||||
|
| Failure to add oil will result in engine damage. |
|
|
|
|
| |||||||
|
|
|
|
| IMPORTANT Mower is shipped without oil in engine. |
|
|
|
|
| ||||
• Carefully read all the manuals supplied with the mower. They contain important safety, operating, and |
|
|
|
|
|
|
|
| ||||||
FreshStartTM card, snap the fuel preserver cartridge into the bottom of |
|
| DANGER |
| ||||||||||
|
|
|
|
|
|
|
|
|
| |||||
maintenance information. |
|
|
|
| • Remove the fuel fill cap (B). Following the |
|
|
|
|
| ||||
|
|
|
|
|
|
|
|
|
|
|
| |||
3 |
|
|
|
|
|
| the fuel fill cap. |
| Fuel stabilizer is a hazardous chemical. |
| ||||
Unfold the handle |
|
|
|
|
|
|
|
| IF SWALLOWED, call a physician immediately. | |||||
|
|
|
| • Add clean, fresh, UNLEADED fuel with a minimum of 87 octane, leaving |
| Fuel stabilizer contains: |
| |||||||
|
|
|
|
|
| one inch of space from the top of the tank for fuel expansion. |
|
| ||||||
|
|
|
|
|
|
|
| |||||||
|
|
|
|
|
|
|
| |||||||
• Turn the knobs (A, Figure 1) on either side |
|
|
|
|
|
|
|
| aliphatic petroleum distillate |
| ||||
of the lower handle 1/4 turn to retract the |
|
|
|
| IMPORTANT Fuel tank holds less than 1/2 gallon. |
|
|
|
|
| ||||
locking pins. |
|
|
| B | IMPORTANT DO NOT mix oil with fuel. |
|
|
|
|
| ||||
|
|
|
|
|
|
|
| |||||||
• Raise the lower handle, aligning it with one |
|
|
| • Replace the fuel fill cap, and wipe up any spills. |
|
|
|
|
| |||||
|
|
|
|
| Running engines give off carbon monoxide, an | |||||||||
of the three sets of holes in the handle |
|
|
|
|
|
|
|
| ||||||
|
|
|
|
|
|
|
| odorless, colorless, poison gas. Breathing carbon | ||||||
bracket (most users will prefer the middle |
|
|
|
|
|
|
|
| monoxide can cause nausea, fainting, or death. | |||||
position). |
|
|
|
|
|
|
| Operate this product ONLY outdoors. |
| |||||
|
|
|
| A |
|
|
| Keep exhaust gas from entering a confined area through | ||||||
• Turn the knobs to release the locking pins |
|
|
|
| windows, doors, ventilation intakes or other openings. |
| ||||||||
|
|
|
|
|
|
| DO NOT operate this product inside any building or |
| ||||||
and secure the lower handle. |
|
|
|
|
|
|
| enclosure, even if windows and doors are open. |
| |||||
Recoil Rope | Drive | |
Handle | ||
Lever | ||
|
Fuel Fill Cap
Oil Fill and
Dipstick
Mulching
Cover
•Loosen, but do not remove, the upper knobs (B) on the handle. Remove the cardboard slats.
•Raise the upper handle to the operating position, and tighten the upper knobs.
Figure 1
4 Set up the recoil rope handle
•Hold the bail control against the handle,
and pull the recoil rope handle out to the rope |
| |
guide (A, Figure 2) on the handle. Hook the recoil rope | A | |
into the rope guide (it might be a tight fit). | ||
|
6 Start the mower
•Move the cutting height adjust levers (A, Figure 4) to the desired cutting height.
•Set the mower to mulch, discharge or bag. (See
•Hold the bail control (A, Figure 5) against the drive handle.
•Pull the recoil rope handle (B) until the engine starts.
•To engage the drive system, slowly pull the drive lever (C) back. To increase ground speed, slowly pull the drive lever farther back. To decrease ground speed, slowly release the drive lever.
•To disengage the drive system, release the drive lever.
•To stop the engine and blade, release the bail control.
A |
Figure 4
A
A |
B
C
Figure 5
Figure 2
Cutting Height Adjust Lever
(At Each Wheel)
Items that you will need
Unleaded Fuel (minimum 87 octane)
Utility Knife
Items Included
FreshStartTM Fuel
Preserver Cartridge
3-in-1: Convert from mulching to bagging to side-discharge:
1 | For mulching: | 2 | To convert to bagging: |
• Leave the mulching cover | • Lift the rear door (A, Figure 7). | ||
(Figure 6) in place.
• Holding the rear door open, attach the grass catcher (B) to the rear of the mower.
• Make sure the hooks (A, Figure 8) on either side of the catcher frame hook
A | 3 To convert to | A |
•Lift the mulching cover (A, Figure 9).
•Install the side discharge deflector (B) onto
| B | the mower deck. Make sure the upper tabs (A, | B | |
| Figure 10) of the deflector are hooked behind |
| ||
|
| the mulching cover rod, and the deck tabs |
| |
Figure 7 | ||||
| Figure 9 | |||
|
| stick up through the locking slots (B). |
| |
|
|
|
Side Discharge
Figure 6
onto the rear door rod (B).
A | • Release the mulching cover (it will lay | A |
|
Deflector
• Release the rear door (it will lay on top of the grass catcher).
on top of the side discharge deflector). |
Grass Catcher | SAE30W | Operator’s |
Oil | Manual |
B | B |
Figure 8 | Figure 10 |
© Briggs & Stratton Corporation | Form No. 7101690 (Rev. |
We reserve the right to improve our products and make changes in specifications, designs, and standard equipment without notice and without incurring obligation. | TP |