STEP BY STEP GUIDE TO PROGRAMMING THIS ALARM
AND USING THE OPTIONAL LOCKING FEATURES
M08-0086-001 T 01/04 | MODEL SCO7 |
Printed in Mexico | |
All Rights Reserved. © 2004 BRK Brands, Inc.
BRK Brands, Inc., 3901 Liberty Street Road, Aurora, IL 60504-8122 Consumer Affairs: (800) 323-9005 • www.firstalert.com
PROGRAMMING THE ALARM FOR THE FIRST TIME
WHAT YOU WILL SEE AND HEAR WITH THIS ALARM
Under Normal Operations | |
Voice: Silent | Power/Smoke LED: Flashes |
| Green once a minute |
Horn: Silent | CO LED: Off |
When You Test the Alarm
Voice: “Testing.” “Warning, evacuate smoke in [Location, example: “Kitchen”]. Evacuate.”
Horn: 3 beeps, pause, 3 beeps, voice
Power/Smoke LED: Flashes Red
CO LED: Off followed by
Voice: “Warning, evacuate carbon monoxide in [Location, example: “Kitchen”]. Evacuate.”
Horn: 4 beeps, pause, 4 beeps, voice
Power/Smoke LED: Off
OPTIONAL LOCKING FEATURES
The optional locking features are designed to discourage unauthorized removal of the batteries or alarm. It is not necessary to activate the locks in single-family households where unauthorized battery or alarm removal is not a concern.
This Smoke/CO Alarm has two separate locking features: one to lock the battery compartment, and the other to lock the Smoke/CO Alarm to the mounting bracket. You can choose to use either feature independently, or use them both.
Tools you will need: • Needle-nose pliers or utility knife • Standard flathead screwdriver.
Both locking features use locking pins, which are molded into the mounting bracket. Depending on which locking features you use, remove one or both pins from the mounting bracket using needle-nose pliers or a utility knife.
To permanently remove either locking pin, insert a flathead screwdriver between the locking pin and the lock, and pry the pin out of the lock.
| 1. Insert batteries (2, AA | “Welcome, First Alert Carbon |
| batteries). | Monoxide and Smoke Alarm. |
| | No location programmed. To |
| | select location, press and hold |
| | test button now.” |
| 2. Press & Hold Test Button, or | “To save location, press and |
| use your IR remote control’s | hold test button after location |
| channel or volume button, if | is heard.” Alarm will speak list |
| you would like to program | of locations (see below). |
| the location. Release button | |
| after Alarm responds. | |
| 3. After you hear the location | “[Location, example “Kitchen”] |
| of where you are placing the | location saved.” |
| Alarm, Press & Hold the | If no location is chosen: “No |
| Test Button or use your IR |
| location saved.” |
| remote control’s channel or |
| |
| volume button. | |
Your Alarm has now been programmed for the location of your choice.
Available locations: | Basement | Kitchen |
| Child’s Bedroom | Living Room |
| Dining Room | Master Bedroom |
| Family Room | No Location |
| Guest Bedroom | Office |
| Hallway | Utility Room |
IF YOU ARE CHANGING THE BATTERIES |
Action: | Alarm Will Say: |
CO LED: Flashes Red
If Battery Becomes Low or is Missing
Voice: “Replace battery in [Location, example “Kitchen”].” Repeated every 5 hours
Horn: chirps once a minute
Power/Smoke LED: Flashes approximately once a minute
CO LED: Off
If Alarm is Not Operating Properly
Voice: “Detector error in [Location, example “Kitchen”], please see manual.” Repeated every 5 hours
Horn: Three rapid chirps every minute
Power/Smoke LED: Flashes approximately once a minute
CO LED: Off
Alarm Levels of CO are Detected
Voice: “Warning, evacuate carbon monoxide in [Location, example: “Kitchen”]. Evacuate.” “____ ppm.”
Horn: 4 beeps, pause, 4 beeps, voice*
Power/Smoke LED: Off
CO LED: Flashes Red
*NOTE: If unit goes into CO alarm, the regular 4 beeps-brief pause cycle will repeat for four minutes. After four minutes, the pause will increase to one minute.
Smoke is Detected
Voice: “Warning, evacuate smoke in [Location, example: “Kitchen”]. Evacuate.”
Horn: 3 beeps, pause, 3 beeps, voice
Power/Smoke LED: Flashes Red
CO LED: Off
TO LOCK THE BATTERY COMPARTMENT
Do not lock the battery compartment until you activate the battery and test the Smoke/CO Alarm.
1.Install the batteries before attaching the Alarm to the bracket. Insert the
two (2) AA batteries (included) into the battery compartment. Match the terminals on the end of the battery with the terminals on the unit.
Match “+” to “+” and “-” to “-.” If the batteries are not fully inserted, the unit cannot receive battery power.
2.Push and hold test button until the alarm sounds.
If the unit does not alarm during testing, DO NOT lock the battery compartment! Install a new battery and test again. If the unit still does not alarm, replace it immediately.
3.Using needle-nose pliers or a utility knife, detach one locking pin from the mounting bracket.
4.Push the locking pin through the hole near the battery door latch on the back of the Smoke/CO Alarm.
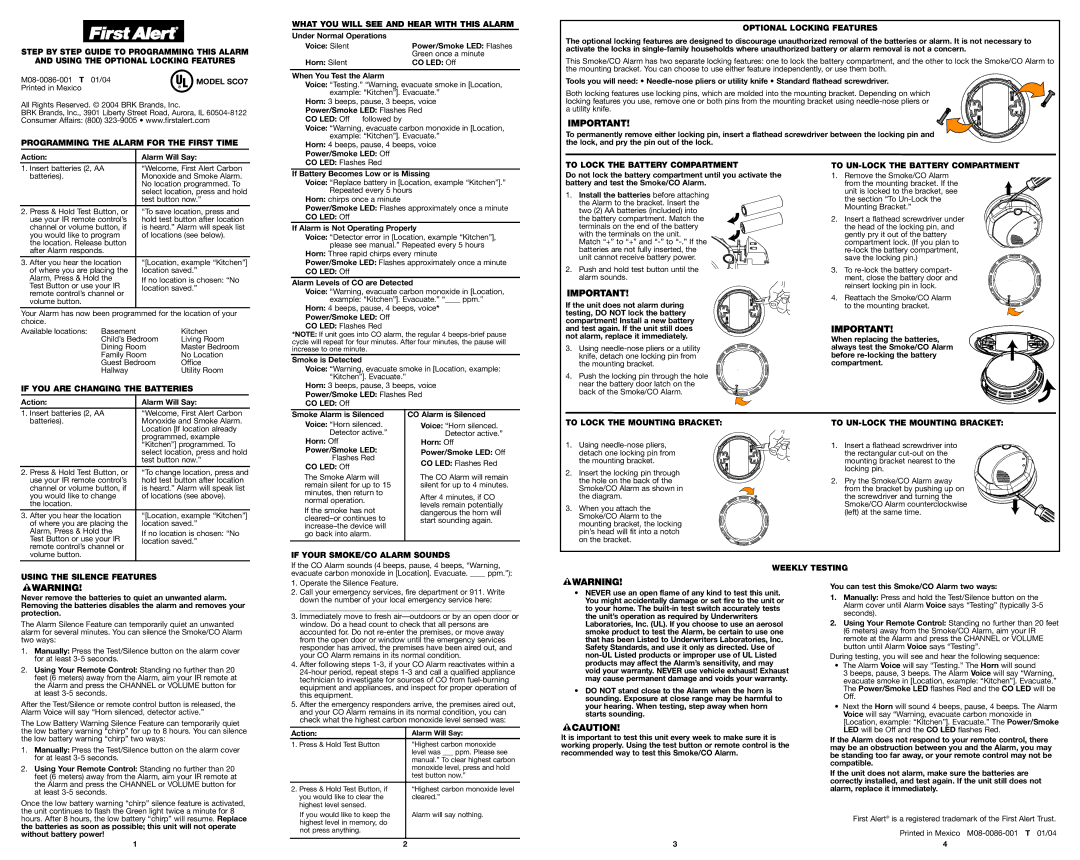
TO UN-LOCK THE BATTERY COMPARTMENT
1. Remove the Smoke/CO Alarm from the mounting bracket. If the unit is locked to the bracket, see the section “To Un-Lock the Mounting Bracket.”
2.Insert a flathead screwdriver under the head of the locking pin, and gently pry it out of the battery compartment lock. (If you plan to re-lock the battery compartment, save the locking pin.)
3.To re-lock the battery compart- ment, close the battery door and reinsert locking pin in lock.
4. Reattach the Smoke/CO Alarm to the mounting bracket.
When replacing the batteries, always test the Smoke/CO Alarm before re-locking the battery compartment.
| 1. Insert batteries (2, AA | “Welcome, First Alert Carbon |
| batteries). | Monoxide and Smoke Alarm. |
| | Location [If location already |
| | programmed, example |
| | “Kitchen”] programmed. To |
| | select location, press and hold |
| | test button now.” |
| 2. Press & Hold Test Button, or | “To change location, press and |
| use your IR remote control’s | hold test button after location |
| channel or volume button, if | is heard.” Alarm will speak list |
| you would like to change | of locations (see above). |
| the location. | |
| 3. After you hear the location | “[Location, example “Kitchen”] |
| of where you are placing the | location saved.” |
| Alarm, Press & Hold the | If no location is chosen: “No |
| Test Button or use your IR |
| location saved.” |
| remote control’s channel or |
| |
| volume button. | |
| Smoke Alarm is Silenced | CO Alarm is Silenced |
| Voice: “Horn silenced. | Voice: “Horn silenced. |
| Detector active.” | Detector active.” |
| Horn: Off | Horn: Off |
| Power/Smoke LED: | Power/Smoke LED: Off |
| Flashes Red | CO LED: Flashes Red |
| CO LED: Off |
| |
| The Smoke Alarm will | The CO Alarm will remain |
| remain silent for up to 15 | silent for up to 4 minutes. |
| minutes, then return to | After 4 minutes, if CO |
| normal operation. |
| levels remain potentially |
| If the smoke has not |
| dangerous the horn will |
| cleared–or continues to | start sounding again. |
| increase–the device will |
| |
| go back into alarm. | |
| | |
IF YOUR SMOKE/CO ALARM SOUNDS
TO LOCK THE MOUNTING BRACKET:
1.Using needle-nose pliers, detach one locking pin from the mounting bracket.
2.Insert the locking pin through the hole on the back of the Smoke/CO Alarm as shown in the diagram.
3.When you attach the Smoke/CO Alarm to the mounting bracket, the locking pin’s head will fit into a notch on the bracket.
TO UN-LOCK THE MOUNTING BRACKET:
1. Insert a flathead screwdriver into the rectangular cut-out on the mounting bracket nearest to the locking pin.
2.Pry the Smoke/CO Alarm away from the bracket by pushing up on
the screwdriver and turning the Smoke/CO Alarm counterclockwise (left) at the same time.
Never remove the batteries to quiet an unwanted alarm. Removing the batteries disables the alarm and removes your protection.
The Alarm Silence Feature can temporarily quiet an unwanted alarm for several minutes. You can silence the Smoke/CO Alarm two ways:
1.Manually: Press the Test/Silence button on the alarm cover for at least 3-5 seconds.
2.Using Your Remote Control: Standing no further than 20 feet (6 meters) away from the Alarm, aim your IR remote at the Alarm and press the CHANNEL or VOLUME button for at least 3-5 seconds.
After the Test/Silence or remote control button is released, the Alarm Voice will say “Horn silenced, detector active.”
The Low Battery Warning Silence Feature can temporarily quiet the low battery warning “chirp” for up to 8 hours. You can silence the low battery warning “chirp” two ways:
1.Manually: Press the Test/Silence button on the alarm cover for at least 3-5 seconds.
2.Using Your Remote Control: Standing no further than 20 feet (6 meters) away from the Alarm, aim your IR remote at the Alarm and press the CHANNEL or VOLUME button for at least 3-5 seconds.
1.Operate the Silence Feature.
2.Call your emergency services, fire department or 911. Write down the number of your local emergency service here:
_______________________________________________________
3.Immediately move to fresh air—outdoors or by an open door or window. Do a head count to check that all persons are accounted for. Do not re-enter the premises, or move away from the open door or window until the emergency services responder has arrived, the premises have been aired out, and your CO Alarm remains in its normal condition.
4.After following steps 1-3, if your CO Alarm reactivates within a 24-hour period, repeat steps 1-3 and call a qualified appliance technician to investigate for sources of CO from fuel-burning equipment and appliances, and inspect for proper operation of this equipment.
5.After the emergency responders arrive, the premises aired out, and your CO Alarm remains in its normal condition, you can check what the highest carbon monoxide level sensed was:
Action: | Alarm Will Say: |
1. Press & Hold Test Button | “Highest carbon monoxide |
| level was ___ ppm. Please see |
| manual.” To clear highest carbon |
| monoxide level, press and hold |
| test button now.” |
| |
2. Press & Hold Test Button, if | “Highest carbon monoxide level |
you would like to clear the | cleared.” |
•NEVER use an open flame of any kind to test this unit. You might accidentally damage or set fire to the unit or to your home. The built-in test switch accurately tests the unit’s operation as required by Underwriters Laboratories, Inc. (UL). If you choose to use an aerosol smoke product to test the Alarm, be certain to use one that has been Listed to Underwriters Laboratories, Inc. Safety Standards, and use it only as directed. Use of non-UL Listed products or improper use of UL Listed products may affect the Alarm’s sensitivity, and may void your warranty. NEVER use vehicle exhaust! Exhaust may cause permanent damage and voids your warranty.
•DO NOT stand close to the Alarm when the horn is sounding. Exposure at close range may be harmful to your hearing. When testing, step away when horn starts sounding.
It is important to test this unit every week to make sure it is working properly. Using the test button or remote control is the recommended way to test this Smoke/CO Alarm.
You can test this Smoke/CO Alarm two ways:
1.Manually: Press and hold the Test/Silence button on the Alarm cover until Alarm Voice says “Testing” (typically 3-5 seconds).
2.Using Your Remote Control: Standing no further than 20 feet (6 meters) away from the Smoke/CO Alarm, aim your IR remote at the Alarm and press the CHANNEL or VOLUME button until Alarm Voice says “Testing”.
During testing, you will see and hear the following sequence:
•The Alarm Voice will say “Testing.” The Horn will sound
3 beeps, pause, 3 beeps. The Alarm Voice will say “Warning, evacuate smoke in [Location, example: “Kitchen”]. Evacuate.” The Power/Smoke LED flashes Red and the CO LED will be Off.
•Next the Horn will sound 4 beeps, pause, 4 beeps. The Alarm Voice will say “Warning, evacuate carbon monoxide in [Location, example: “Kitchen”]. Evacuate.” The Power/Smoke LED will be Off and the CO LED flashes Red.
If the Alarm does not respond to your remote control, there may be an obstruction between you and the Alarm, you may be standing too far away, or your remote control may not be compatible.
If the unit does not alarm, make sure the batteries are correctly installed, and test again. If the unit still does not alarm, replace it immediately.