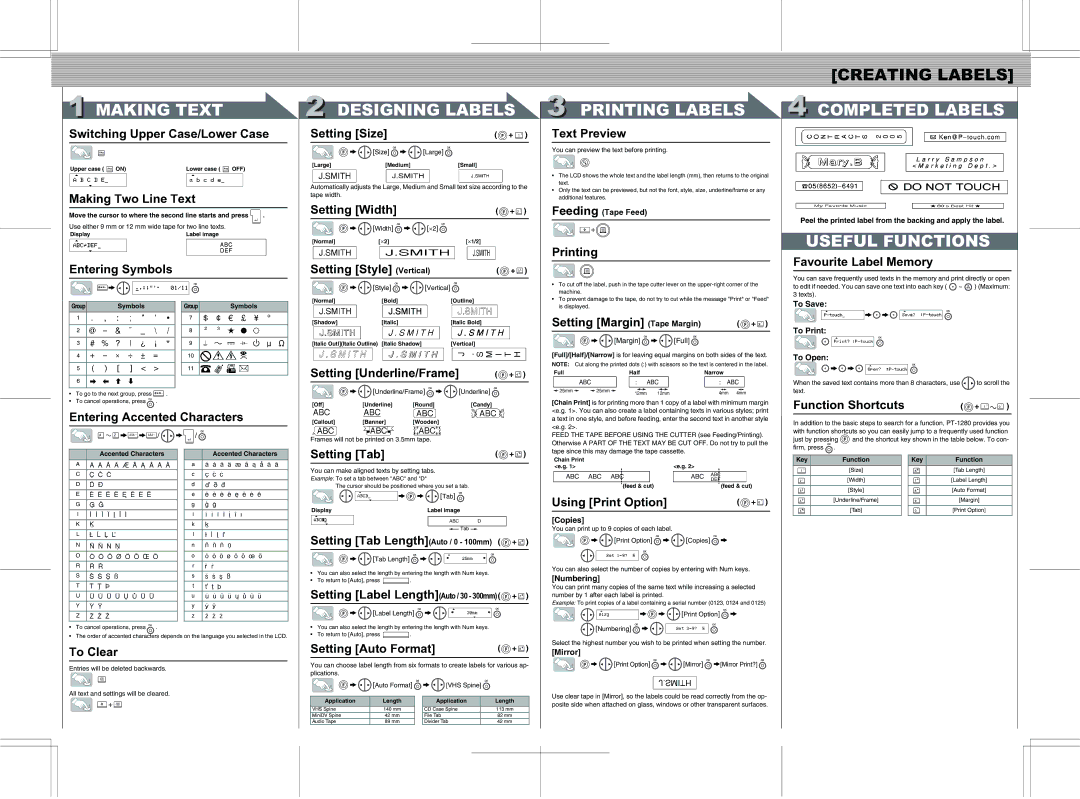
[CREATING LABELS]

1 MAKING TEXT

Switching Upper Case/Lower Case

Upper case (

ON)

Lower case (

OFF)

Making Two Line Text

Move the cursor to where the second line starts and press .

Use either 9 mm or 12 mm wide tape for two line texts.

Display

Label image


Entering Symbols

>

2 DESIGNING LABELS

Setting [Size]

( + )

>

[Size] >

[Large]

[Large]

[Medium]

[Small]

Automatically adjusts the Large, Medium and Small text size according to the tape width.

Setting [Width]


(

+

)

>

[Width]

>

[2]


[Normal]

[2]


[1/2]


Setting [Style] (Vertical)

(

+

)

>

[Style]

>

[Vertical]


[Normal]

[Bold]


[Outline]


3 PRINTING LABELS

Text Preview

You can preview the text before printing.

The LCD shows the whole text and the label length (mm), then returns to the original text.

Only the text can be previewed, but not the font, style, size, underline/frame or any additional features.

Feeding (Tape Feed)

+

Printing

To cut off the label, push in the tape cutter lever on the upper-right corner of the


machine.

To prevent damage to the tape, do not try to cut while the message "Print" or "Feed"

4 COMPLETED LABELS

Peel the printed label from the backing and apply the label.

USEFUL FUNCTIONS

Favourite Label Memory

You can save frequently used texts in the memory and print directly or open to edit if needed. You can save one text into each key ( ~ ) (Maximum: 3 texts).

Group

Symbols

1

2

3

4

5

6

To go to the next group, press .

To cancel operations, press .

Group

Symbols

7

8

9

10

11

[Shadow]

[Italic]


[Italic Bold]


[Italic Outl](Italic Outline) [Italic Shadow]

[Vertical]


Setting [Underline/Frame]

( + )

>

[Underline/Frame] >

[Underline]


[Off]

[Underline]

[Round]

[Candy]


is displayed.

Setting [Margin] (Tape Margin)

( + )

> [Margin] > [Full]

[Full]/[Half]/[Narrow] is for leaving equal margins on both sides of the text.

NOTE: Cut along the printed dots (:) with scissors so the text is centered in the label.

FullHalfNarrow


ABC


: ABC


: ABC


25mm


25mm

12mm 12mm

4mm 4mm


[Chain Print] is for printing more than 1 copy of a label with minimum margin

To Save:

>>

To Print:

To Open:

>>

When the saved text contains more than 8 characters, use to scroll the text.

Entering Accented Characters

>>/ > /

[Callout] [Banner] [Wooden]

Frames will not be printed on 3.5mm tape.

<e.g. 1>. You can also create a label containing texts in various styles; print a text in one style, and before feeding, enter the second text in another style <e.g. 2>.

FEED THE TAPE BEFORE USING THE CUTTER (see Feeding/Printing). Otherwise A PART OF THE TEXT MAY BE CUT OFF. Do not try to pull the

In addition to the basic steps to search for a function, PT-1280 provides you with function shortcuts so you can easily jump to a frequently used function

just by pressing and the shortcut key shown in the table below. To con- firm, press .

Accented Characters

A

C

D

E

G

I

K

L

N

O

R

S

T

U

Y

Z

Accented Characters

a

c

d

e

g

i

k

l

n

o

r

s

t

u

y

z

Setting [Tab]

( + )

You can make aligned texts by setting tabs.

Example: To set a tab between "ABC" and "D"

The cursor should be positioned where you set a tab.

> > [Tab]

Display

Label image

ABC D

Tab

Setting [Tab Length](Auto / 0 - 100mm) ( + )

> [Tab Length] >

You can also select the length by entering the length with Num keys.

To return to [Auto], press .

Setting [Label Length](Auto / 30 - 300mm)( + )

> [Label Length] >

tape since this may damage the tape cassette.

Chain Print


<e.g. 1>

<e.g. 2>

ABC ABC ABC

ABC

ABC


DEF

(feed & cut)


(feed & cut)

Using [Print Option]


( + )

[Copies]

You can print up to 9 copies of each label.

> [Print Option] > [Copies] >

You can also select the number of copies by entering with Num keys.

[Numbering]

You can print many copies of the same text while increasing a selected number by 1 after each label is printed.

Example: To print copies of a label containing a serial number (0123, 0124 and 0125)

> > [Print Option] >

Key

Function

Key

Function


[Size]


[Tab Length]


[Width]


[Label Length]


[Style]


[Auto Format]


[Underline/Frame]


[Margin]


[Tab]


[Print Option]

To cancel operations, press .

The order of accented characters depends on the language you selected in the LCD.

To Clear

Entries will be deleted backwards.

All text and settings will be cleared.

+

You can also select the length by entering the length with Num keys.

To return to [Auto], press .

Setting [Auto Format]

( + )

You can choose label length from six formats to create labels for various ap- plications.

> [Auto Format] > [VHS Spine]

Application

Length


Application

Length

VHS Spine

140 mm


CD Case Spine

113 mm

MiniDV Spine

42 mm


File Tab

82 mm

Audio Tape

89 mm


Divider Tab

42 mm

[Numbering] >

Select the highest number you wish to be printed when setting the number.

[Mirror]

> [Print Option] > [Mirror] >[Mirror Print?]

Use clear tape in [Mirror], so the labels could be read correctly from the op- posite side when attached on glass, windows or other transparent surfaces.

Page 2
Image 2
Brother LN7424001 specifications Making Text, Designing Labels, Printing Labels, Completed Labels, Useful Functions

LN7424001 specifications

The Brother LN7424001 is a cutting-edge sewing machine that caters to both beginners and experienced seamstresses alike. This model combines versatility, practicality, and innovative technology to meet the varied needs of its users. One of the standout features of the LN7424001 is its array of built-in stitches. With over 100 stitch options, including utility, decorative, and quilt stitches, users can unleash their creativity and tackle a wide range of sewing projects with ease.

The LN7424001 is equipped with an automatic needle threader, which simplifies the threading process and saves time. This feature is particularly appreciated by those who might struggle with the intricate task of manual threading, making it accessible for novices. Once the thread is in place, the machine’s drop-in bobbin system promotes effortless loading, reducing the chances of jamming and ensuring smoother operation.

Another remarkable characteristic of this sewing machine is its adjustable presser foot pressure. This allows users to tackle various fabric types, from lightweight silks to heavier denim, providing optimal control and ensuring even stitching results. The LCD display is user-friendly, making it easy to select stitches and adjust settings, contributing to a seamless sewing experience.

The Brother LN7424001 incorporates advanced technology to enhance user experience. Its sewing speed can be adjusted to accommodate different skill levels and project types, offering beginners a slower pace while allowing experienced users to work quickly. Additionally, the machine includes a built-in free arm, which is invaluable for sewing cylindrical pieces such as sleeves and pant hems.

Portability is another key feature of the LN7424001. Weighing just around 12 pounds, it is lightweight and comes with a carrying handle, making it easy to transport to sewing classes or craft gatherings. The spacious work area is complemented by LED lighting, which brightens the workspace and reduces eye strain, enabling users to sew for extended periods without discomfort.

Safety features like the built-in needle safety guard ensure that users can sew with confidence. Overall, the Brother LN7424001 combines functionality and innovation, making it an excellent choice for anyone looking to enhance their sewing skills and create beautiful projects. Whether you’re mending clothes, crafting home décor, or exploring new sewing techniques, this machine provides the tools and features necessary for success. With its robust performance and thoughtful design, it is a valuable addition to any sewing enthusiast’s toolkit.