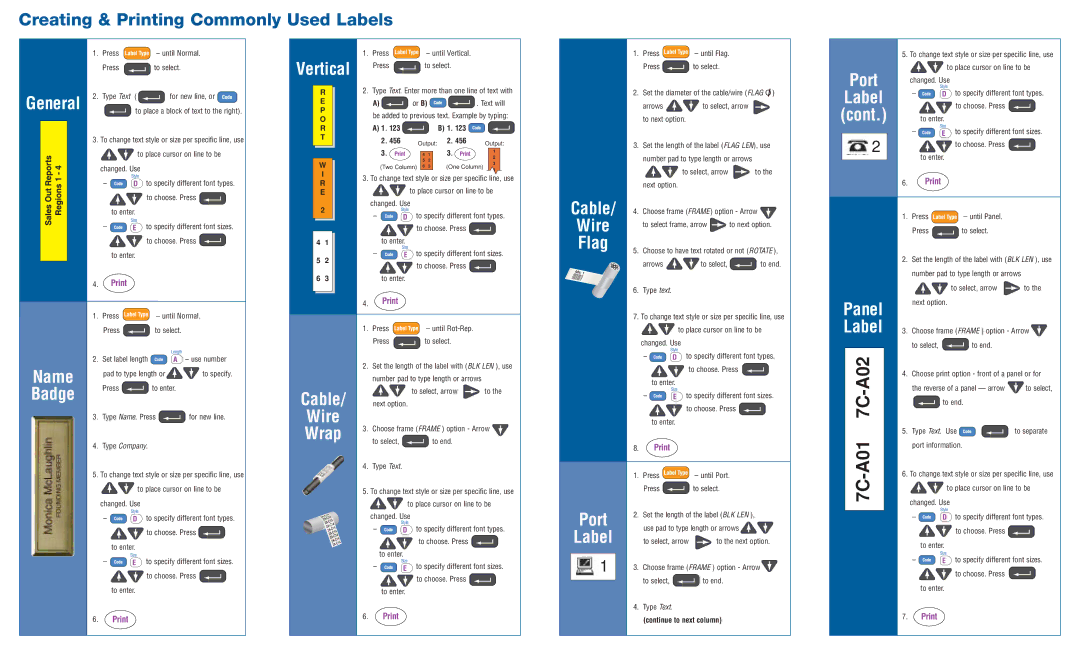
Creating & Printing Commonly Used Labels

General

Name Badge

1.Press – until Normal.

Press to select.

2.Type Text ( for new line, or

to place a block of text to the right).

3.To change text style or size per specific line, use to place cursor on line to be changed. Use

to specify different font types.

to choose. Press to enter.

to specify different font sizes.

to choose. Press to enter.

4.

1.Press – until Normal.

Press to select.

2.Set label length – use number

pad to type length or to specify.

Press to enter.

3.Type Name. Press for new line.

4.Type Company.

5.To change text style or size per specific line, use

to place cursor on line to be changed. Use

to specify different font types.

to choose. Press to enter.

to specify different font sizes.

to choose. Press to enter.

1. Press – until Vertical.

Vertical

Press

to select.


R2. Type Text. Enter more than one line of text with

E

A)

or B)


. Text will

P

be added to previous text. Example by typing:

O


R

A) 1.

123


B) 1.

123


T

2.

456

Output:

2.

456


Output:


3.


3.


1￿


4

1￿


2￿


W


5

2￿


3￿


(Two Column)


6

3￿


(One Column)


I3. To change text style or size per specific line, use

R

E

to place cursor on line to be


changed. Use


2

to specify different font types.


to choose. Press

4 1

to enter.

5

to specify different font sizes.

2

to choose. Press


6 3

to enter.

4.

1.Press – until Rot-Rep.

Press to select.

2.Set the length of the label with (BLK LEN ), use number pad to type length or arrows

Cable/


to select, arrow

to the

next option.


Wire


Wrap

3. Choose frame (FRAME ) option - Arrow

to select,

to end.


4.Type Text.

5.To change text style or size per specific line, use to place cursor on line to be

changed. Use


to specify different font types.


to choose. Press

to enter.


to specify different font sizes.

to choose. Press to enter.

1.Press – until Flag.

Press to select.

2.Set the diameter of the cable/wire (FLAG OI )

arrows to select, arrow to next option.

3.Set the length of the label (FLAG LEN), use

number pad to type length or arrows

to select, arrow to the next option.

Cable/ 4.

Choose frame (FRAME ) option - Arrow

Wire


to select frame, arrow

to next option.


Flag

5.

Choose to have text rotated or not (ROTATE ),


arrows

to select,

to end.

6.Type text.

7.To change text style or size per specific line, use

to place cursor on line to be changed. Use

to specify different font types.

to choose. Press to enter.

to specify different font sizes.

to choose. Press to enter.

8.

1.Press – until Port.

Press to select.

Port

2.

Set the length of the label (BLK LEN ),


use pad to type length or arrows

Label


to select, arrow

to the next option.


1

3.

Choose frame (FRAME ) option - Arrow


to select,

to end.


Port

Label

(cont.)

2

Panel Label

7C-A01 7C-A02

5.To change text style or size per specific line, use to place cursor on line to be changed. Use

to specify different font types.

to choose. Press to enter.

to specify different font sizes.

to choose. Press to enter.

6.

1.

Press

– until Panel.


Press

to select.


2.

Set the length of the label with (BLK LEN ), use


number pad to type length or arrows


to select, arrow

to the


next option.


3.

Choose frame (FRAME ) option - Arrow


to select,

to end.


4.

Choose print option - front of a panel or for


the reverse of a panel — arrow

to select,


to end.


5.

Type Text. Use

to separate


port information.


6.

To change text style or size per specific line, use


to place cursor on line to be


changed. Use


to specify different font types.


to choose. Press


to enter.


to specify different font sizes.


to choose. Press


to enter.


6.

6.


4.Type Text.

(continue to next column)

7.

Page 2
Image 2
Brother PT-1600 manual General, Vertical, Cable, Wire, Flag, Port Label Cont

PT-1600 specifications

The Brother PT-1600 is a versatile and compact label maker designed for both home and office use, making it a popular choice among professionals and hobbyists alike. Notable for its ease of use, the PT-1600 brings together a combination of advanced features and practical design to streamline the labeling process.

One of the standout features of the PT-1600 is its user-friendly interface. The device is equipped with a large, easy-to-read LCD display that provides a clear view of your text as you type, minimizing formatting errors. Navigation is simplified with a convenient set of keys that allow users to quickly access various options, making it ideal for those who may not be tech-savvy.

The PT-1600 supports a variety of font styles and sizes, enabling users to create labels that are tailored to their specific needs. With options for bold text, italics, and different font sizes, this label maker ensures that important information stands out. Users also have the ability to add symbols and frames to enhance the visual appeal of their labels.

Another core feature of the Brother PT-1600 is its capability to print on a range of label types and sizes. It uses Brother's patented TZ tape, which is available in numerous colors and widths, allowing users to choose the perfect tape for each application. The tape is also durable and water-resistant, ensuring that labels remain legible and intact in a variety of environmental conditions.

For organizational tasks, the PT-1600 offers several pre-formatted templates to jumpstart your labeling projects. These templates cover common scenarios, such as file organization, workspace labeling, and personal identification, significantly reducing the time required to create professional-looking labels.

In terms of connectivity, the PT-1600 features a built-in memory that allows users to store previously created labels for future use, making repetitive tasks quicker and more efficient. This added convenience is perfect for frequent labeling tasks or busy work environments.

Overall, the Brother PT-1600 label maker is a reliable, feature-rich device that adapts to various labeling needs. With its combination of user-friendly operation, diverse label creation options, and durable supplies, it stands out as an essential tool for anyone seeking efficient labeling solutions. From home organization to office management, the PT-1600 is designed to handle it all with ease.