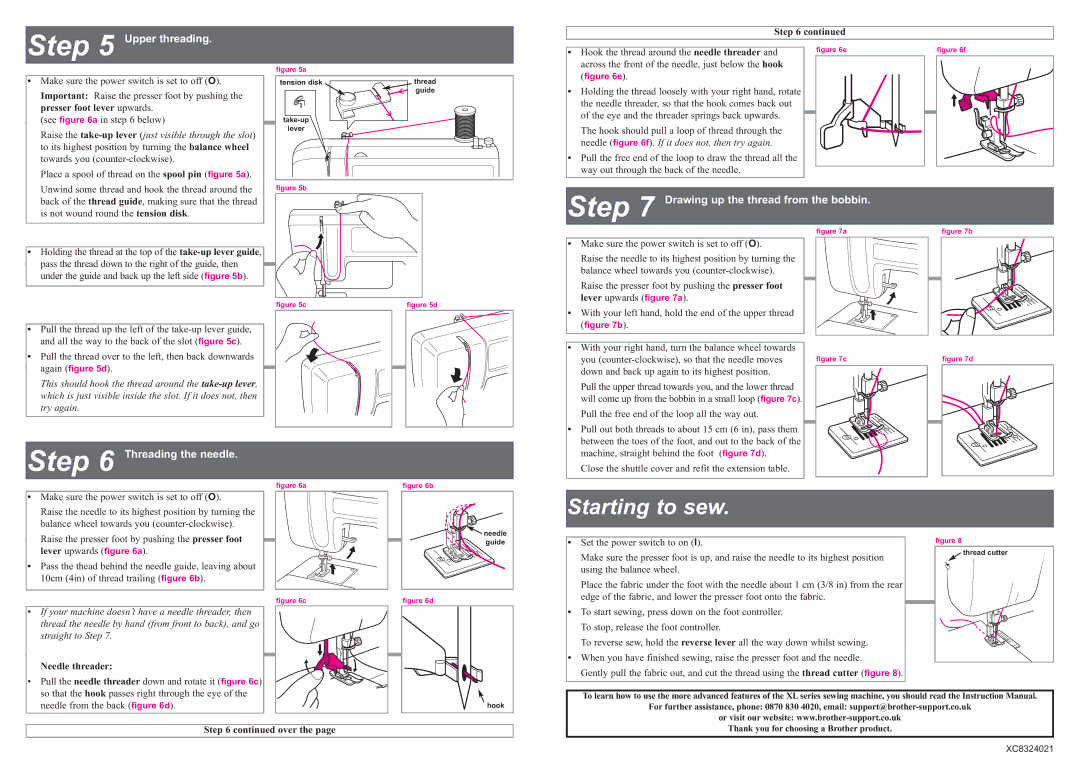
Step 5 Upper threading.

Step 6 continued

figure 5a

Hook the thread around the needle threader and

across the front of the needle, just below the hook

figure 6e

figure 6f

Make sure the power switch is set to off (O).

Important: Raise the presser foot by pushing the presser foot lever upwards.

(see figure 6a in step 6 below)

Raise the take-up lever (just visible through the slot) to its highest position by turning the balance wheel towards you (counter-clockwise).

Place a spool of thread on the spool pin (figure 5a).

Unwind some thread and hook the thread around the back of the thread guide, making sure that the thread is not wound round the tension disk.

tension disk

thread


guide

take-up


lever


figure 5b

(figure 6e).

Holding the thread loosely with your right hand, rotate

the needle threader, so that the hook comes back out

of the eye and the threader springs back upwards.

The hook should pull a loop of thread through the

needle (figure 6f). If it does not, then try again.

Pull the free end of the loop to draw the thread all the

way out through the back of the needle.

Step 7 Drawing up the thread from the bobbin.

figure 7a

figure 7b

Holding the thread at the top of the take-up lever guide, pass the thread down to the right of the guide, then under the guide and back up the left side (figure 5b).

figure 5c

figure 5d

Pull the thread up the left of the take-up lever guide, and all the way to the back of the slot (figure 5c).

Pull the thread over to the left, then back downwards again (figure 5d).

This should hook the thread around the take-up lever, which is just visible inside the slot. If it does not, then try again.

Make sure the power switch is set to off (O).

Raise the needle to its highest position by turning the

balance wheel towards you (counter-clockwise).

Raise the presser foot by pushing the presser foot

lever upwards (figure 7a).

With your left hand, hold the end of the upper thread

(figure 7b).

With your right hand, turn the balance wheel towards

you (counter-clockwise), so that the needle moves

down and back up again to its highest position.

Pull the upper thread towards you, and the lower thread

will come up from the bobbin in a small loop (figure 7c).

Pull the free end of the loop all the way out.

Pull out both threads to about 15 cm (6 in), pass them

between the toes of the foot, and out to the back of the

figure 7c

figure 7d

Step 6 Threading the needle.

figure 6a

Make sure the power switch is set to off (O).

Raise the needle to its highest position by turning the balance wheel towards you (counter-clockwise).

figure 6b

needle

machine, straight behind the foot (figure 7d).

Close the shuttle cover and refit the extension table.

Starting to sew.

Raise the presser foot by pushing the presser foot lever upwards (figure 6a).

Pass the thead behind the needle guide, leaving about 10cm (4in) of thread trailing (figure 6b).

figure 6c

If your machine doesn’t have a needle threader, then

thread the needle by hand (from front to back), and go straight to Step 7.

Needle threader:

guide

figure 6d

Set the power switch to on (I).

Make sure the presser foot is up, and raise the needle to its highest position using the balance wheel.

Place the fabric under the foot with the needle about 1 cm (3/8 in) from the rear edge of the fabric, and lower the presser foot onto the fabric.

To start sewing, press down on the foot controller. To stop, release the foot controller.

To reverse sew, hold the reverse lever all the way down whilst sewing.

When you have finished sewing, raise the presser foot and the needle.

Gently pull the fabric out, and cut the thread using the thread cutter (figure 8).

figure 8

thread cutter

• Pull the needle threader down and rotate it (figure 6c) so that the hook passes right through the eye of the needle from the back (figure 6d).

To learn how to use the more advanced features of the XL series sewing machine, you should read the Instruction Manual.

For further assistance, phone: 0870 830 4020, email: support@brother-support.co.uk

or visit our website: www.brother-support.co.uk

Step 6 continued over the page

Thank you for choosing a Brother product.

XC8324021

Page 2
Image 2
Brother XC8324021 Upper threading, Drawing up the thread from the bobbin, Threading the needle, Needle threader, Over

XC8324021 specifications

The Brother XC8324021 is an innovative accessory designed to enhance the versatility of sewing machines, particularly catering to avid sewers looking to elevate their craft. This unique sewing machine foot is part of Brother's extensive line of attachments, which aim to simplify sewing processes and improve overall outcomes.

One of the main features of the Brother XC8324021 is its specialized design for creating accurate and professional-quality quilting and sewing projects. The foot is primarily crafted for use with Brother's range of sewing machines, ensuring compatibility while maximizing performance. This makes it an essential tool for quilters and those working with layered fabrics.

The XC8324021 showcases advanced technology that allows for easy maneuverability and control. Its design includes a guide that helps seamstresses maintain consistent seam allowances, making it easier to create beautifully finished edges and precise stitching on a variety of materials. This feature is particularly valuable for quilting, where accuracy is vital for aligning patches and achieving optimal results.

Moreover, the Brother XC8324021 is constructed with durability in mind. Made from high-quality materials, this foot can withstand the rigors of frequent use, making it a reliable companion for both beginners and experienced sewists. Its robust build ensures that it maintains its performance over time, providing excellent value for users.

Another noteworthy characteristic of the XC8324021 is its versatility. It can easily handle multiple layers of fabric, including bulky quilt layers, due to its unique foot design. This adaptability empowers users to tackle diverse projects from simple quilts to intricate garment constructions, expanding the range of creative possibilities.

In summary, the Brother XC8324021 is a remarkable accessory for those looking to improve their sewing and quilting experience. With features that prioritize accuracy, ease of use, and durability, it stands out as a must-have for any sewing enthusiast. By integrating this sewing machine foot into their toolkit, users can unlock new levels of precision and creativity in their crafting endeavors, making it an investment that truly enhances the art of sewing. Whether you're a seasoned quilter or a novice exploring the world of fabric arts, the XC8324021 is a valuable addition to any sewing collection.