|
|
|
|
|
| Pressure Washer | |||
|
|
|
|
|
|
|
|
|
|
|
|
|
|
|
|
|
|
|
|
|
|
|
|
|
|
|
|
|
|
|
|
|
|
|
|
|
| ||
UNPACKING |
|
|
|
|
|
|
| ||
| Thermal |
| Chemical injector |
| |||||
Remove the equipment and all parts from | Brass swivel |
|
| ||||||
| hose barb |
|
| ||||||
relief valve |
|
|
| ||||||
the carton. The carton should contain the | adapter |
|
|
|
| ||||
|
|
|
|
|
| ||||
following. |
|
|
|
|
|
|
| ||
• One pressure washer (pump, engine, |
|
|
|
|
|
|
| ||
|
| cart base) |
|
|
|
|
|
|
|
• One cart handle assembly |
|
|
|
|
| High |
| ||
• | One detergent tank |
|
|
|
| Pump |
| ||
|
|
|
| pressure |
| ||||
• | One spray gun |
|
|
|
| outlet | hose |
| |
|
|
|
|
|
|
| |||
• | One lance |
|
|
|
|
|
|
| |
• One tip holder with 2 spray tips. |
| Pump inlet |
|
|
|
| |||
|
| Additional tips available for purchase, | Garden hose |
|
|
|
|
|
|
|
| see Page 13 |
|
|
|
|
|
|
|
|
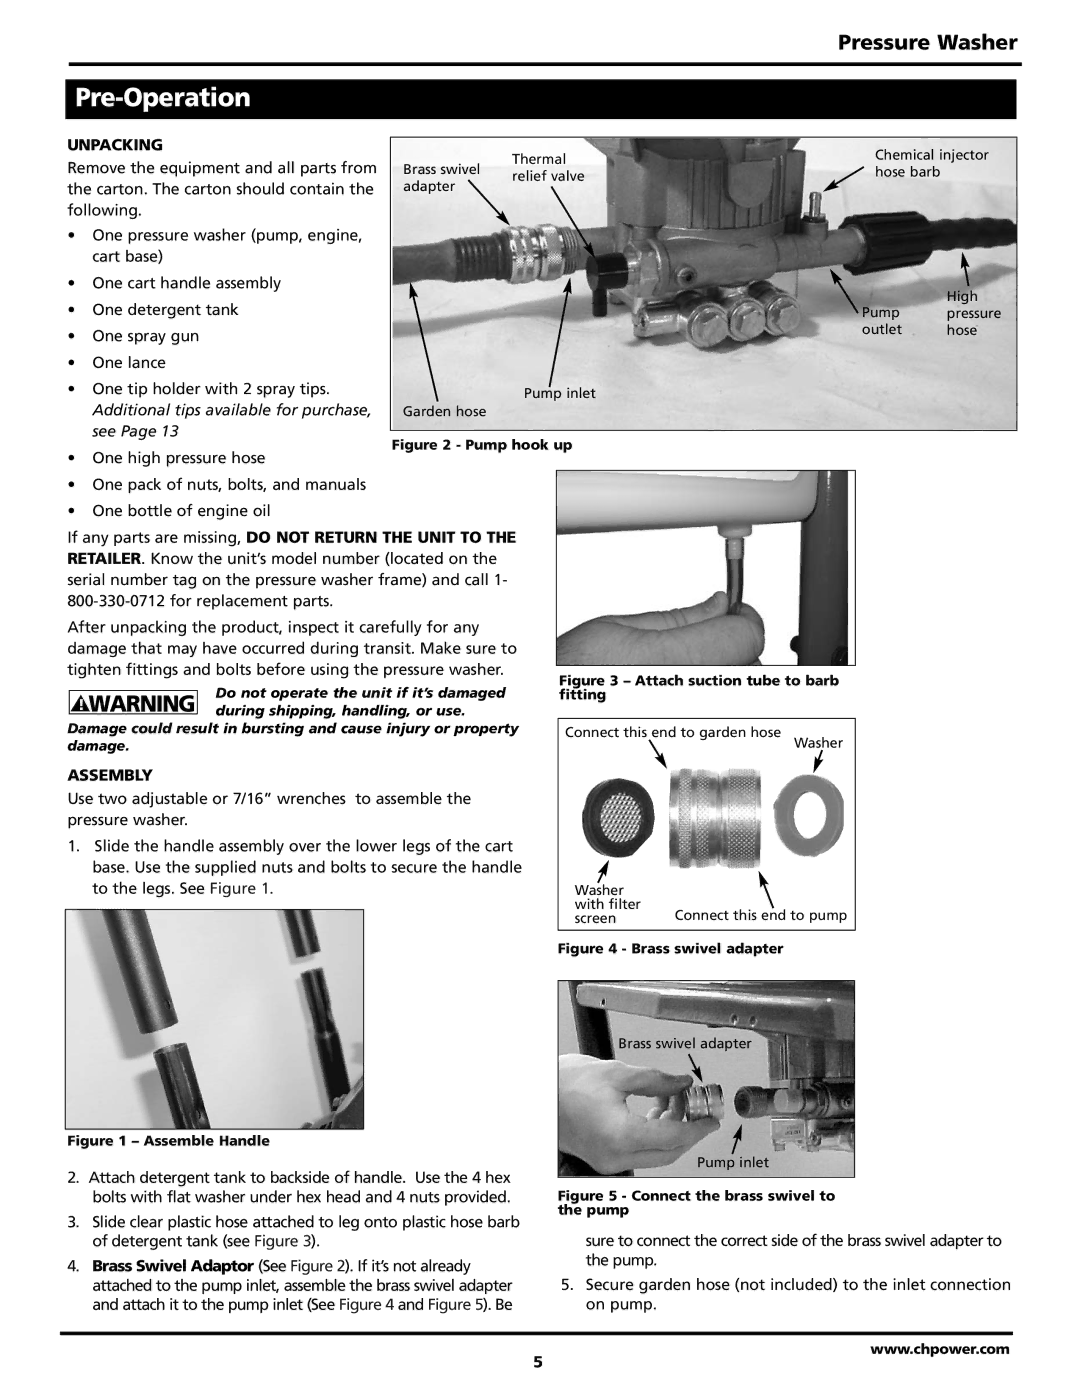
| Figure 2 - Pump hook up |
|
|
|
| |||
• One high pressure hose |
|
|
|
| |||||
|
|
|
|
|
|
| |||
|
|
|
|
|
|
| |||
• One pack of nuts, bolts, and manuals |
|
|
|
|
|
|
| ||
|
|
|
|
|
|
| |||
• One bottle of engine oil |
|
|
|
|
|
|
| ||
If any parts are missing, DO NOT RETURN THE UNIT TO THE RETAILER. Know the unit’s model number (located on the serial number tag on the pressure washer frame) and call 1-
After unpacking the product, inspect it carefully for any |
|
|
|
|
|
|
|
| ||||
damage that may have occurred during transit. Make sure to |
|
|
|
|
|
|
|
| ||||
tighten fittings and bolts before using the pressure washer. |
|
|
|
|
|
|
|
| ||||
|
|
|
|
|
|
|
| |||||
Figure 3 – Attach suction tube to barb | ||||||||||||
|
| Do not operate the unit if it’s damaged | ||||||||||
|
| fitting |
|
|
|
| ||||||
| ! WARNING |
|
|
|
| |||||||
| during shipping, handling, or use. |
|
|
|
|
|
|
|
| |||
|
|
|
|
|
|
|
|
| ||||
|
|
|
|
|
|
|
|
|
| |||
Damage could result in bursting and cause injury or property |
| Connect this end to garden hose |
|
|
| |||||||
damage. |
|
|
| Washer |
| |||||||
|
|
|
|
|
| |||||||
ASSEMBLY |
|
|
|
|
|
|
|
|
|
| ||
Use two adjustable or 7/16” wrenches to assemble the |
|
|
|
|
|
|
|
| ||||
pressure washer. |
|
|
|
|
|
|
|
|
|
| ||
1. Slide the handle assembly over the lower legs of the cart |
|
|
|
|
|
|
|
| ||||
| base. Use the supplied nuts and bolts to secure the handle |
|
|
|
|
|
|
|
| |||
| to the legs. See Figure 1. |
|
|
|
|
|
|
|
| |||
|
|
| Washer |
|
|
|
| |||||
|
|
|
|
|
| with filter |
|
|
|
|
| |
|
|
|
|
|
| screen |
| Connect this end to pump |
| |||
|
|
|
|
|
|
|
|
|
|
|
| |
|
|
|
|
|
|
|
|
|
|
|
| |
Figure 1 – Assemble Handle
2.Attach detergent tank to backside of handle. Use the 4 hex bolts with flat washer under hex head and 4 nuts provided.
3.Slide clear plastic hose attached to leg onto plastic hose barb of detergent tank (see Figure 3).
4.Brass Swivel Adaptor (See Figure 2). If it’s not already attached to the pump inlet, assemble the brass swivel adapter and attach it to the pump inlet (See Figure 4 and Figure 5). Be
Figure 4 - Brass swivel adapter
Brass swivel adapter
Pump inlet
Figure 5 - Connect the brass swivel to the pump
sure to connect the correct side of the brass swivel adapter to the pump.
5.Secure garden hose (not included) to the inlet connection on pump.
www.chpower.com
5