Latitude Scales

The easiest way to polar align a telescope is with a latitude scale. Unlike other methods that require you to find the celestial pole by identifying certain stars near it, this method works off of a known constant to determine how high the polar axis should be pointed (see figure 10).

The constant, mentioned above, is a relationship between your latitude and the angular distance the celestial pole is above the northern (or southern) horizon; The angular distance from the northern horizon to the north celestial pole is always equal to your latitude. To illustrate this, imagine that you are standing on the north pole, latitude +90°. The north celestial pole, which has a declination of +90°, would be directly overhead (i.e., 90 above the horizon). Now, let’s say that you move one degree south — your latitude is now +89° and the celestial pole is no longer directly overhead. It has moved one degree closer toward the northern horizon. This means the pole is now 89° above the northern horizon. If you move one degree further south, the same thing happens again. You would have to travel 70 miles north or south to change your latitude by one degree. As you can see from this example, the distance from the northern horizon to the celestial pole is always equal to your latitude.

If you are observing from Los Angeles, which has a latitude of 34°, then the celestial pole is 34° above the northern horizon. All a latitude scale does then is to point the polar axis of the telescope at the right elevation above the northern (or southern) horizon. To align your telescope:

1.Make sure the polar axis of the mount is pointing due north. Use a landmark that you know faces north.

2.Adjust the mount in altitude until the latitude indicator points to your latitude. Moving the mount affects the angle the polar axis is pointing.

This method can be done in daylight, thus eliminating the need to fumble around in the dark. Although this method does NOT put you directly on the pole, it will limit the number of corrections you will make when tracking an object.

Pointing at Polaris

This method utilizes Polaris as a guidepost to the celestial pole. Since Polaris is less than a degree from the celestial pole, you can simply point the polar axis of your telescope at Polaris. Although this is by no means perfect alignment, it does get you within one degree. Unlike the previous method, this must be done in the dark when Polaris is visible.

1.Set the telescope up so that the polar axis is pointing north. See Figure 10.

2.Loosen the DEC clutch knob and move the telescope so that the tube is parallel to the polar axis. When this is done, the declination setting circle will read +90°. If the declination setting circle is not aligned, move the telescope so that the tube is parallel to the polar axis.

3.Adjust the mount in altitude and/or azimuth until Polaris is in the field of view of the finder.

4.Center Polaris in the field of the telescope using the fine adjustment controls on the mount.

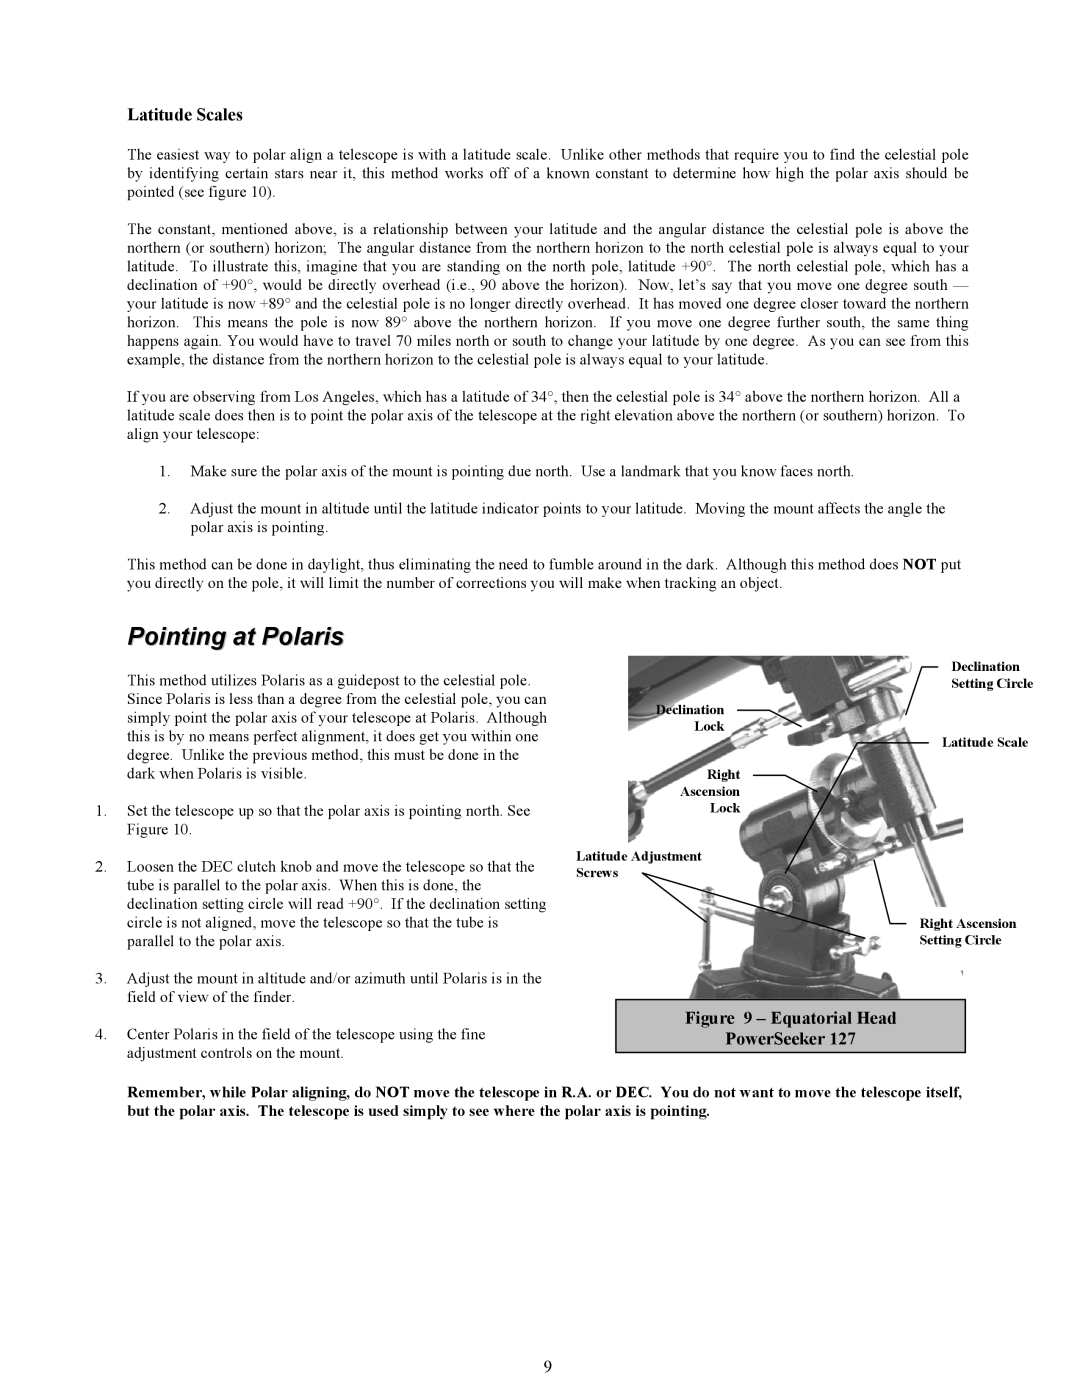
Declination

Setting Circle

Declination

Lock

Latitude Scale

Right

Ascension

Lock

Latitude Adjustment

Screws

Right Ascension

Setting Circle

Figure 9 – Equatorial Head

PowerSeeker 127

Remember, while Polar aligning, do NOT move the telescope in R.A. or DEC. You do not want to move the telescope itself, but the polar axis. The telescope is used simply to see where the polar axis is pointing.

9

Page 9
Image 9
Celestron 127 manual Pointing at Polaris, Latitude Scales

127 specifications

The Celestron 127 is a highly regarded telescope within the Celestron family, known for its combination of portability, reliability, and versatility. This telescope is specifically designed to cater to both novice astronomers and seasoned observers, making it a popular choice for those looking to explore the night sky.

One of the standout features of the Celestron 127 is its 127mm aperture. This size is optimal for gathering light and allows users to observe celestial objects in great detail, from the craters of the Moon to distant galaxies. The telescope employs a Maksutov-Cassegrain design, which strategically combines mirrors and lenses to create a compact and efficient optical system. This design minimizes chromatic aberration while providing impressive image quality, ensuring that celestial objects appear sharp and clear.

The Celestron 127 offers a focal length of 1500mm, resulting in a focal ratio of f/11.8. This relatively long focal length is advantageous for high-power observations, making it possible to view planets in stunning detail. For instance, users can clearly see Saturn's rings or the surface features of Mars with the right eyepieces.

Portability is another major aspect of the Celestron 127. Weighing in at approximately 11 lbs, it is lightweight enough to be transported easily to dark sky locations, yet sturdy enough for regular use. The telescope comes mounted on a stable, easily adjustable mount that allows for smooth tracking of celestial objects as they move across the night sky.

Celestron integrates advanced technologies into the 127 model to enhance user experience. The telescope is compatible with various Celestron accessories, including computerized mounts for automatic tracking and GoTo functionality. This feature is especially user-friendly for beginners, who may struggle with manually locating objects.

The Celestron 127 is not only limited to astronomical observations; it can also be used for terrestrial viewing. The additional versatility allows users to take advantage of the telescope's optical capabilities during the day.

In summary, the Celestron 127 stands out as a well-rounded telescope that marries portability with advanced optical technology. With its generous aperture, Maksutov-Cassegrain design, and user-friendly features, it is an excellent choice for anyone eager to discover the wonders of the universe, whether it's their first telescope or an addition to a growing collection.