uSer guiDe
Feature liSt anD oVerVieW
Feature liSt anD oVerVieW | call liSt (ciD) |
D603TM
Amplified Cordless DECT
Telephone with CID
Clarity, a Division of Plantronics, Inc.
4289 Bonny Oaks Drive, Suite 106 Chattanooga,TN 37406
www.clarityproducts.com
© 2009 Clarity, a division of Plantronics, Inc.All rights reserved.Amplifying your life, Clarity, the amplification device, Clarity and the amplification device combined, Clarity, D603, Digital Clarity Power and DCP are trademarks or registered trademarks of Plantronics, Inc.
Rev. F
contentS & partS checKliSt
Your package includes all the items as shown here. If there is anything missing, please contact our Customer Care Department immediately.
note: PLEASE RETAIN A COPY OF PROOF OF PURCHASE FOR YOUR RECORDS.
Telephone line | User guide |
cord |
|
Base unit | DC adapter |
Handset | |
Battery | 6V 300mA |
pack |
|
pleaSe reFer to the SaFety inStructionS
!SectionS For important proDuct SaFety inFormation prior to inStallation or uSe oF the proDuct.
inStalling your D603
1.Connect one end of the telephone cord into the (square) LINE port on the bottom of the base; connect the other end of the phone cord into our wall telephone outlet. See Figure 1.
2.Connect the DC adapter cord into the DC 6V 300mA port on the bottom of the base; plug the adapter into your wall outlet. See Figure 1.
3.Slide open the battery compartment door and connect the rechargeable battery into the battery compartment. See Figure 2.
4.Put the handset on the base to charge for at least 24 hours before first use. Subsequent charging time should be
Figure 1 | Figure 2 |
Telephone Wall Outlet | Electric Wall Outlet |
(insert phone cord) |
(insert power adapter)
Battery performance
The battery icon will blink on the menu screen when the battery is low. A fully charged battery will provide an estimated 10 hours of talk time and 100 hours of standby time.
To keep your battery pack in the best condition, leave the handset off the base for a few hours at a time. Running the battery pack down at least once will help it last as long as possible. The charge capacity of rechargeable battery pack will reduce with time as it wears out, giving the handset less talk/standby time. Eventually it will need to be replaced.
note: Battery pack and handset may become warm during charging.This is normal.
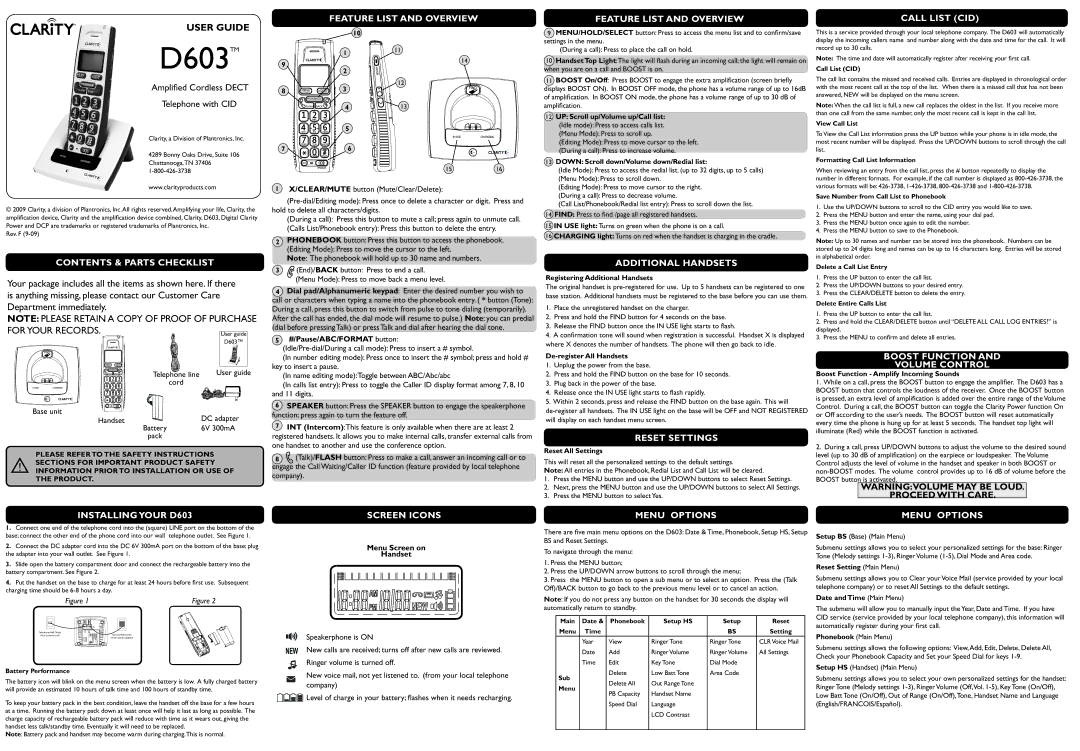
10
| 1 | 11 |
|
| |
9 |
| 14 |
2 |
| |
|
| |
| 3 | 12 |
8 |
| |
| 4 | 13 |
5
7 ![]()
![]()
![]()
![]()
![]()
![]()
![]()
![]()
![]()
![]()
![]() 6
6
1516
1X/clear/mute button (Mute/Clear/Delete):
(During a call): Press this button to mute a call; press again to unmute call.
(Calls List/Phonebook entry): Press this button to delete the entry.
2phoneBooK button: Press this button to access the phonebook.
(Editing Mode): Press to move the cursor to the left.
note: The phonebook will hold up to 30 name and numbers.
3(End)/BacK button: Press to end a call.
(Menu Mode): Press to move back a menu level.
4Dial pad/alphanumeric keypad: Enter the desired number you wish to call or characters when typing a name into the phonebook entry. ( * button (Tone): During a call, press this button to switch from pulse to tone dialing (temporarily). After the call has ended, the dial mode will resume to pulse.) note: you can predial (dial before pressing Talk) or press Talk and dial after hearing the dial tone.
5#/pause/aBc/Format button:
(In number editing mode): Press once to insert the # symbol; press and hold # key to insert a pause.
(In name editing mode):Toggle between ABC/Abc/abc
(In calls list entry): Press to toggle the Caller ID display format among 7, 8, 10 and 11 digits.
6SpeaKer button: Press the SPEAKER button to engage the speakerphone function; press again to turn the feature off.
7int (intercom):This feature is only available when there are at least 2 registered handsets. It allows you to make internal calls, transfer external calls from one handset to another and use the conference option.
8(Talk)/FlaSh button: Press to make a call, answer an incoming call or to engage the Call Waiting/Caller ID function (feature provided by local telephone company).
Screen iconS
menu Screen on
handset
Speakerphone is ON
New calls are received; turns off after new calls are reviewed. Ringer volume is turned off.
New voice mail, not yet listened to. (from your local telephone company)
![]()
![]()
![]() Level of charge in your battery; flashes when it needs recharging.
Level of charge in your battery; flashes when it needs recharging.
9menu/holD/Select button: Press to access the menu list and to confirm/save settings in the menu.
(During a call): Press to place the call on hold.
10handset top light:The light will flash during an incoming call; the light will remain on when you are on a call and BOOST is on.
11BooSt on/off: Press BOOST to engage the extra amplification (screen briefly displays BOOST ON). In BOOST OFF mode, the phone has a volume range of up to 16dB of amplification. In BOOST ON mode, the phone has a volume range of up to 30 dB of amplification.
12up: Scroll up/Volume up/call list:
(Idle mode): Press to access calls list.
(Menu Mode): Press to scroll up.
(Editing Mode): Press to move cursor to the left.
(During a call): Press to increase volume.
13DoWn: Scroll down/Volume down/redial list:
(Idle Mode): Press to access the redial list. (up to 32 digits, up to 5 calls)
(Menu Mode): Press to scroll down.
(Editing Mode): Press to move cursor to the right.
(During a call): Press to decrease volume.
(Call List/Phonebook/Redial list entry): Press to scroll down the list.
14FinD: Press to find /page all registered handsets.
15in uSe light: Turns on green when the phone is on a call.
16charging light: Turns on red when the handset is charging in the cradle.
aDDitional hanDSetS
registering additional handsets
The original handset is
1.Place the unregistered handset on the charger.
2.Press and hold the FIND button for 4 seconds on the base.
3.Release the FIND button once the IN USE light starts to flash.
4.A confirmation tone will sound when registration is successful. Handset X is displayed where X denotes the number of handsets. The phone will then go back to idle.
De-register all handsets
1.Unplug the power from the base.
2.Press and hold the FIND button on the base for 10 seconds.
3.Plug back in the power of the base.
4.Release once the IN USE light starts to flash rapidly.
5.Within 2 seconds, press and release the FIND button on the base again. This will
reSet SettingS
reset all Settings
This will reset all the personalized settings to the default settings.
note: All entries in the Phonebook, Redial List and Call List will be cleared.
1.Press the MENU button and use the UP/DOWN buttons to select Reset Settings.
2.Next, press the MENU button and use the UP/DOWN buttons to select All Settings.
3.Press the MENU button to select Yes.
menu optionS
There are five main menu options on the D603: Date & Time, Phonebook, Setup HS, Setup BS and Reset Settings.
To navigate through the menu:
1.Press the MENU button;
2.Press the UP/DOWN arrow buttons to scroll through the menu;
3.Press the MENU button to open a sub menu or to select an option. Press the (Talk Off)/BACK button to go back to the previous menu level or to cancel an action.
note: If you do not press any button on the handset for 30 seconds the display will automatically return to standby.
main | Date & | phonebook | Setup hS | Setup | reset |
menu | time |
|
| BS | Setting |
| Year | View | Ringer Tone | Ringer Tone | CLR Voice Mail |
| Date | Add | Ringer Volume | Ringer Volume | All Settings |
| Time | Edit | Key Tone | Dial Mode |
|
Sub |
| Delete | Low Batt Tone | Area Code |
|
| Delete All | Out Range Tone |
|
| |
menu |
|
|
| ||
| PB Capacity | Handset Name |
|
| |
|
|
|
| ||
|
| Speed Dial | Language |
|
|
|
|
| LCD Contrast |
|
|
|
|
|
|
|
|
This is a service provided through your local telephone company. The D603 will automatically display the incoming callers name and number along with the date and time for the call. It will record up to 30 calls.
note: The time and date will automatically register after receiving your first call.
call list (ciD)
The call list contains the missed and received calls. Entries are displayed in chronological order with the most recent call at the top of the list. When there is a missed call that has not been answered, NEW will be displayed on the menu screen.
note: When the call list is full, a new call replaces the oldest in the list. If you receive more than one call from the same number, only the most recent call is kept in the call list.
View call list
To View the Call List information press the UP button while your phone is in idle mode, the most recent number will be displayed. Press the UP/DOWN buttons to scroll through the call list.
Formatting call list information
When reviewing an entry from the call list, press the # button repeatedly to display the number in different formats. For example, if the call number is displayed as
Save number from call list to phonebook
1.Use the UP/DOWN buttons to scroll to the CID entry you would like to save.
2.Press the MENU button and enter the name, using your dial pad.
3.Press the MENU button once again to edit the number.
4.Press the MENU button to save to the Phonebook.
note: Up to 30 names and number can be stored into the phonebook. Numbers can be stored up to 24 digits long and names can be up to 16 characters long. Entries will be stored in alphabetical order.
Delete a call list entry
1.Press the UP button to enter the call list.
2.Press the UP/DOWN buttons to your desired entry.
3.Press the CLEAR/DELETE button to delete the entry.
Delete entire calls list
1.Press the UP button to enter the call list.
2.Press and hold the CLEAR/DELETE button until “DELETE ALL CALL LOG ENTRIES?” is displayed.
3.Press the MENU to confirm and delete all entries.
BooSt Function anD
Volume control
Boost Function - amplify incoming Sounds
1.While on a call, press the BOOST button to engage the amplifier. The D603 has a BOOST button that controls the loudness of the receiver. Once the BOOST button is pressed, an extra level of amplification is added over the entire range of the Volume Control. During a call, the BOOST button can toggle the Clarity Power function On or Off according to the user’s needs. The BOOST button will reset automatically every time the phone is hung up for at least 5 seconds. The handset top light will illuminate (Red) while the BOOST function is activated.
2.During a call, press UP/DOWN buttons to adjust the volume to the desired sound level (up to 30 dB of amplification) on the earpiece or loudspeaker. The Volume Control adjusts the level of volume in the handset and speaker in both BOOST or
BOOST button is activated.
Warning:Volume may Be louD.
proceeD With care.
menu optionS
Setup BS (Base) (Main Menu)
Submenu settings allows you to select your personalized settings for the base: Ringer Tone (Melody settings
reset Setting (Main Menu)
Submenu settings allows you to Clear your Voice Mail (service provided by your local telephone company) or to reset All Settings to the default settings.
Date and time (Main Menu)
The submenu will allow you to manually input the Year, Date and Time. If you have CID service (service provided by your local telephone company), this information will automatically register during your first call.
phonebook (Main Menu)
Submenu settings allows the following options: View,Add, Edit, Delete, Delete All, Check your Phonebook Capacity and Set your Speed Dial for keys
Setup hS (Handset) (Main Menu)
Submenu settings allows you to select your own personalized settings for the handset: Ringer Tone (Melody settings