71031

1

Note: If necessary, cut shelf between wires with a hacksaw or boltcutter in one inch increments to desired length.


CAUTION: Sharp ends on shelf when cut. Immediately place endcaps onto cut shelf ends.

a. Place shelf endcaps onto exposed shelf wires.

Nota: Si es necesario, corte la repisa a la longitud deseada con una sierra cortametales o un cortador de pernos en incrementos de una pulgada (2,54 cm).

PRECAUCIÓN: Los extremos de las repisas quedan afilados al cortarlas. Coloque los tapones en los extremos de las repisas cortadas inmediatamente.

a. Coloque los tapones en los alambres expuestos de la repisa.

Note Nota

a.


2

a.

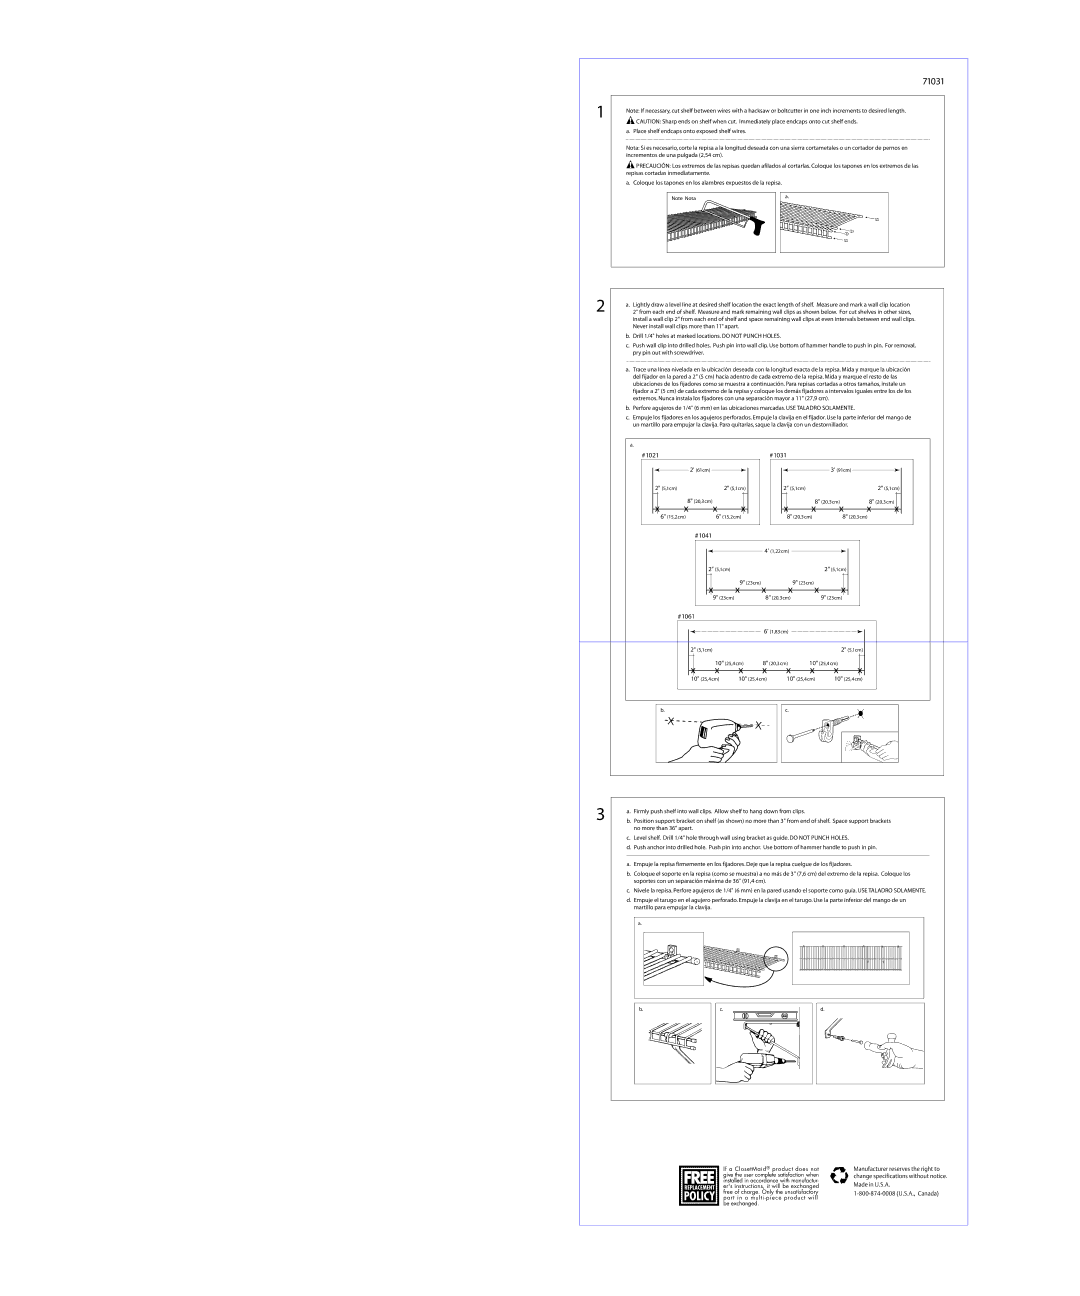
Lightly draw a level line at desired shelf location the exact length of shelf. Measure and mark a wall clip location


2" from each end of shelf. Measure and mark remaining wall clips as shown below. For cut shelves in other sizes,


install a wall clip 2" from each end of shelf and space remaining wall clips at even intervals between end wall clips.


Never install wall clips more than 11" apart.


b. Drill 1/4" holes at marked locations. DO NOT PUNCH HOLES.


c. Push wall clip into drilled holes. Push pin into wall clip. Use bottom of hammer handle to push in pin. For removal,


pry pin out with screwdriver.


a. Trace una línea nivelada en la ubicación deseada con la longitud exacta de la repisa. Mida y marque la ubicación


del fijador en la pared a 2" (5 cm) hacia adentro de cada extremo de la repisa. Mida y marque el resto de las


ubicaciones de los fijadores como se muestra a continuación. Para repisas cortadas a otros tamaños, instale un


fijador a 2" (5 cm) de cada extremo de la repisa y coloque los demás fijadores a intervalos iguales entre los de los


extremos. Nunca instala los fijadores con una separación mayor a 11" (27,9 cm).


b. Perfore agujeros de 1/4" (6 mm) en las ubicaciones marcadas. USE TALADRO SOLAMENTE.


c. Empuje los fijadores en los agujeros perforados. Empuje la clavija en el fijador. Use la parte inferior del mango de


un martillo para empujar la clavija. Para quitarlas, saque la clavija con un destornillador.

a.


#1021


#1031


2' (61cm)


3' (91cm)


2" (5,1cm)


2" (5,1cm)


2" (5,1cm)


2" (5,1cm)


8" (20,3cm)


8" (20,3cm)


8" (20,3cm)


x


x

x

x


x

x


x


x

x


6" (15,2cm)

6" (15,2cm)


8" (20,3cm)


8" (20,3cm)


#1041


4' (1,22cm)


2" (5,1cm)


2" (5,1cm)


x9" (23cm) x


x9" (23cm) x


x


x


9" (23cm)


8" (20,3cm)


9" (23cm)


#1061


6' (1,83cm)


2" (5,1cm)


2" (5,1cm)


10" (25,4cm)


8" (20,3cm)

10" (25,4cm)


x


x

x

x


x


x

x


x


10" (25,4cm)

10" (25,4cm)


10" (25,4cm)


10" (25,4cm)


b.

c.

3

a.Firmly push shelf into wall clips. Allow shelf to hang down from clips.

b.Position support bracket on shelf (as shown) no more than 3" from end of shelf. Space support brackets no more than 36" apart.

c.Level shelf. Drill 1/4" hole through wall using bracket as guide. DO NOT PUNCH HOLES.

d.Push anchor into drilled hole. Push pin into anchor. Use bottom of hammer handle to push in pin.

a.Empuje la repisa firmemente en los fijadores. Deje que la repisa cuelgue de los fijadores.

b.Coloque el soporte en la repisa (como se muestra) a no más de 3" (7,6 cm) del extremo de la repisa. Coloque los soportes con un separación máxima de 36" (91,4 cm).

c.Nivele la repisa. Perfore agujeros de 1/4" (6 mm) en la pared usando el soporte como guía. USE TALADRO SOLAMENTE.

d.Empuje el tarugo en el agujero perforado. Empuje la clavija en el tarugo. Use la parte inferior del mango de un martillo para empujar la clavija.

a.

b.

c.

d.

REPLACEMENT

POLICY

If a ClosetMaid® product does not give the user complete satisfaction when installed in accordance with manufactur- er's instructions, it will be exchanged free of charge. Only the unsatisfactory part in a multi-piece product will be exchanged.

Manufacturer reserves the right to change specifications without notice.

Made in U.S.A.

1-800-874-0008 (U.S.A., Canada)

Page 1
Image 1
Closet Maid 71031 specifications Policy, #1031, #1041, #1061

71031 specifications

The Closet Maid 71031 is a versatile and efficient storage solution designed to tackle the clutter and maximize the organization within closets and other living spaces. Known for its durability and practicality, this product showcases a range of features that make it a popular choice among homeowners.

One of the key features of the Closet Maid 71031 is its customizable design. The shelving units can be adjusted to different heights, allowing users to tailor the space according to their specific storage needs. This flexibility is particularly beneficial for accommodating various items, from shoes and clothing to bins and boxes, making it a highly adaptable solution for any room.

In terms of materials, the Closet Maid 71031 is constructed with high-quality, sturdy components that ensure longevity and support. The use of laminated MDF provides a sleek appearance while maintaining the unit's strength. This design not only resists wear and tear but is also easy to clean, ensuring that the shelves remain presentable even after years of use.

Another notable feature is the easy installation process. The Closet Maid 71031 comes with a detailed instruction manual and all necessary hardware, allowing users to set up their storage unit without requiring professional help. This DIY-friendly approach empowers homeowners to create an organized space without the additional cost of hiring someone.

Moreover, the 71031 model incorporates advanced technologies to further enhance its functionality. The shelving consists of fixed and adjustable options, which help promote optimal use of vertical space. With its open design, users can quickly identify stored items, making retrieval effortless and reducing time spent searching for belongings.

The closet organizer is also aesthetically pleasing, available in neutral colors that seamlessly blend with various interior styles. Its clean lines and modern look make it not only a functional addition but also a stylish one that complements any décor.

In summary, the Closet Maid 71031 stands out as an exceptional storage solution that combines flexibility, durability, and ease of installation. Its innovative design, coupled with high-quality materials, makes it a smart investment for anyone seeking to improve organization in their home. The ability to customize the unit according to personal needs further adds to its appeal, making it a go-to choice for achieving a tidy and manageable living environment.