5

x2

x2

x2

x2


All units MUST be


WARNING fastened to the wall.

Finished edges to front!

When stacking units, the unit on the bottom

must be attached to the wall first before set-

Bordures ouvrées à l’avant!

ting another unit on top.

¡Bordes terminados hacia el frente!


Tous les


AVERTISSEMENT modules


DOIVENT être attachés au mur. Pour empiler

a.

les modules, celui du bas doit d’abord être fixé

au mur avant l’installation d’un autre module par


dessus.


ADVERTENCIA Todas las unidades


DEBEN sujetarse a


la pared. Cuando las unidades se apilen, la


unidad del fondo debe sujetarse a la pared


primero antes de colocar otra unidad encima.

b. c.

e.

d.

USE SMALLEST SCREWS!

UTILISE R LES PLUS PETITES VIS!

¡USE LOS TORNILLOS MÁS PEQUEÑOS!

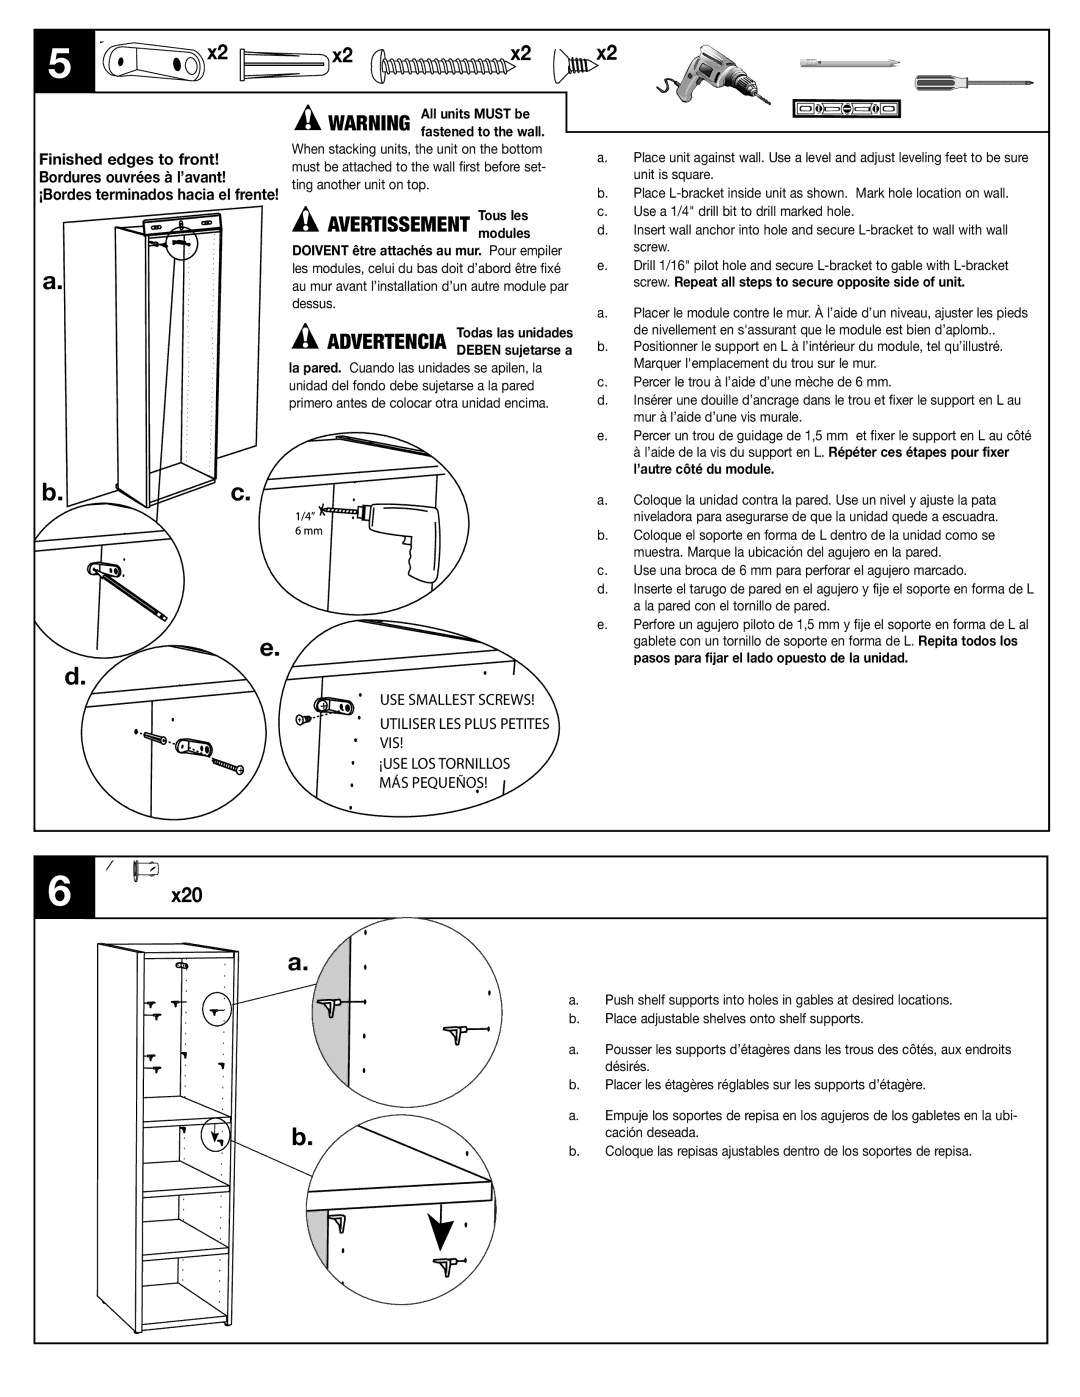
a.Place unit against wall. Use a level and adjust leveling feet to be sure unit is square.

b.Place L-bracket inside unit as shown. Mark hole location on wall.

c.Use a 1/4" drill bit to drill marked hole.

d.Insert wall anchor into hole and secure L-bracket to wall with wall screw.

e.Drill 1/16" pilot hole and secure L-bracket to gable with L-bracket screw. Repeat all steps to secure opposite side of unit.

a.Placer le module contre le mur. À l’aide d’un niveau, ajuster les pieds de nivellement en s'assurant que le module est bien d’aplomb..

b.Positionner le support en L à l’intérieur du module, tel qu’illustré. Marquer l'emplacement du trou sur le mur.

c.Percer le trou à l’aide d’une mèche de 6 mm.

d.Insérer une douille d’ancrage dans le trou et fixer le support en L au mur à l’aide d’une vis murale.

e.Percer un trou de guidage de 1,5 mm et fixer le support en L au côté à l’aide de la vis du support en L. Répéter ces étapes pour fixer l’autre côté du module.

a.Coloque la unidad contra la pared. Use un nivel y ajuste la pata niveladora para asegurarse de que la unidad quede a escuadra.

b.Coloque el soporte en forma de L dentro de la unidad como se muestra. Marque la ubicación del agujero en la pared.

c.Use una broca de 6 mm para perforar el agujero marcado.

d.Inserte el tarugo de pared en el agujero y fije el soporte en forma de L a la pared con el tornillo de pared.

e.Perfore un agujero piloto de 1,5 mm y fije el soporte en forma de L al gablete con un tornillo de soporte en forma de L. Repita todos los pasos para fijar el lado opuesto de la unidad.

6 x20

a.

b.

a.Push shelf supports into holes in gables at desired locations.

b.Place adjustable shelves onto shelf supports.

a.Pousser les supports d’étagères dans les trous des côtés, aux endroits désirés.

b.Placer les étagères réglables sur les supports d’étagère.

a.Empuje los soportes de repisa en los agujeros de los gabletes en la ubi- cación deseada.

b.Coloque las repisas ajustables dentro de los soportes de repisa.

Page 3
Image 3
Closet Maid S12ST manual X20

S12ST specifications

The Closet Maid S12ST is a well-regarded product within the organizing and storage solutions sector, particularly designed to enhance closet efficiency and maximize available space. Its intelligent design and range of features make it an ideal choice for homeowners looking to streamline their storage process.

One of the standout features of the Closet Maid S12ST is its adjustable shelving system, which allows users to customize the space according to their specific needs. This flexibility is essential for accommodating various items, from folded clothes to shoes and accessories. The system includes multiple shelves that can be repositioned to suit different heights, providing efficient use of vertical space.

The S12ST also boasts a durable construction, often made from high-quality materials that ensure longevity and stability. Its robust design can support considerable weight, making it perfect for storing heavier items without compromising safety or structural integrity.

Another key characteristic of the Closet Maid S12ST is its simple installation process. The product comes with clear instructions and all the necessary hardware, allowing users to assemble it with minimal effort. This user-friendly aspect is a significant advantage for those who may not have extensive DIY experience.

In terms of aesthetics, the Closet Maid S12ST features a sleek and modern design that suits various interior styles. It is available in multiple finishes, enabling homeowners to select a look that complements their existing decor. This attention to design not only enhances functionality but also adds visual appeal to spaces.

The product also incorporates advanced technologies to further improve user experience. For example, the unique sliding rod system allows for easy access to clothes and accessories, taking convenience to the next level. This design ensures that even items stored at the back of the closet are easily reachable.

In summary, the Closet Maid S12ST is an exemplary storage solution that combines functionality, durability, and elegance. Its adjustable shelves, robust construction, easy installation, and innovative design features make it a desirable choice for any organization project. Whether one is looking to revamp a small closet or maximize the utility of a large storage space, the Closet Maid S12ST stands out as a reliable and stylish option.