Carefully read all instructions before use and save for future reference.
TO CHARGE BATTERY
When the battery is fully discharged, it will take 16 to 18 hours to fully recharge it. To obtain maximum performance, charge for 18 hours for the first three cycles. Always charge the battery immediately after use whenever possible.
Charge indoors using household source. On a full charge, the continuous run time is up to 10 hours on LOW and 5 hours on HIGH. Total run time will increase if the unit is turned on and off intermittently.
Do not leave the lantern turned on after the battery has stopped, as overdischarging the battery can cause problems in recharging the battery to a full charge. If this does occur, immediately switch the lantern off and recharge for 40 hours.
After an extended period of storage (more than 6 months), recharge for the full 16 hours or more.
The lantern can be recharged after first charging from either a
The
This lantern is also equipped with an emergency on feature. If the lantern is set to the Low or High setting while charging and power is disrupted, the lantern will turn on.
CAUTION: The
it may be possible to blow the fuse in some USA vehicles when only the small plug from the lantern
is disconnected and the large cigarette plug remains connected to the 12V DC adapter socket.
In this situation, if the small plug contacts the metal of the vehicle, the fuse may blow! Therefore, always remove the large DC plug from the DC adapter socket first! This caution applies to any vehicle, RV, boat, etc., in which the
NOTE: On some automobiles, the DC receptacle is turned on and off by the ignition switch.
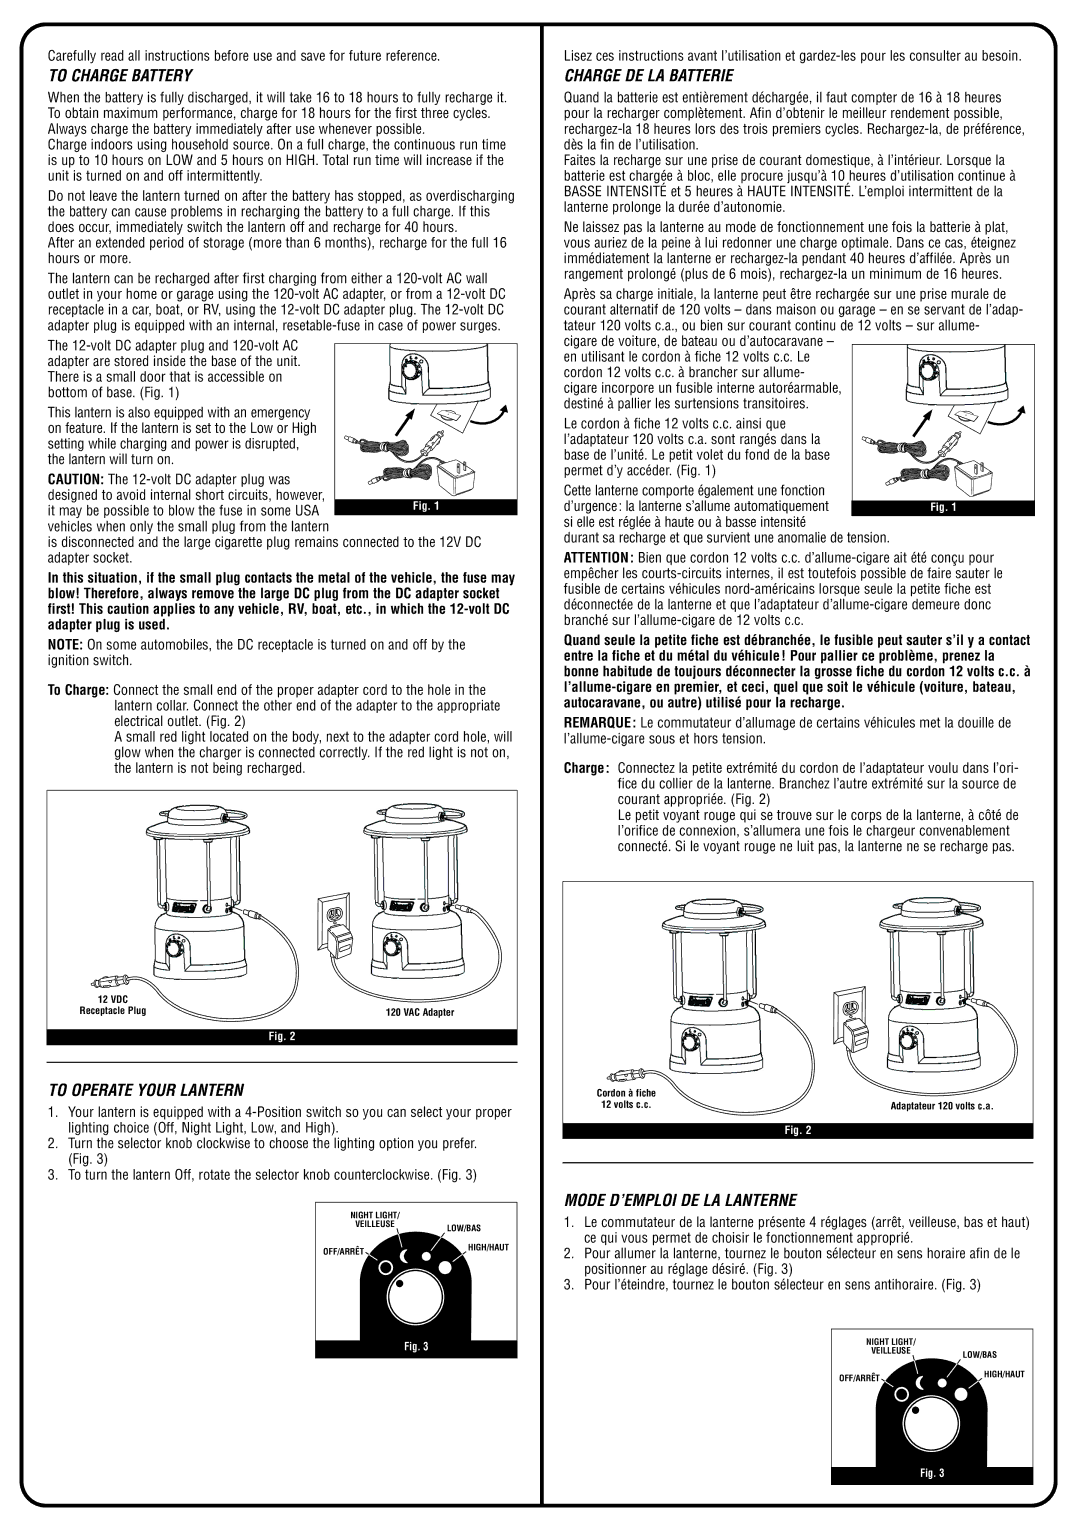
To Charge: Connect the small end of the proper adapter cord to the hole in the lantern collar. Connect the other end of the adapter to the appropriate electrical outlet. (Fig. 2)
A small red light located on the body, next to the adapter cord hole, will glow when the charger is connected correctly. If the red light is not on, the lantern is not being recharged.
12 VDC |
|
Receptacle Plug | 120 VAC Adapter |
Fig. 2
TO OPERATE YOUR LANTERN
1.Your lantern is equipped with a
2.Turn the selector knob clockwise to choose the lighting option you prefer. (Fig. 3)
3.To turn the lantern Off, rotate the selector knob counterclockwise. (Fig. 3)
NIGHT LIGHT/
VEILLEUSELOW/BAS
OFF/ARRET | HIGH/HAUT |
|
Fig. 3
Lisez ces instructions avant l’utilisation et
CHARGE DE LA BATTERIE
Quand la batterie est entièrement déchargée, il faut compter de 16 à 18 heures pour la recharger complètement. Afin d’obtenir le meilleur rendement possible,
Faites la recharge sur une prise de courant domestique, à l’intérieur. Lorsque la batterie est chargée à bloc, elle procure jusqu’à 10 heures d’utilisation continue à BASSE INTENSITÉ et 5 heures à HAUTE INTENSITÉ. L’emploi intermittent de la lanterne prolonge la durée d’autonomie.
Ne laissez pas la lanterne au mode de fonctionnement une fois la batterie à plat, vous auriez de la peine à lui redonner une charge optimale. Dans ce cas, éteignez immédiatement la lanterne er
Après sa charge initiale, la lanterne peut être rechargée sur une prise murale de courant alternatif de 120 volts – dans maison ou garage – en se servant de l’adap- tateur 120 volts c.a., ou bien sur courant continu de 12 volts – sur allume- cigare de voiture, de bateau ou d’autocaravane –
en utilisant le cordon à fiche 12 volts c.c. Le cordon 12 volts c.c. à brancher sur allume- cigare incorpore un fusible interne autoréarmable, destiné à pallier les surtensions transitoires.
Le cordon à fiche 12 volts c.c. ainsi que l’adaptateur 120 volts c.a. sont rangés dans la
base de l’unité. Le petit volet du fond de la base permet d’y accéder. (Fig. 1)
Cette lanterne comporte également une fonction
d’urgence: la lanterne s’allume automatiquementFig. 1 si elle est réglée à haute ou à basse intensité
durant sa recharge et que survient une anomalie de tension.
ATTENTION: Bien que cordon 12 volts c.c.
Quand seule la petite fiche est débranchée, le fusible peut sauter s’il y a contact entre la fiche et du métal du véhicule! Pour pallier ce problème, prenez la bonne habitude de toujours déconnecter la grosse fiche du cordon 12 volts c.c. à
REMARQUE: Le commutateur d’allumage de certains véhicules met la douille de
Charge: Connectez la petite extrémité du cordon de l’adaptateur voulu dans l’ori- fice du collier de la lanterne. Branchez l’autre extrémité sur la source de courant appropriée. (Fig. 2)
Le petit voyant rouge qui se trouve sur le corps de la lanterne, à côté de l’orifice de connexion, s’allumera une fois le chargeur convenablement connecté. Si le voyant rouge ne luit pas, la lanterne ne se recharge pas.
Cordon à fiche |
|
12 volts c.c. | Adaptateur 120 volts c.a. |
Fig. 2
MODE D’EMPLOI DE LA LANTERNE
1.Le commutateur de la lanterne présente 4 réglages (arrêt, veilleuse, bas et haut) ce qui vous permet de choisir le fonctionnement approprié.
2.Pour allumer la lanterne, tournez le bouton sélecteur en sens horaire afin de le positionner au réglage désiré. (Fig. 3)
3.Pour l’éteindre, tournez le bouton sélecteur en sens antihoraire. (Fig. 3)
NIGHT LIGHT/
VEILLEUSELOW/BAS
OFF/ARRET | HIGH/HAUT |
|
Fig. 3
