GALILEOTM 9’ X 7’ MODEL 2000001126

STITCH LINE

Before you begin

Read all instructions before set up.

Select a level campsite clear of rocks, branches, and other hard or sharp objects, to install your tent.

WARNING: Keep clear of overhead power lines.

Do not set up your tent under trees.

For best results in windy conditions, position end of tent into the wind.

Enlist the help of at least one other person to assist you when it is time to assemble the tent.

Parts and Components

Description

Part Number

Main Poles (2)

9240-1221

Front/Awning Poles, Gray (2)

9240-1231

Rainfly

9240-1241


To Set Up Tent

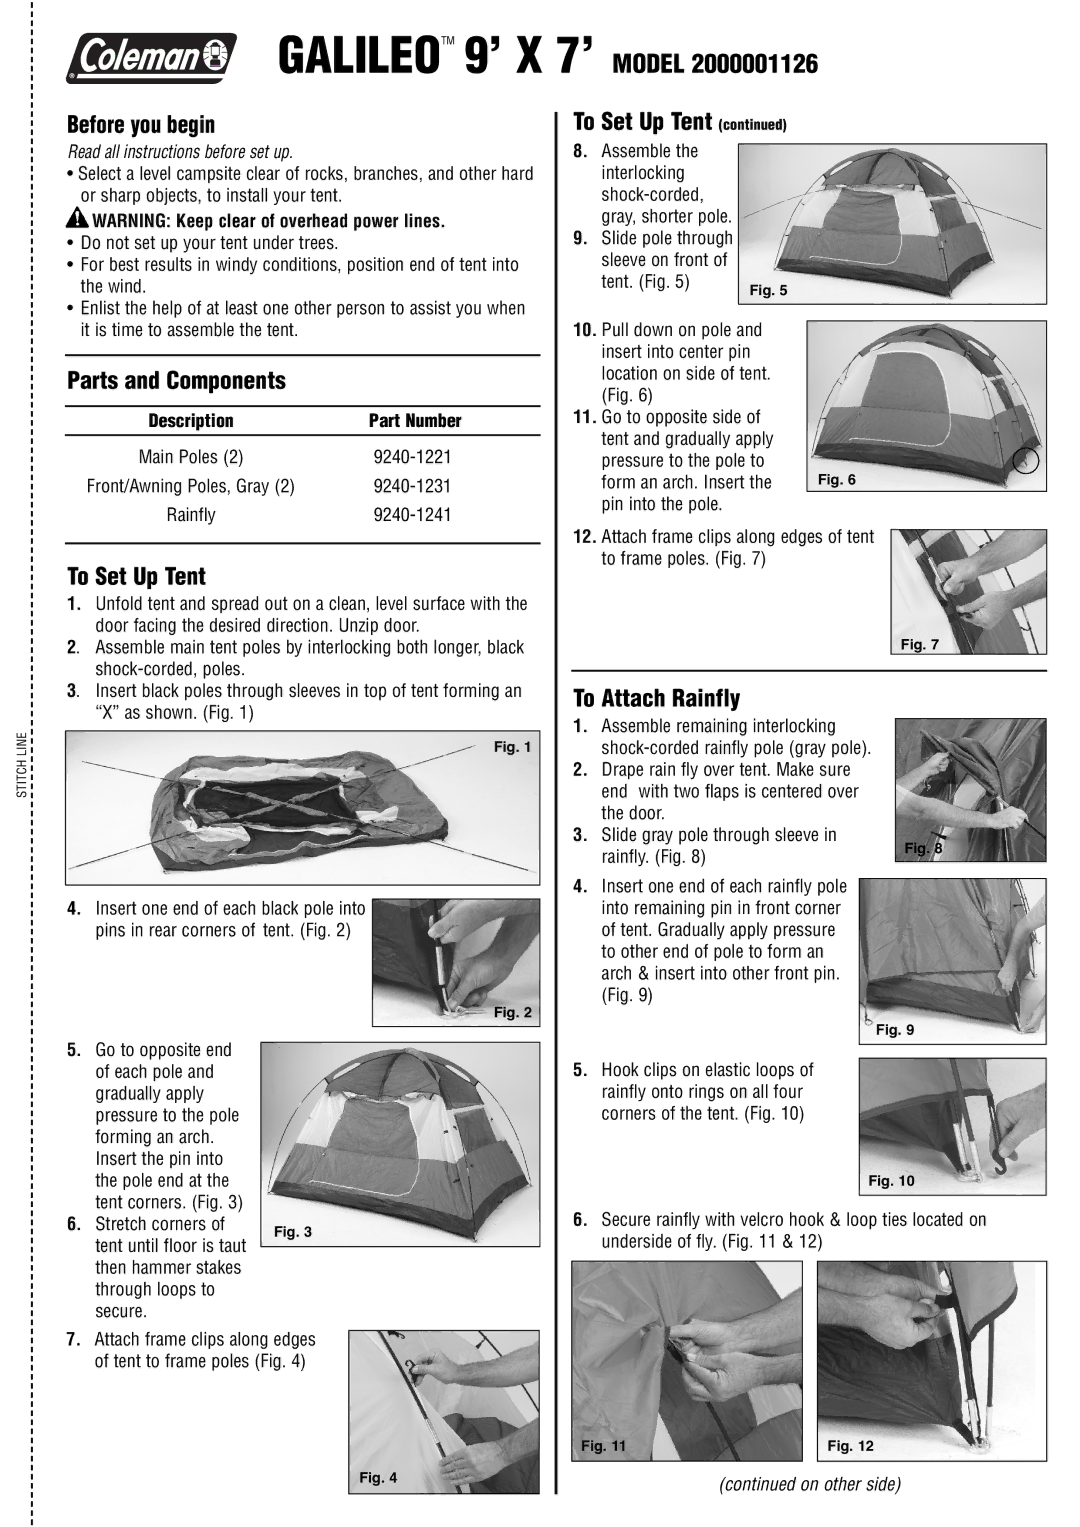
1.Unfold tent and spread out on a clean, level surface with the door facing the desired direction. Unzip door.

2. Assemble main tent poles by interlocking both longer, black shock-corded, poles.

3. Insert black poles through sleeves in top of tent forming an “X” as shown. (Fig. 1)

Fig. 1

4.Insert one end of each black pole into pins in rear corners of tent. (Fig. 2)

Fig. 2

5. Go to opposite end


of each pole and


gradually apply


pressure to the pole


forming an arch.


Insert the pin into


the pole end at the


tent corners. (Fig. 3)


6. Stretch corners of

Fig. 3

tent until floor is taut


then hammer stakes through loops to secure.

7.Attach frame clips along edges of tent to frame poles (Fig. 4)

Fig. 4

To Set Up Tent (continued)

8.Assemble the interlocking shock-corded, gray, shorter pole.

9.Slide pole through sleeve on front of

tent. (Fig. 5)

Fig. 5


10.Pull down on pole and insert into center pin location on side of tent. (Fig. 6)

11.Go to opposite side of tent and gradually apply

pressure to the pole to

form an arch. Insert the Fig. 6 pin into the pole.

12.Attach frame clips along edges of tent to frame poles. (Fig. 7)

Fig. 7

To Attach Rainfly

1.Assemble remaining interlocking shock-corded rainfly pole (gray pole).

2.Drape rain fly over tent. Make sure end with two flaps is centered over the door.

3.Slide gray pole through sleeve in

rainfly. (Fig. 8)

Fig. 8


4.Insert one end of each rainfly pole into remaining pin in front corner of tent. Gradually apply pressure to other end of pole to form an arch & insert into other front pin. (Fig. 9)

Fig. 9

5.Hook clips on elastic loops of rainfly onto rings on all four corners of the tent. (Fig. 10)

Fig. 10

6.Secure rainfly with velcro hook & loop ties located on underside of fly. (Fig. 11 & 12)

Fig. 11


Fig. 12


(continued on other side)

Page 1
Image 1
Coleman 2000001126 manual Before you begin, Parts and Components, To Set Up Tent, To Attach Rainfly

2000001126 specifications

The Coleman 2000001126 is a versatile outdoor camping stove that embodies both efficiency and convenience, making it a popular choice among outdoor enthusiasts and families alike. Designed with portability in mind, this stove features a compact and lightweight structure, making it easy to transport to campsites, picnics, or tailgate parties. Weighing in at just a few pounds, it can easily fit into a vehicle trunk or be carried in a backpack, which is a significant advantage for those who value space and weight management when embarking on outdoor adventures.

One of the standout characteristics of the Coleman 2000001126 is its dual-burner design. Equipped with two efficient burners, this stove allows cooks to prepare multiple dishes simultaneously, which is especially useful for family meals or when entertaining a group. Each burner is independently adjustable, giving users precise control over their cooking temperature. The powerful output of these burners ensures that meals are cooked evenly and quickly, making it suitable for sizzling breakfasts or hearty dinners.

Coleman has infused innovative technologies into this portable stove to enhance its performance and safety. The stove utilizes a matchless ignition system, which eliminates the need for manual lighting and reduces the risk of burns. This feature is particularly useful for inexperienced campers or in adverse weather conditions. Additionally, the stove is designed with windblock panels, which help shield the flames from gusty winds, thus maintaining consistent cooking temperatures regardless of outdoor conditions.

Another significant feature of the Coleman 2000001126 is its sturdy construction. The stove is built with durable materials that are designed to withstand the rigors of outdoor use, ensuring longevity and reliability. The integrated grease tray simplifies cleaning, making post-cooking maintenance hassle-free.

Furthermore, this stove operates on propane, which is readily available and easy to transport. The use of propane allows for quick heat-up times and efficient cooking, making it a practical choice for all types of outdoor cooking needs. With its combination of portability, dual burners, matchless ignition, and robust build, the Coleman 2000001126 stands out as an essential tool for those who appreciate the joy of cooking in nature. It serves as an excellent companion for countless outdoor adventures, bringing convenience and comfort to the camping experience.