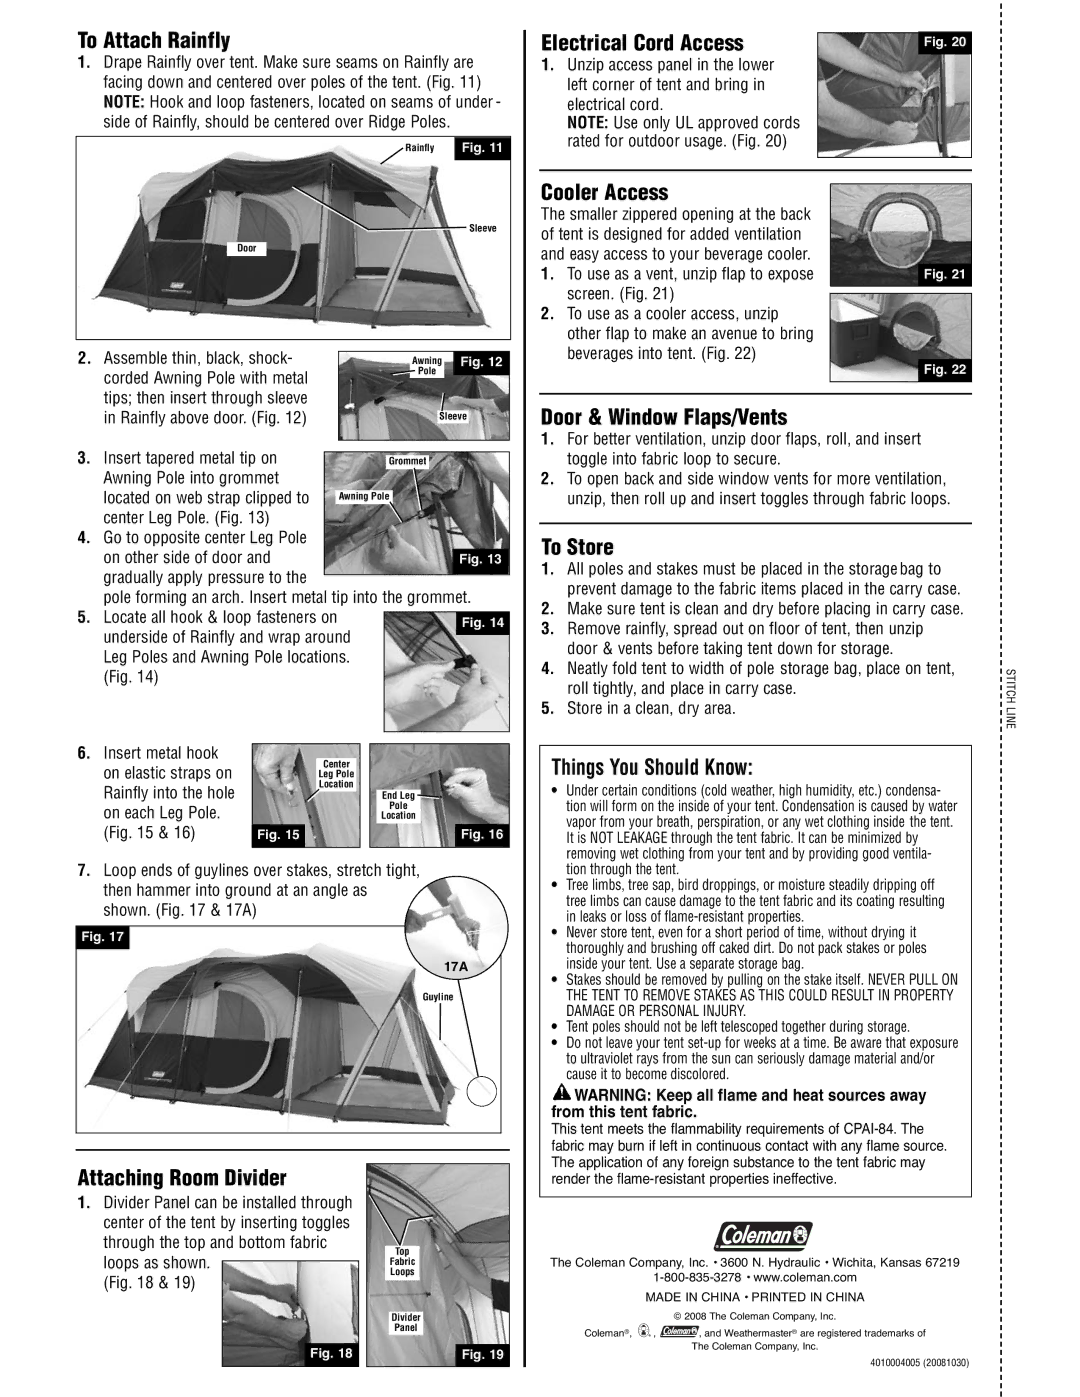
To Attach Rainfly

1.Drape Rainfly over tent. Make sure seams on Rainfly are facing down and centered over poles of the tent. (Fig. 11) NOTE: Hook and loop fasteners, located on seams of under - side of Rainfly, should be centered over Ridge Poles.

Rainfly

Fig. 11


Sleeve

Door

2.

Assemble thin, black, shock-


Awning


Fig. 12


corded Awning Pole with metal


Pole


tips; then insert through sleeve


in Rainfly above door. (Fig. 12)


Sleeve

3. Insert tapered metal tip on


Grommet


Awning Pole into grommet


located on web strap clipped to


Awning Pole


center Leg Pole. (Fig. 13)


4. Go to opposite center Leg Pole


on other side of door and


Fig. 13


gradually apply pressure to the


pole forming an arch. Insert metal tip into the grommet.

5. Locate all hook & loop fasteners on


Fig. 14


underside of Rainfly and wrap around


Leg Poles and Awning Pole locations.


(Fig. 14)


6.

Insert metal hook


Center


on elastic straps on


Leg Pole


Rainfly into the hole


Location


End Leg


on each Leg Pole.


Pole


Location


(Fig. 15 & 16)


Fig. 15


Fig. 16


7.Loop ends of guylines over stakes, stretch tight, then hammer into ground at an angle as shown. (Fig. 17 & 17A)

Fig. 17

17A

Guyline

Electrical Cord Access

Fig. 20

1.Unzip access panel in the lower left corner of tent and bring in electrical cord.

NOTE: Use only UL approved cords rated for outdoor usage. (Fig. 20)

Cooler Access

The smaller zippered opening at the back of tent is designed for added ventilation and easy access to your beverage cooler.

1. To use as a vent, unzip flap to exposeFig. 21 screen. (Fig. 21)

2.To use as a cooler access, unzip other flap to make an avenue to bring beverages into tent. (Fig. 22)

Fig. 22

Door & Window Flaps/Vents

1.For better ventilation, unzip door flaps, roll, and insert toggle into fabric loop to secure.

2.To open back and side window vents for more ventilation, unzip, then roll up and insert toggles through fabric loops.

To Store

1.All poles and stakes must be placed in the storage bag to prevent damage to the fabric items placed in the carry case.

2.Make sure tent is clean and dry before placing in carry case.

3.Remove rainfly, spread out on floor of tent, then unzip door & vents before taking tent down for storage.

4.Neatly fold tent to width of pole storage bag, place on tent, roll tightly, and place in carry case.

5.Store in a clean, dry area.

Things You Should Know:

Under certain conditions (cold weather, high humidity, etc.) condensa- tion will form on the inside of your tent. Condensation is caused by water vapor from your breath, perspiration, or any wet clothing inside the tent. It is NOT LEAKAGE through the tent fabric. It can be minimized by removing wet clothing from your tent and by providing good ventila- tion through the tent.

Tree limbs, tree sap, bird droppings, or moisture steadily dripping off tree limbs can cause damage to the tent fabric and its coating resulting in leaks or loss of flame-resistant properties.

Never store tent, even for a short period of time, without drying it thoroughly and brushing off caked dirt. Do not pack stakes or poles inside your tent. Use a separate storage bag.

Stakes should be removed by pulling on the stake itself. NEVER PULL ON THE TENT TO REMOVE STAKES AS THIS COULD RESULT IN PROPERTY DAMAGE OR PERSONAL INJURY.

Tent poles should not be left telescoped together during storage.

Do not leave your tent set-up for weeks at a time. Be aware that exposure to ultraviolet rays from the sun can seriously damage material and/or cause it to become discolored.

WARNING: Keep all flame and heat sources away from this tent fabric.

STITCH LINE

Attaching Room Divider

1.Divider Panel can be installed through center of the tent by inserting toggles through the top and bottom fabric loops as shown.

(Fig. 18 & 19)

Fig. 18

Top

Fabric

Loops

Divider

Panel

Fig. 19

This tent meets the flammability requirements of CPAI-84. The fabric may burn if left in continuous contact with any flame source. The application of any foreign substance to the tent fabric may render the flame-resistant properties ineffective.

The Coleman Company, Inc. • 3600 N. Hydraulic • Wichita, Kansas 67219

1-800-835-3278 • www.coleman.com

MADE IN CHINA • PRINTED IN CHINA

© 2008 The Coleman Company, Inc.

Coleman®, , , and Weathermaster® are registered trademarks of

The Coleman Company, Inc.

4010004005 (20081030)

Page 2
Image 2
Coleman 2000001597 manual To Attach Rainfly, Cooler Access, Door & Window Flaps/Vents, To Store, Things You Should Know

2000001597 specifications

The Coleman 2000001597 is a highly regarded camping lantern that exemplifies reliability and performance in outdoor lighting. Designed for adventurers and casual campers alike, this lantern combines powerful illumination with user-friendly features, making it a staple in any camping gear collection.

One of the main features of the Coleman 2000001597 is its impressive brightness. With a lighting output of up to 800 lumens, it can illuminate large areas, ensuring visibility and safety during nighttime activities. This brightness level is particularly useful for group camping, as it provides adequate light for cooking, socializing, or relaxation around the campsite.

The lantern is equipped with a durable construction, including a rugged plastic body that can withstand outdoor conditions. It is designed to be water-resistant, ensuring it can handle unexpected rain showers or spills without compromising performance. This durability makes it suitable for all types of weather, making it reliable for various outdoor adventures.

One of the standout technologies incorporated in the Coleman 2000001597 is its runtime efficiency. The lantern can run for a remarkable 15 hours on low settings, allowing for extended use without the need for frequent battery replacements. This feature is essential for outdoor enthusiasts who want to minimize the hassle of maintaining their gear while maximizing their time spent in nature.

The lantern also features an adjustable brightness setting, allowing users to customize the light output according to their needs. Whether you require a bright, focused beam for detail work or a softer glow for relaxing ambiance, this lantern can accommodate both situations easily.

In terms of usability, the Coleman 2000001597 offers a convenient handle for easy transportation and hanging. This ergonomic design enhances its portability, making it easy to carry from one location to another or suspend from a tree branch, adding versatility to its use.

Furthermore, the lantern runs on standard batteries, making it easily accessible and convenient for users to obtain replacements when needed. This feature eliminates the need for specialized power sources, making it a practical choice for emergency preparedness as well.

In conclusion, the Coleman 2000001597 is a robust and efficient camping lantern that excels in performance, durability, and user-friendliness. With its powerful illumination, adjustable brightness settings, and water-resistant design, this lantern is an ideal companion for any outdoor excursion, ensuring safety, convenience, and enjoyment under the stars. Whether you're camping, hiking, or preparing for emergency situations, this lantern is a valuable asset.