EVANSTONTM 14’ X 12’ MODEL 9163-141

STITCH LINE

Before you begin

Read all instructions before set up.

Select a level campsite clear of rocks, branches, and other hard or sharp objects, to install your tent.

WARNING: Keep clear of overhead power lines.

Do not set up your tent under trees.

For best results in windy conditions, position end of tent into the wind.

Enlist the help of at least one other person to assist you when it is time to assemble the tent.

Parts and Components

Description

Part Number

Main Poles (2)

9163-1101

Side Poles (2)

9163-1111

Rainfly

9163-1131

Vertical Hinge Door Pole, Black, short with


plastic cap tips (1)

9163-1121

Hinge Door Pole, Black, long with


plastic cap tips (1)

9163-1171

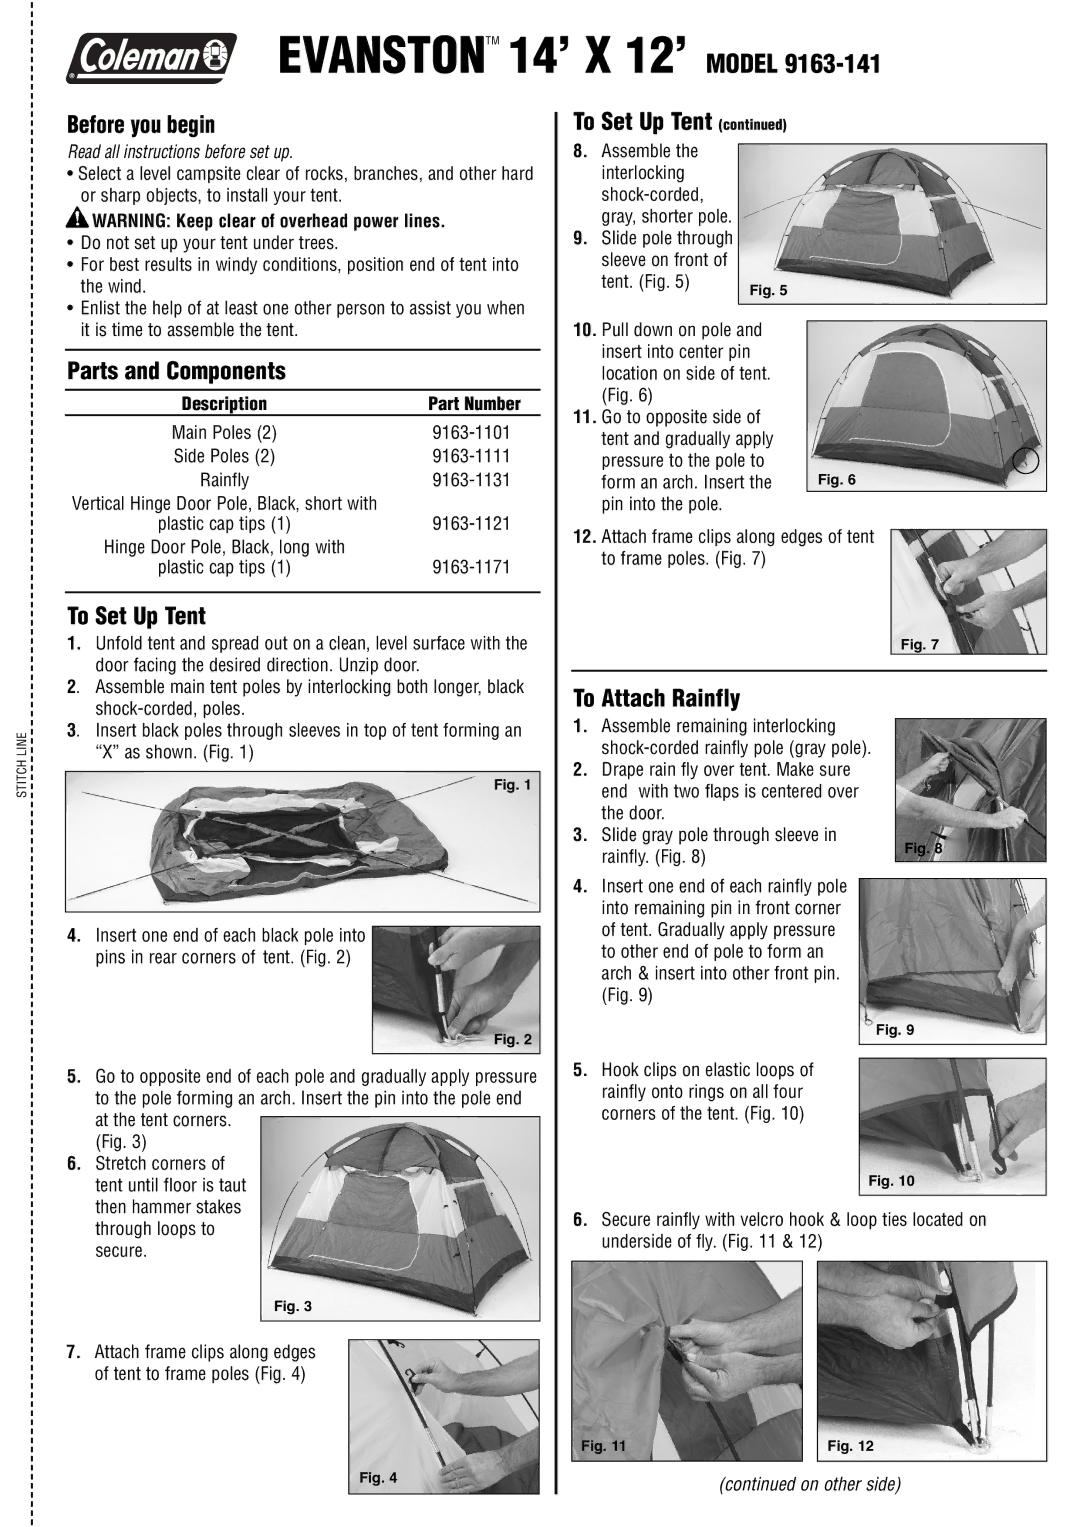
To Set Up Tent

1.Unfold tent and spread out on a clean, level surface with the door facing the desired direction. Unzip door.

2. Assemble main tent poles by interlocking both longer, black shock-corded, poles.

3. Insert black poles through sleeves in top of tent forming an “X” as shown. (Fig. 1)

Fig. 1

4.Insert one end of each black pole into pins in rear corners of tent. (Fig. 2)

Fig. 2

5.Go to opposite end of each pole and gradually apply pressure to the pole forming an arch. Insert the pin into the pole end at the tent corners.

(Fig. 3)

6.Stretch corners of tent until floor is taut then hammer stakes through loops to secure.

Fig. 3

7.Attach frame clips along edges of tent to frame poles (Fig. 4)

Fig. 4

To Set Up Tent (continued)

8.Assemble the interlocking shock-corded, gray, shorter pole.

9.Slide pole through sleeve on front of

tent. (Fig. 5)

Fig. 5


10.Pull down on pole and insert into center pin location on side of tent. (Fig. 6)

11.Go to opposite side of tent and gradually apply

pressure to the pole to

form an arch. Insert the Fig. 6 pin into the pole.

12.Attach frame clips along edges of tent to frame poles. (Fig. 7)

Fig. 7

To Attach Rainfly

1.Assemble remaining interlocking shock-corded rainfly pole (gray pole).

2.Drape rain fly over tent. Make sure end with two flaps is centered over the door.

3.Slide gray pole through sleeve in

rainfly. (Fig. 8)

Fig. 8


4.Insert one end of each rainfly pole into remaining pin in front corner of tent. Gradually apply pressure to other end of pole to form an arch & insert into other front pin. (Fig. 9)

Fig. 9

5.Hook clips on elastic loops of rainfly onto rings on all four corners of the tent. (Fig. 10)

Fig. 10

6.Secure rainfly with velcro hook & loop ties located on underside of fly. (Fig. 11 & 12)

Fig. 11


Fig. 12


(continued on other side)

Page 1
Image 1
Coleman 9163-141 manual Before you begin, Parts and Components, To Set Up Tent, To Attach Rainfly

9163-141 specifications

The Coleman 9163-141 is a versatile and reliable propane camping stove designed to enhance your outdoor cooking experience. Built with functionality and durability in mind, this stove is an essential companion for campers, tailgaters, and outdoor enthusiasts alike.

One of the standout features of the Coleman 9163-141 is its two burners, which provide a total cooking power of up to 20,000 BTUs. The burners are easily adjustable, allowing users to achieve precise temperature control for a variety of cooking tasks, from simmering sauces to boiling water. This stove can accommodate multiple pots and pans simultaneously, making meal preparation for larger groups quick and efficient.

The design of the Coleman 9163-141 also emphasizes portability and convenience. Weighing in at a manageable amount, it can be easily transported in a vehicle without taking up too much space. The stove features a sturdy construction with a wind-blocking design that helps protect the flames from wind gusts, ensuring consistent cooking performance even in less-than-ideal weather conditions.

One of the key technologies incorporated into this model is the PerfectHeat technology that allows for effective heat distribution. This feature minimizes fuel consumption while maximizing cooking efficiency, making it a cost-effective option for outdoor cooking. Additionally, the stove is compatible with standard propane cylinders, providing convenience for users who already own propane gear.

The Coleman 9163-141 is designed with safety in mind, featuring a removable, easy-to-clean drip tray that catches spills and reduces mess. The burners can be easily removed for cleaning as well, ensuring that maintenance is straightforward.

Other characteristics worth noting include a compact design that allows for easy stacking and storage, making it ideal for those with limited storage space. The stove also boasts an easy-to-use ignition system, eliminating the need for matches or lighters, which is a significant advantage when you're outdoors.

In conclusion, the Coleman 9163-141 is a robust camping stove that combines powerful performance with portability and user-friendly features. Its advanced technology, safety mechanisms, and ease of maintenance make it an outstanding choice for anyone looking to elevate their outdoor cooking capabilities. Whether you are on a weekend camping trip or enjoying a backyard barbecue, this stove delivers reliable results every time.