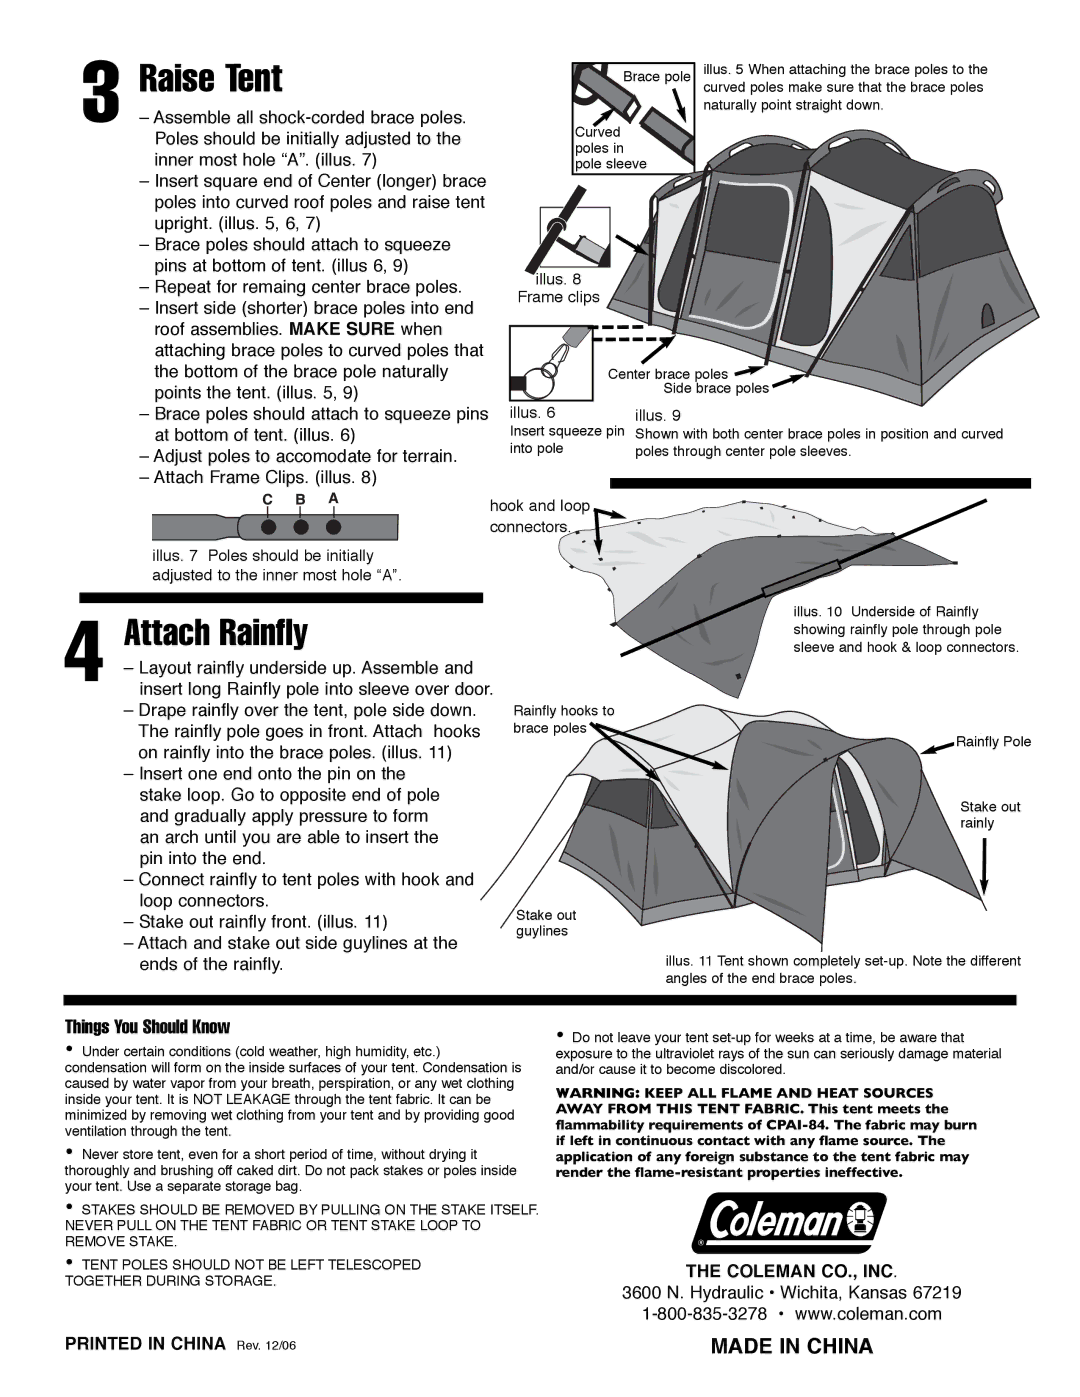
3 Raise Tent

– Assemble all shock-corded brace poles. Poles should be initially adjusted to the inner most hole “A”. (illus. 7)

– Insert square end of Center (longer) brace poles into curved roof poles and raise tent upright. (illus. 5, 6, 7)

– Brace poles should attach to squeeze pins at bottom of tent. (illus 6, 9)

– Repeat for remaing center brace poles.

– Insert side (shorter) brace poles into end roof assemblies. MAKE SURE when attaching brace poles to curved poles that the bottom of the brace pole naturally points the tent. (illus. 5, 9)

– Brace poles should attach to squeeze pins at bottom of tent. (illus. 6)

– Adjust poles to accomodate for terrain.

– Attach Frame Clips. (illus. 8)

Brace pole

illus. 5 When attaching the brace poles to the


curved poles make sure that the brace poles


naturally point straight down.

Curved


poles in


pole sleeve


illus. 8

Frame clips

Center brace poles

Side brace poles

illus. 6

illus. 9

Insert squeeze pin Shown with both center brace poles in position and curved

into pole

poles through center pole sleeves.

hook and loop connectors.

illus. 7 Poles should be initially adjusted to the inner most hole “A”.

4 Attach Rainfly

– Layout rainfly underside up. Assemble and insert long Rainfly pole into sleeve over door.

– Drape rainfly over the tent, pole side down. The rainfly pole goes in front. Attach hooks on rainfly into the brace poles. (illus. 11)

– Insert one end onto the pin on the stake loop. Go to opposite end of pole and gradually apply pressure to form an arch until you are able to insert the pin into the end.

– Connect rainfly to tent poles with hook and loop connectors.

– Stake out rainfly front. (illus. 11)

– Attach and stake out side guylines at the ends of the rainfly.

illus. 10 Underside of Rainfly showing rainfly pole through pole sleeve and hook & loop connectors.

Rainfly hooks to

brace poles

Rainfly Pole

Stake out rainly

Stake out guylines

illus. 11 Tent shown completely set-up. Note the different angles of the end brace poles.

Things You Should Know

Under certain conditions (cold weather, high humidity, etc.) condensation will form on the inside surfaces of your tent. Condensation is caused by water vapor from your breath, perspiration, or any wet clothing inside your tent. It is NOT LEAKAGE through the tent fabric. It can be minimized by removing wet clothing from your tent and by providing good ventilation through the tent.

Never store tent, even for a short period of time, without drying it thoroughly and brushing off caked dirt. Do not pack stakes or poles inside your tent. Use a separate storage bag.

STAKES SHOULD BE REMOVED BY PULLING ON THE STAKE ITSELF. NEVER PULL ON THE TENT FABRIC OR TENT STAKE LOOP TO REMOVE STAKE.

TENT POLES SHOULD NOT BE LEFT TELESCOPED

TOGETHER DURING STORAGE.

PRINTED IN CHINA Rev. 12/06

Do not leave your tent set-up for weeks at a time, be aware that exposure to the ultraviolet rays of the sun can seriously damage material and/or cause it to become discolored.

WARNING: KEEP ALL FLAME AND HEAT SOURCES AWAY FROM THIS TENT FABRIC. This tent meets the flammability requirements of CPAI-84. The fabric may burn if left in continuous contact with any flame source. The application of any foreign substance to the tent fabric may render the flame-resistant properties ineffective.

THE COLEMAN CO., INC.

3600 N. Hydraulic • Wichita, Kansas 67219

1-800-835-3278 • www.coleman.com

MADE IN CHINA

Page 2
Image 2
Coleman 9230-014 manual Raise Tent, Attach Rainfly, Things You Should Know, Illus Frame clips

9230-014 specifications

The Coleman 9230-014 is a portable gas camping stove designed for outdoor enthusiasts who demand efficiency and convenience while cooking in nature. This compact unit is popular among campers, hikers, and tailgaters for its remarkable combination of performance and portability.

One of the standout features of the Coleman 9230-014 is its two-burner design, providing a total output of 20,000 BTUs. This allows chefs to cook multiple dishes simultaneously, significantly reducing meal preparation time. Each burner is independently adjustable, offering precise temperature control for various cooking methods, from boiling water to simmering sauces. This flexibility makes it an ideal option for cooking anything from breakfast pancakes to a hearty stew.

The stove incorporates a windscreen that enhances performance in windy conditions, ensuring that the flame remains steady and reduces fuel consumption. This technology is particularly valuable for outdoor cooking, where unpredictable weather can affect cooking efficiency. Additionally, the integrated InstaStart ignition system eliminates the need for matches or lighters, allowing users to ignite the burners quickly and effortlessly with just the push of a button.

Another notable characteristic of the Coleman 9230-014 is its portability. Weighing in at just over 10 pounds, it is lightweight and easy to transport. The folding legs provide stability on uneven ground and can be easily tucked away for storage or transport. The compact design means that it can fit into most camping gear without taking up excessive space.

Durability is also a key aspect of this stove. Made from high-quality materials, it is designed to withstand the rigors of outdoor use and has a drip tray to catch spills, making cleanup a breeze. With its robust construction, the Coleman 9230-014 ensures longevity and reliability, making it a worthwhile investment for regular outdoor adventurers.

In summary, the Coleman 9230-014 offers a powerful and versatile cooking solution for outdoor cooking. Its dual burners, wind-resistant design, quick ignite technology, and portability make it a favorite among camping enthusiasts. Whether planning a weekend getaway or a family picnic, this stove provides a reliable cooking experience, allowing users to enjoy delicious meals while surrounded by nature.