Fig. 1
Fig. 2
Fig. 6

RANGEVIEWTM 5 MODEL 9230-110

STITCH LINE

Before you begin

Read all instructions before set up.

Select a level campsite clear of rocks, branches, and other hard or sharp objects, to install your tent.

WARNING: Keep clear of overhead power lines.

Do not set up your tent under trees.

For best results in windy conditions, position end of tent into the wind.

Enlist the help of at least one other person to assist you when it is time to assemble the tent.

Parts and Components

Description

Part Number

Main Poles, Black (2)

9230-1151

Side Poles, Gray (2)

9230-1161

Long, Side-to-Side Pole, Black (1)

9230-1171

Rainfly Pole, Black with Plastic Tips (1)

9230-1181

Rainfly

9230-1191


To Set Up Tent

1.Unfold tent and spread out on a clean, level surface with the door facing the desired direction. Unzip door.

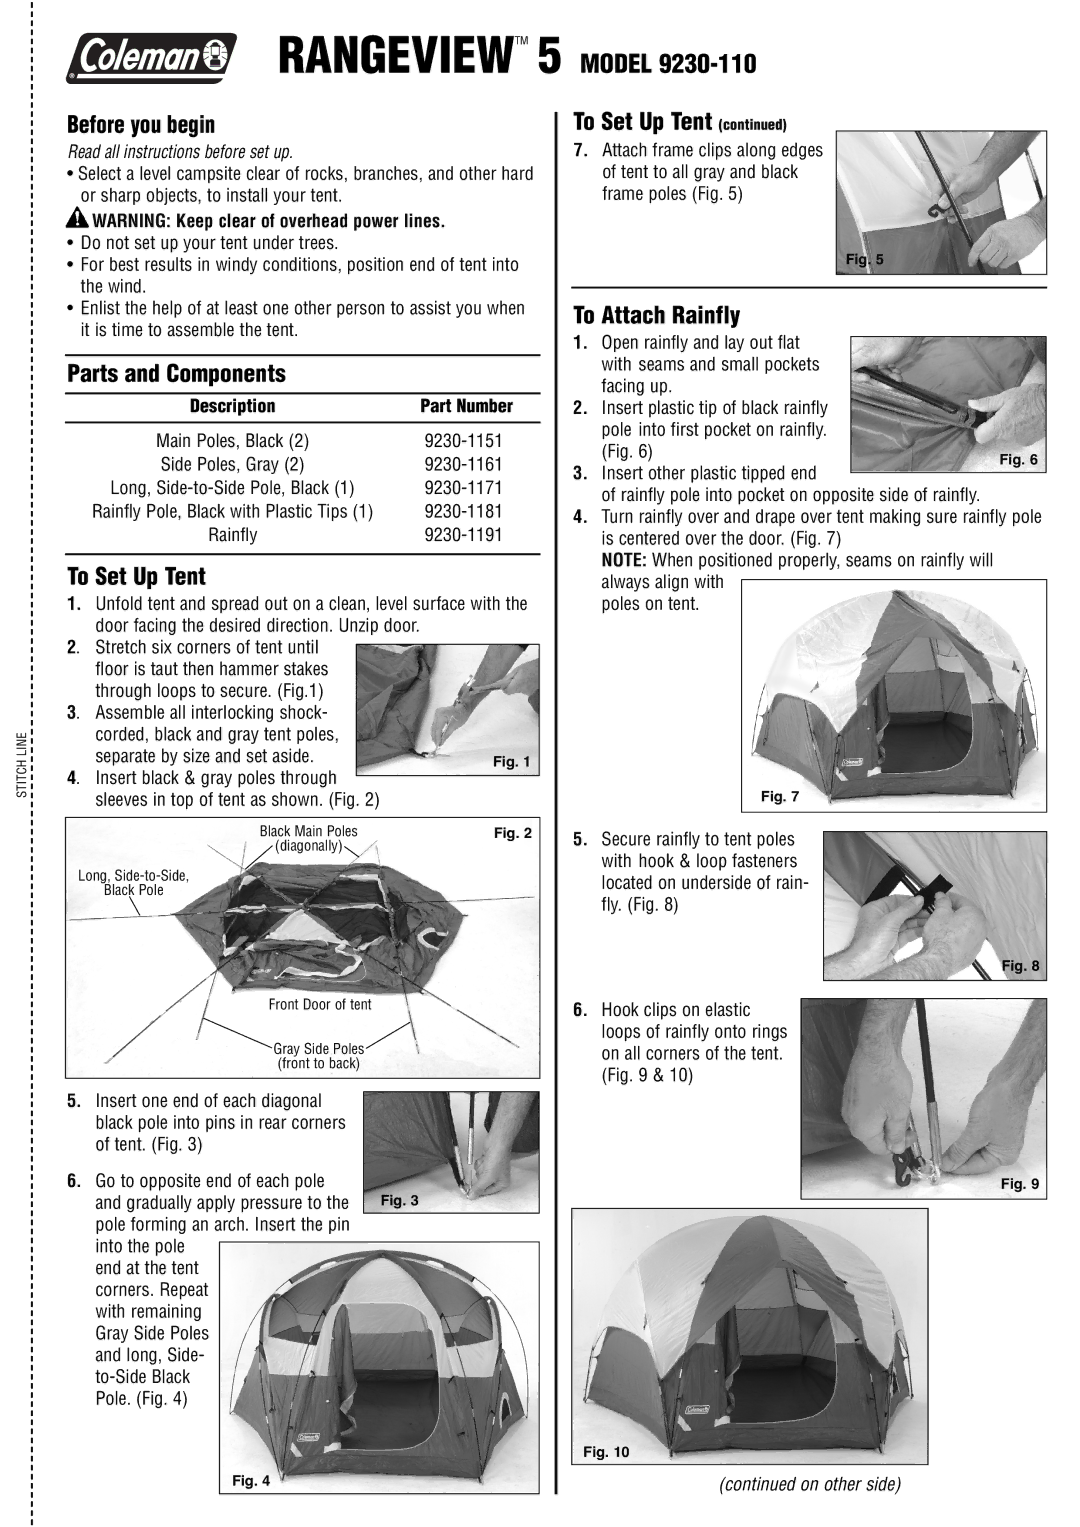
2. Stretch six corners of tent until floor is taut then hammer stakes through loops to secure. (Fig.1)

3. Assemble all interlocking shock- corded, black and gray tent poles, separate by size and set aside.

4. Insert black & gray poles through sleeves in top of tent as shown. (Fig. 2)

Black Main Poles

(diagonally)

Long, Side-to-Side,

Black Pole

Front Door of tent

Gray Side Poles (front to back)

5. Insert one end of each diagonal


black pole into pins in rear corners


of tent. (Fig. 3)


6. Go to opposite end of each pole


and gradually apply pressure to the

Fig. 3

pole forming an arch. Insert the pin


into the pole


end at the tent


corners. Repeat


with remaining


Gray Side Poles


and long, Side-


to-Side Black


Pole. (Fig. 4)


Fig. 4


To Set Up Tent (continued)

7.Attach frame clips along edges of tent to all gray and black frame poles (Fig. 5)

Fig. 5

To Attach Rainfly

1.Open rainfly and lay out flat with seams and small pockets facing up.

2.Insert plastic tip of black rainfly pole into first pocket on rainfly.

(Fig. 6)

3.Insert other plastic tipped end

of rainfly pole into pocket on opposite side of rainfly.

4.Turn rainfly over and drape over tent making sure rainfly pole is centered over the door. (Fig. 7)

NOTE: When positioned properly, seams on rainfly will always align with

poles on tent.

Fig. 7

5.Secure rainfly to tent poles with hook & loop fasteners located on underside of rain- fly. (Fig. 8)

Fig. 8

6.Hook clips on elastic loops of rainfly onto rings on all corners of the tent. (Fig. 9 & 10)

Fig. 9

Fig. 10

(continued on other side)

Page 1
Image 1
Coleman 9230-110 manual Before you begin, Parts and Components, To Set Up Tent, To Attach Rainfly

9230-110 specifications

The Coleman 9230-110 is a reliable and efficient heating solution designed to create comfort in outdoor spaces, particularly during chilly evenings or winter camping trips. This versatile heater is known for its durable construction and user-friendly features, making it a popular choice among outdoor enthusiasts and casual users alike.

One standout characteristic of the Coleman 9230-110 is its propane power source. Utilizing propane as fuel not only allows for efficient heating but also provides the added benefit of portability. The cylinder is easy to replace, ensuring that users can keep the heat going as long as needed. With a heat output of up to 20,000 BTUs, the heater can effectively warm up medium to large outdoor spaces quickly and efficiently.

The design of the Coleman 9230-110 is both practical and functional. It features an adjustable heat setting, which allows users to control the intensity of the heat according to their comfort level. This flexibility is ideal for varying weather conditions, whether one needs a gentle warmth or intense heat during colder temperatures.

Safety is a top priority in the design of the Coleman 9230-110. The device is equipped with a safety shut-off feature that automatically turns the unit off in case of accidental tip-overs, providing peace of mind while using the heater. Additionally, the heater includes a protective guard that helps prevent burns and keeps the unit safe during operation.

Another notable technology integrated into the Coleman 9230-110 is its efficient combustion system. This system maximizes fuel utilization, ensuring that propane is burned effectively, which not only provides efficient heating but also minimizes emissions. As a result, users can enjoy outdoor gatherings without worrying about excessive smoke or pollutants.

In terms of mobility, the Coleman 9230-110 is designed with convenience in mind. Its lightweight and compact design allow for easy transport, whether it be to a campsite, a tailgate party, or a backyard gathering. The optional wheeled cart adds an extra layer of mobility, enabling users to easily relocate the heater as needed.

Overall, the Coleman 9230-110 stands out as a reliable propane heater that combines efficiency, safety, and portability. Its user-friendly features and durable design make it suitable for a wide range of outdoor activities, ensuring warmth and comfort in any setting. Whether for camping trips, outdoor parties, or just enjoying the patio during cooler months, the Coleman 9230-110 is a dependable choice for all heating needs.