3 Raise Tent
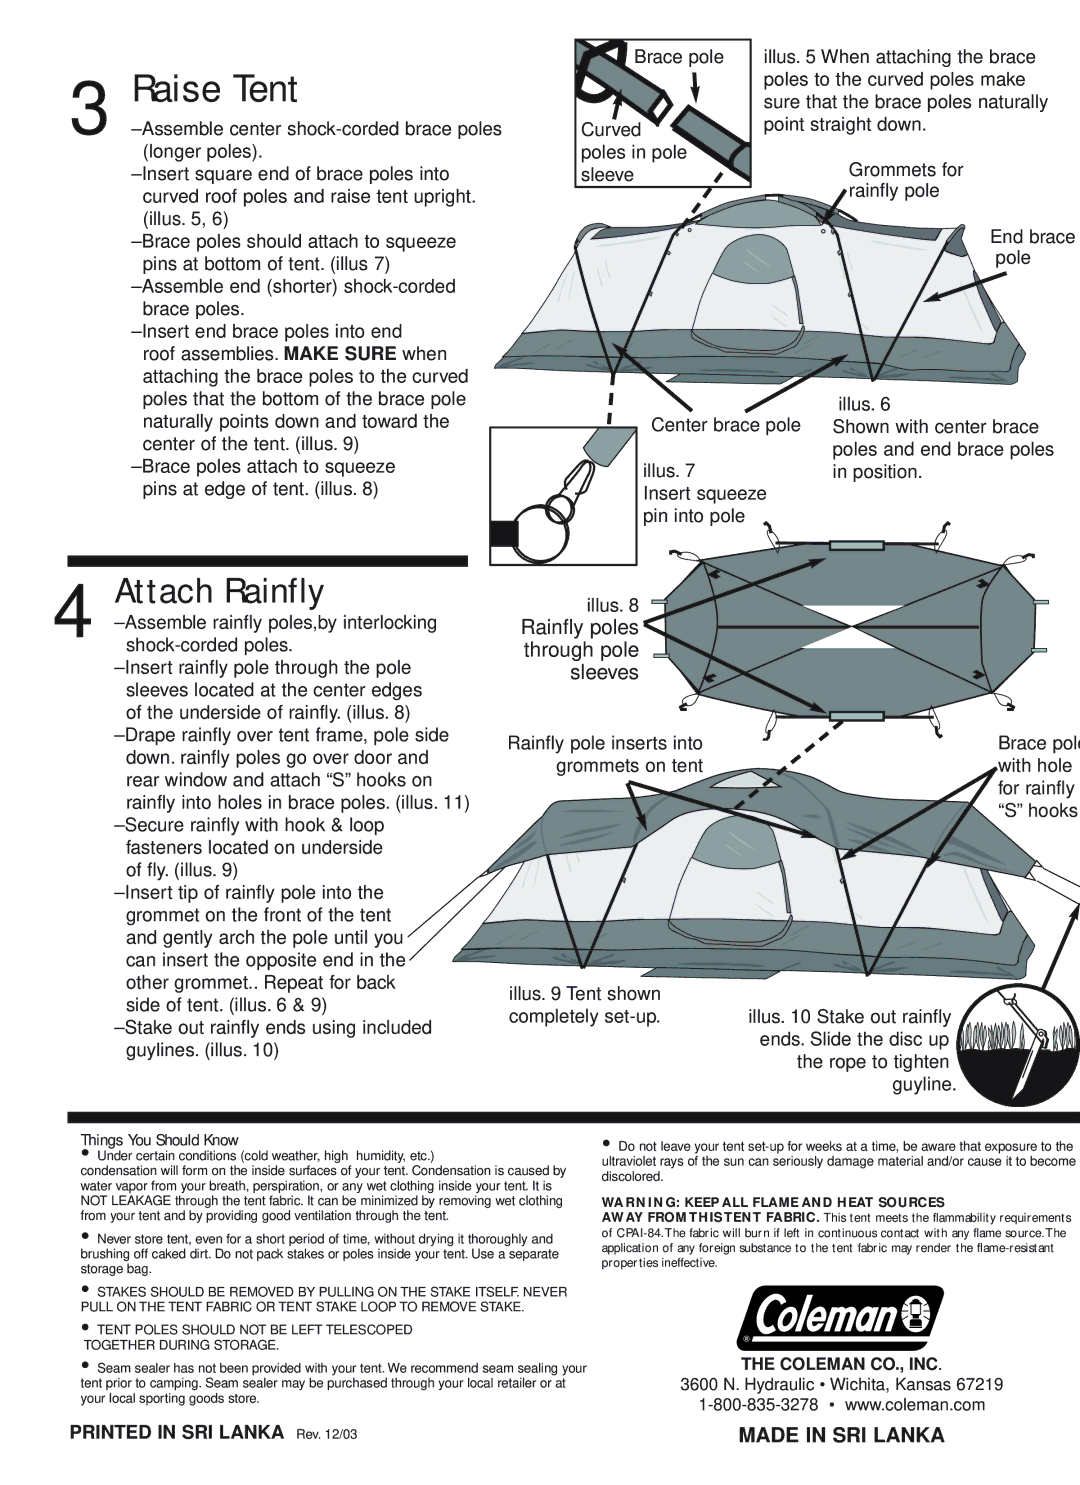
Brace pole |
Curved |
poles in pole |
sleeve |
illus. 5 When attaching the brace poles to the curved poles make sure that the brace poles naturally point straight down.
Grommets for
![]() rainfly pole
rainfly pole
End brace pole
Center brace pole | illus. 6 | |
Shown with center brace | ||
illus. 7 | poles and end brace poles | |
in position. | ||
Insert squeeze |
|
|
pin into pole |
|
|
|
|
|
|
|
|
4 Attach Rainfly
can insert the opposite end in the other grommet.. Repeat for back
side of tent. (illus. 6 & 9)
illus. 8
Rainfly poles through pole sleeves
Rainfly pole inserts into grommets on tent
illus. 9 Tent shown completely
Brace pole with hole for rainfly “S” hook
illus. 10 Stake out rainfly
ends. Slide the disc up ![]()
![]()
![]()
![]()
![]()
![]()
![]()
![]()
![]()
![]()
![]()
![]()
![]()
![]()
![]() the rope to tighten
the rope to tighten ![]()
guyline.
Things You Should Know
•Under certain conditions (cold weather, high humidity, etc.)
condensation will form on the inside surfaces of your tent. Condensation is caused by water vapor from your breath, perspiration, or any wet clothing inside your tent. It is NOT LEAKAGE through the tent fabric. It can be minimized by removing wet clothing from your tent and by providing good ventilation through the tent.
•Never store tent, even for a short period of time, without drying it thoroughly and brushing off caked dirt. Do not pack stakes or poles inside your tent. Use a separate storage bag.
•STAKES SHOULD BE REMOVED BY PULLING ON THE STAKE ITSELF. NEVER PULL ON THE TENT FABRIC OR TENT STAKE LOOP TO REMOVE STAKE.
•TENT POLES SHOULD NOT BE LEFT TELESCOPED
TOGETHER DURING STORAGE.
•Seam sealer has not been provided with your tent. We recommend seam sealing your tent prior to camping. Seam sealer may be purchased through your local retailer or at your local sporting goods store.
PRINTED IN SRI LANKA Rev. 12/03
•Do not leave your tent
WARNING: KEEP ALL FLAME AND HEAT SOURCES
AWAY FROM THIS TENT FABRIC. This tent meets the flammability requirements of
THE COLEMAN CO., INC.
3600 N. Hydraulic • Wichita, Kansas 67219
MADE IN SRI LANKA