.óptimos resultados logra y alisado el facilita pues tecnología, nueva esta con trabajar placer un Es
.antiadherente material un es también cerámica la que ya limpiar, de fáciles muy son también placas Las .brillante y sedoso suave, cabello el deja y profesionales resultados logra cual lo pareja, forma en calor el distribuyen placas Las .frizz el y estática la eliminar a ayuda y placas las entre fácilmente deslice se cabello el que hace cerámica La .cerámica tecnología en último lo suave, increíblemente cerámica de capa una de cubiertas están alaciadora plancha nueva su de placas Las CERÁMICA TECNOLOGÍA
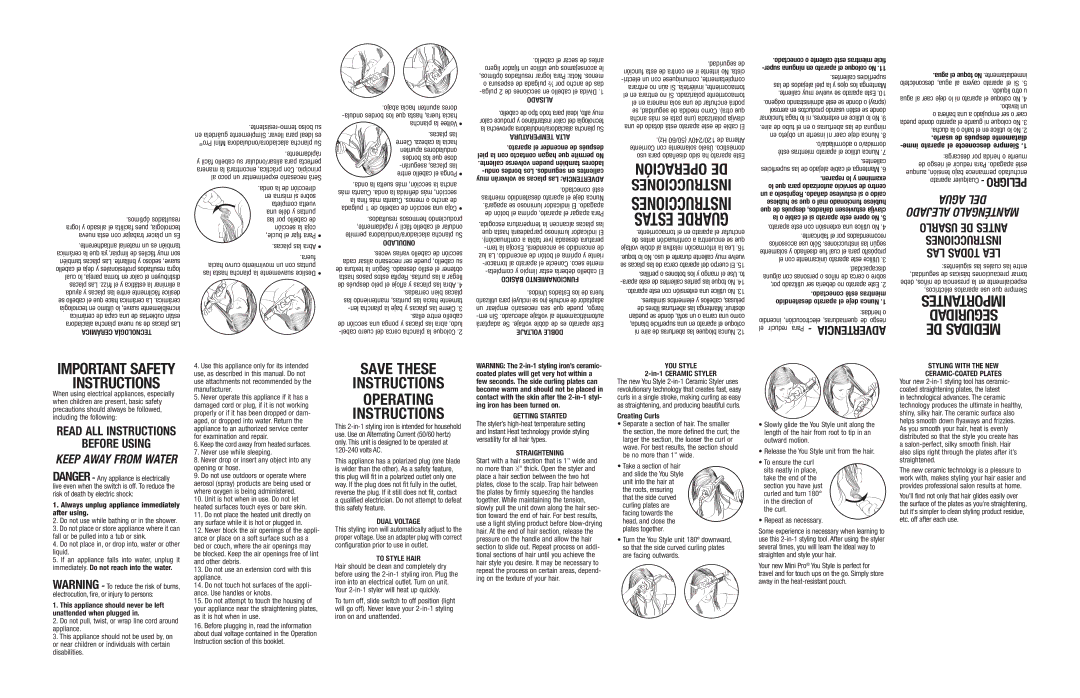
.rápidamente y fácil cabello su alisar/ondular para perfecta manera la encontrará práctica, Con .principio al poco un experimentar necesario Será
.onda la de dirección en misma sí sobre completa vuelta una déle y puntas las por cabello de sección la coja bucle, el fijar Para •
.placas las Abra •
.fuera hacia curvo movimiento un con puntas las hasta plancha la suavemente Deslice •
.abajo hacia apunten dores ![]() plancha la Voltee •
plancha la Voltee • ![]()
![]() .placas las
.placas las ![]()
![]() Cierre .cabeza la hacia
Cierre .cabeza la hacia ![]()
![]() apunten onduladores
apunten onduladores ![]()
![]() bordes los que dose
bordes los que dose ![]()
![]()
![]() entre cabello el Ponga •
entre cabello el Ponga •
.onda la suelta más sección, la ancha más Cuanta .onda la definida más sección, la fina más Cuanta .menos o ancho de pulgada 1 de cabello de sección una Coja •
.resultados hermosos produciendo rápidamente, y fácil cabello el ondular permite alaciadora/onduladora plancha Su ONDULADO
.veces varias cabello de sección cada alisar necesario ser puede cabello, su de textura la Según .deseado estilo el obtener hasta pasos estos Repita .puntas las a llegar de después pelo el afloje y placas las Abra .4 .cerradas bien placas las manteniendo puntas, las hacia tamente
.cabello el secar de antes ligero fijador un utilice que aconsejamos le óptimos, resultados lograr Para Nota: .menos o espesura de pulgada ½ por ancho de das
.cabello de tipo todo para ideal alto, muy calor produce y instantáneo calor del tecnología la aprovecha alaciadora/onduladora plancha Su TEMPERATURA ALTA
.aparato el encender de después piel la con contacto hagan que permite No .caliente volverse pueden también ladores
.conectado esté mientras desatendido aparato el deje Nunca .apagará se luminoso indicador El .apagado de botón el oprima aparato, el apagar Para
.escogida temperatura la alcancen placas las que hasta parpadeará luminoso indicador El .continuación) a tabla (ver deseada peratura
.Unidos Estados los de fuera utilizarlo para incluye) se (no enchufe de adaptador un emplear necesario sea que puede bargo,
.seguridad de función esta de contra en ir intente No .cista
.Hz) (50/60 120/240V de Alterna Corriente con solamente Úselo .doméstico uso para diseñado sido ha aparato Este
OPERACIÓN DE INSTRUCCIONES
INSTRUCCIONES ESTAS GUARDE .tomacorriente el en aparato el enchufar de antes continuación a encuentra se que voltaje doble al relativa información la Lea .16
.toque lo No .uso el durante caliente muy vuelve se placas las de cerca aparato del cuerpo El .15
.perillas o botones los y mango el Use .to
.aparato este con extensión una utilice No .13
.similares elementos y cabellos pelusas, de libres aberturas las Mantenga .obstruir puedan se donde sofá, un o cama una como blanda, superficie una en aparato el coloque ni aire de aberturas las bloquee Nunca .12
.conectado o caliente esté mientras ficie | ||
| ||
|
| .calientes superficies |
las de alejados piel la y ojos los Mantenga | ||
.caliente muy vuelve se aparato Este .10 | ||
.oxígeno administrando esté se donde o (spray) | ||
aerosol en productos usando estén se donde | ||
funcionar haga lo ni exteriores, en utilice lo No .9 | ||
.aire de tubo el en o aberturas las de ninguna | ||
en objeto un inserte ni caer deje Nunca .8 | ||
|
| .adormilada/o o dormida/o |
esté mientras aparato el utilice Nunca .7 | ||
|
| .calientes |
superficies las de alejado cable el Mantenga .6 | ||
|
| .reparen lo y examinen |
lo que para autorizado servicio de centro | ||
un a Regréselo .dañado estuviese si o caído | ||
hubiese se que o mal funcionado hubiese | ||
que de después dañados, estuviesen clavija | ||
la o cable el si aparato este opere No .5 | ||
.aparato este con extensión una utilice No .4 | ||
.fabricante el por recomendados | ||
accesorios use Sólo .instrucciones las según | ||
solamente y diseñado fue cual el para propósito | ||
el con únicamente aparato este Utilice .3 | ||
|
| .discapacidad |
alguna con personas o niños de cerca o sobre | ||
por, utilizado ser debería no aparato Este .2 | ||
| .conectado esté mientras | |
desatendido aparato el deje Nunca .1 | ||
|
| heridas: o |
incendio electrocución, quemaduras, de riesgo | ||
el reducir Para | - | ADVERTENCIA |
| ||
.agua el toque No .inmediatamente desconéctelo agua, al cayera aparato el Si .5 .líquido otro u agua al caer deje lo ni aparato el coloque No .4 .lavabo un o bañera una a empujado ser o caer pueda donde aparato el guarde ni coloque No .3 .ducha la o baño el en utilice lo No .2 .usarlo de después diatamente
descarga: por herida o muerte de riesgo el reducir Para .apagado esté aunque tensión, bajo permanece enchufado aparato Cualquier - PELIGRO
AGUA DEL ALEJADO MANTÉNGALO
USARLO DE ANTES
INSTRUCCIONES
LAS TODAS LEA
siguientes: las cuales las entre seguridad, de básicas precauciones tomar debe niños, de presencia la en especialmente eléctricos, aparatos use que Siempre IMPORTANTES SEGURIDAD DE MEDIDAS
IMPORTANT SAFETY
INSTRUCTIONS
When using electrical appliances, especially when children are present, basic safety precautions should always be followed, including the following:
READ ALL INSTRUCTIONS
BEFORE USING
KEEP AWAY FROM WATER
DANGER - Any appliance is electrically live even when the switch is off. To reduce the risk of death by electric shock:
1.Always unplug appliance immediately after using.
2.Do not use while bathing or in the shower.
3.Do not place or store appliance where it can fall or be pulled into a tub or sink.
4.Do not place in, or drop into, water or other liquid.
5.If an appliance falls into water, unplug it immediately. Do not reach into the water.
WARNING - To reduce the risk of burns, electrocution, fire, or injury to persons:
1.This appliance should never be left unattended when plugged in.
2.Do not pull, twist, or wrap line cord around appliance.
3.This appliance should not be used by, on or near children or individuals with certain disabilities.
4.Use this appliance only for its intended use, as described in this manual. Do not use attachments not recommended by the manufacturer.
5.Never operate this appliance if it has a damaged cord or plug, if it is not working properly or if it has been dropped or dam- aged, or dropped into water. Return the appliance to an authorized service center for examination and repair.
6.Keep the cord away from heated surfaces.
7.Never use while sleeping.
8.Never drop or insert any object into any opening or hose.
9.Do not use outdoors or operate where aerosol (spray) products are being used or where oxygen is being administered.
10.Unit is hot when in use. Do not let heated surfaces touch eyes or bare skin.
11.Do not place the heated unit directly on any surface while it is hot or plugged in.
12.Never block the air openings of the appli- ance or place on a soft surface such as a bed or couch, where the air openings may be blocked. Keep the air openings free of lint and other debris.
13.Do not use an extension cord with this appliance.
14.Do not touch hot surfaces of the appli- ance. Use handles or knobs.
15.Do not attempt to touch the housing of your appliance near the straightening plates, as it is hot when in use.
16.Before plugging in, read the information about dual voltage contained in the Operation Instruction section of this booklet.
SAVE THESE
INSTRUCTIONS
OPERATING
INSTRUCTIONS
This
This appliance has a polarized plug (one blade is wider than the other). As a safety feature, this plug will fit in a polarized outlet only one way. If the plug does not fit fully in the outlet, reverse the plug. If it still does not fit, contact a qualified electrician. Do not attempt to defeat this safety feature.
DUAL VOLTAGE
This styling iron will automatically adjust to the proper voltage. Use an adapter plug with correct confi guration prior to use in outlet.
TO STYLE HAIR
Hair should be clean and completely dry before using the
To turn off, slide switch to off position (light will go off). Never leave your
WARNING: The
GETTING STARTED
The styler’s
STRAIGHTENING
Start with a hair section that is 1" wide and no more than 1⁄2" thick. Open the styler and place a hair section between the two hot plates, close to the scalp. Trap hair between the plates by firmly squeezing the handles together. While maintaining the tension, slowly pull the unit down along the hair sec- tion toward the end of hair. For best results, use a light styling product before
YOU STYLE
2-in-1 CERAMIC STYLER
The new You Style
Creating Curls
•Separate a section of hair. The smaller the section, the more defined the curl; the larger the section, the looser the curl or wave. For best results, the section should be no more than 1" wide.
•Take a section of hair
and slide the You Style unit into the hair at the roots, ensuring that the side curved curling plates are facing towards the head, and close the plates together.
•Turn the You Style unit 180º downward, so that the side curved curling plates are facing outwards.
•Slowly glide the You Style unit along the length of the hair from root to tip in an outward motion.
•Release the You Style unit from the hair.
•To ensure the curl
sits neatly in place, take the end of the
section you have just
curled and turn 180°
in the direction of the curl.
• Repeat as necessary.
Some experience is necessary when learning to use this
Your new Mini Pro® You Style is perfect for travel and for touch ups on the go. Simply store away in the
STYLING WITH THE NEW
The new ceramic technology is a pleasure to work with, makes styling your hair easier and provides professional salon results at home.
You’ll find not only that hair glides easily over the surface of the plates as you’re straightening, but it's simpler to clean styling product residue, etc. off after each use.