| enparedla | para.ventiladorel |
|
apoyo de brazo el montar para destornillador un Use 7: Paso |
|
| |
| ganchoslos | lborde | alarejill quecolocó.primero |
con asegurándola que solo trasera la colocó que en manera |
|
| |
misma la de colocándola frontal rejilla la Monte | 6: Paso |
|
|
.correcta manera la de girar puedan no que hará esto |
|
| |
que ya perilla la toquen nunca cuchillas las que de asegúrese |
|
| |
mano, su con girar haciéndolo ventilador el Pruebe | 5: Paso |
|
|
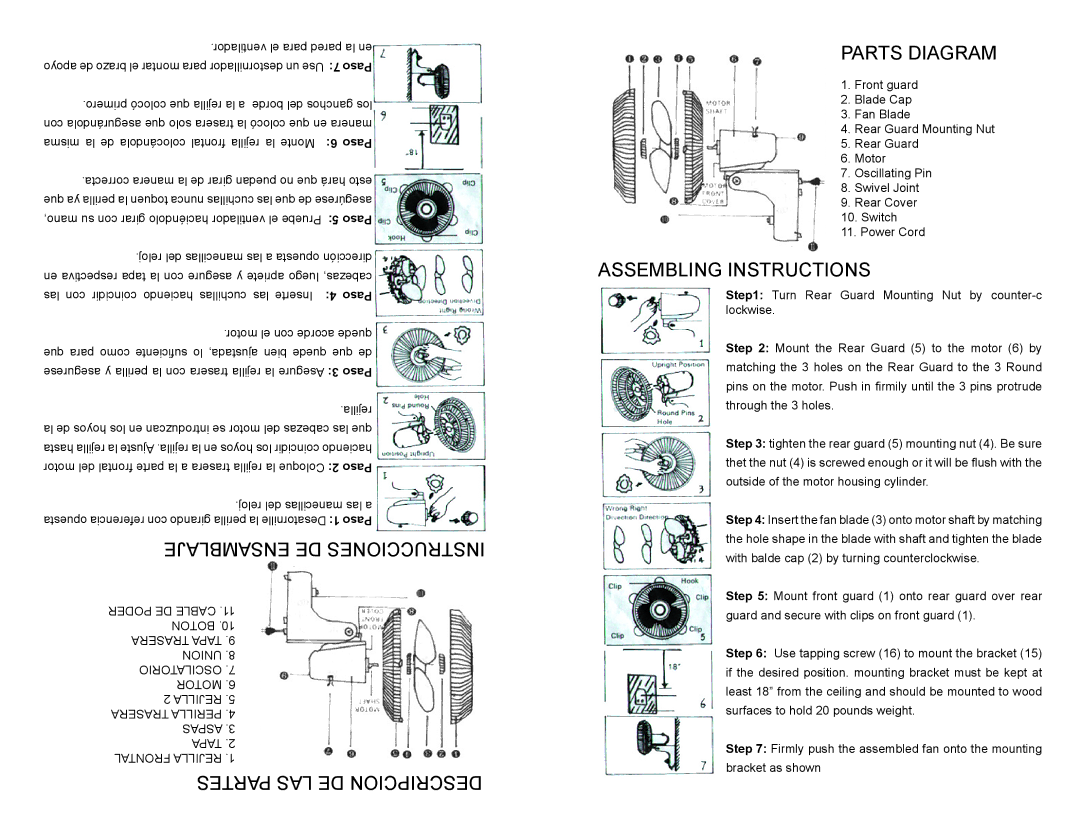
PARTS DIAGRAM
1.Front guard
2.Blade Cap
3.Fan Blade
4.Rear Guard Mounting Nut
5.Rear Guard
6.Motor
7.Oscillating Pin
8.Swivel Joint
9.Rear Cover
10.Switch
11.Power Cord
dirección | opuesta manecillas |
en respectiva tapa la con asegure y apriete luego cabezas, |
|
del.reloj | ASSEMBLING INSTRUCTIONS |
|
las con coincidir haciendo cuchillas las Inserte | 4: Paso |
|
.motor el con acorde quede |
| |
que para como suficiente lo ajustada, bien quede que de |
| |
asegurese y perilla la con trasera rejilla la Asegure 3: Paso |
| |
| .rejilla |
|
la de hoyos los en introduzcan se motor del cabezas las que |
| |
hasta rejilla la Ajuste .rejilla la en hoyos los coincidir haciendo |
| |
motor del frontal parte la a trasera rejilla la Coloque 2: Paso |
| |
| manecillas | del.reloj |
opuesta referencia con girando perilla la Desatornille 1: Paso |
| |
| INSTRUCCIONES | |
ENSAMBLAJEDE
Step1: Turn Rear Guard Mounting Nut by
Step 2: Mount the Rear Guard (5) to the motor (6) by matching the 3 holes on the Rear Guard to the 3 Round pins on the motor. Push in firmily until the 3 pins protrude through the 3 holes.
Step 3: tighten the rear guard (5) mounting nut (4). Be sure thet the nut (4) is screwed enough or it will be flush with the outside of the motor housing cylinder.
Step 4: Insert the fan blade (3) onto motor shaft by matching the hole shape in the blade with shaft and tighten the blade with balde cap (2) by turning counterclockwise.
PODER DE CABLE .11 BOTON .10 TRASERA TAPA .9 UNION .8 OSCILATORIO .7 MOTOR .6
2REJILLA.5
TRASERA PERILLA .4 ASPAS .3 TAPA .2
FRONTAL REJILLA.1
Step 5: Mount front guard (1) onto rear guard over rear guard and secure with clips on front guard (1).
Step 6: Use tapping screw (16) to mount the bracket (15) if the desired position. mounting bracket must be kept at least 18” from the ceiling and should be mounted to wood surfaces to hold 20 pounds weight.
Step 7: Firmly push the assembled fan onto the mounting bracket as shown