8 Figura
quede que asegurar para anillo del tire mente
pressure indicating valve remains in its raised position, there may still be pressure inside the pressure cooker. Continue to cool until the pressure indicating valve drops. After
pressure has been completely reduced, re- move the pressure limiting valve and open cover. Always remove the pressure limit- ing valve before opening the cover.
7 Figura
| reloj |
|
|
| |
del agujas las a |
|
|
| ||
contrario sentido |
|
|
| ||
el en girando |
|
|
| ||
tapa la Abra |
|
|
| ||
|
|
|
|
|
|
| madera) |
| 6 Figura | ||
|
|
| |||
de | palito un con |
|
|
| |
| ligeramente |
|
|
| |
presiónela baja, |
|
|
| ||
no (Si .bajado |
|
|
| ||
ha presión de |
|
|
| ||
indicadora válvula |
|
|
| ||
La .escape de |
|
|
| ||
tubo del vapor |
|
|
| ||
| sale no Ya |
|
|
| |
|
|
|
| ||
|
| 5 Figura |
| ||
.8 Figura la en muestra se como reloj del agujas las de sentido el en girando colocarlo a Vuelva .lávelo y Retírelo .60º de posición una hasta reloj del agujas las a contrario sentido el en bloqueo de protector el Gire .uso cada de después bloqueo de protector el lavarse debe olla, la de higiene la como así libre bloqueo de protector del agujero el mantener de fin el Con bloqueo: de protector del Mantenimiento 9)
.7 y 6 Figuras las en muestra se como tapa la abra Luego .mente
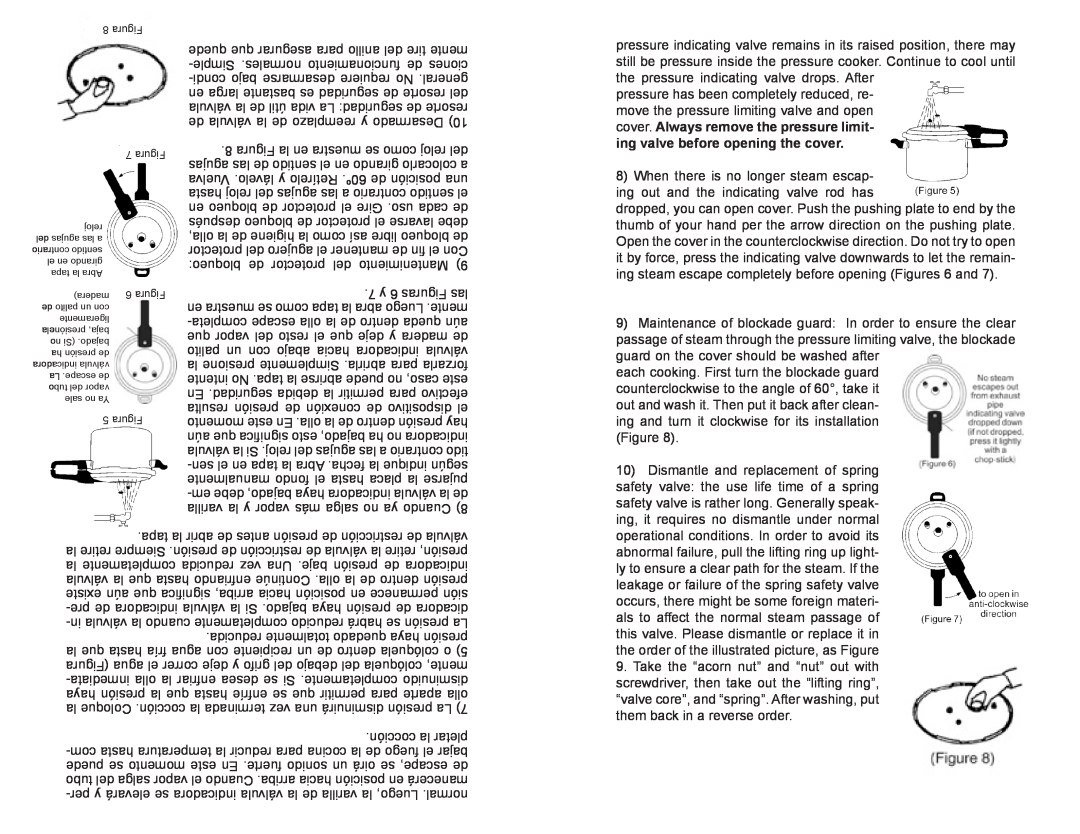
8)When there is no longer steam escap- ing out and the indicating valve rod has
dropped, you can open cover. Push the pushing plate to end by the thumb of your hand per the arrow direction on the pushing plate.
Open the cover in the counterclockwise direction. Do not try to open it by force, press the indicating valve downwards to let the remain- ing steam escape completely before opening (Figures 6 and 7).
9)Maintenance of blockade guard: In order to ensure the clear passage of steam through the pressure limiting valve, the blockade guard on the cover should be washed after
each cooking. First turn the blockade guard counterclockwise to the angle of 60°, take it out and wash it. Then put it back after clean- ing and turn it clockwise for its installation
(Figure 8).
10)Dismantle and replacement of spring
safety valve: the use life time of a spring safety valve is rather long. Generally speak- ing, it requires no dismantle under normal
.tapa la abrir de antes presión de restricción de válvula la retire Siempre .presión de restricción de válvula la retire presión, la completamente reducida vez Una .baje presión de indicadora válvula la que hasta enfriando Continúe .olla la de dentro presión existe aún que significa arriba, hacia posición en permanece sión
.cocción la pletar
operational conditions. In order to avoid its abnormal failure, pull the lifting ring up light- ly to ensure a clear path for the steam. If the leakage or failure of the spring safety valve occurs, there might be some foreign materi- als to affect the normal steam passage of this valve. Please dismantle or replace it in the order of the illustrated picture, as Figure
9.Take the “acorn nut” and “nut” out with screwdriver, then take out the “lifting ring”, “valve core”, and “spring”. After washing, put them back in a reverse order.
