Installation Instructions
Sheet 1 of 2
Vault |
Large, OUTDOOR
YR (16.5")
(Yoke mount, Remote ballast)
Visor and Non-Visor
Warning: Before starting any work ensure that all sources of power are turned off. All work must meet local/national codes and be performed by a certified electrician. Do not
These installation instructions are valid with the above Ametrix styles.
mount fixtures vertically.
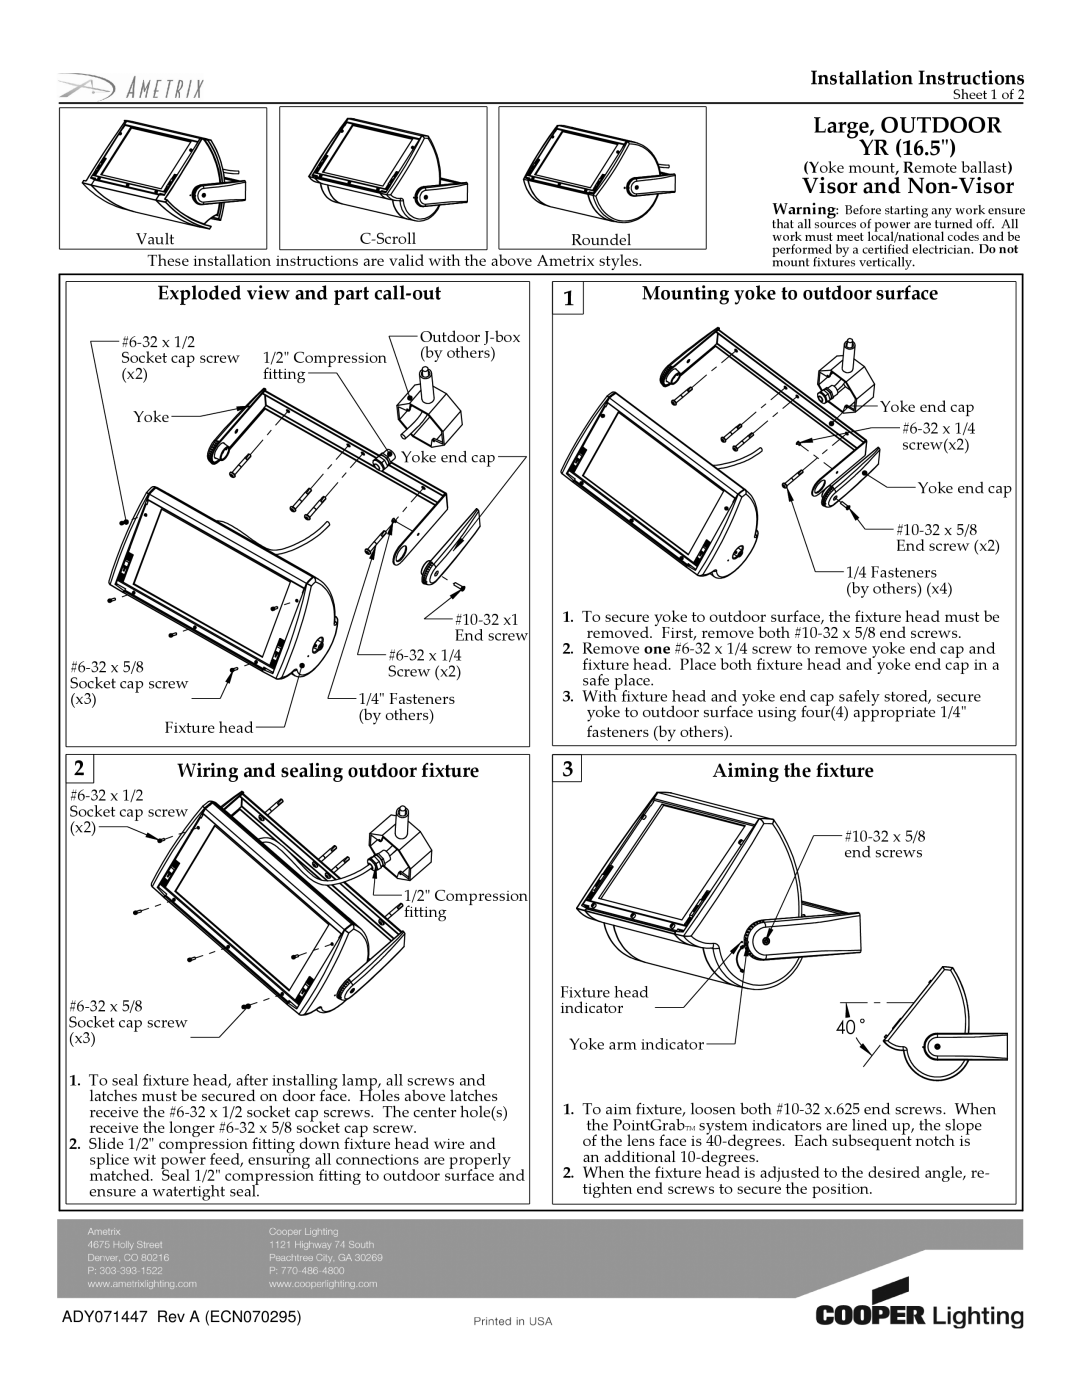
Exploded view and part call-out
| Outdoor | ||
| (by others) | ||
Socket cap screw | 1/2" Compression | ||
| |||
(x2) | fitting |
| |
Yoke |
|
| |
|
| Yoke end cap |
Screw (x2) | ||
Socket cap screw | ||
|
(x3) |
|
|
|
|
|
| 1/4" Fasteners |
|
|
|
|
| |||
| Fixture head |
|
|
| (by others) | ||
|
|
|
|
| |||
|
| ||||||
1Mounting yoke to outdoor surface
![]()
![]()
![]()
![]() Yoke end cap
Yoke end cap
![]()
![]() screw(x2)
screw(x2)
![]() Yoke end cap
Yoke end cap
![]()
End screw (x2)
1/4 Fasteners (by others) (x4)
1.To secure yoke to outdoor surface, the fixture head must be removed. First, remove both
2.Remove one
3.With fixture head and yoke end cap safely stored, secure yoke to outdoor surface using four(4) appropriate 1/4" fasteners (by others).
2Wiring and sealing outdoor fixture
![]() Socket cap screw
Socket cap screw ![]()
![]()
![]() (x2)
(x2) ![]()
![]()
![]() 1/2" Compression
1/2" Compression ![]()
![]() fitting
fitting
#6-32 x 5/8 Socket cap screw (x3)
1.To seal fixture head, after installing lamp, all screws and latches must be secured on door face. Holes above latches receive the
2.Slide 1/2" compression fitting down fixture head wire and splice wit power feed, ensuring all connections are properly matched. Seal 1/2" compression fitting to outdoor surface and ensure a watertight seal.
3Aiming the fixture
Fixture head indicator
40![]()
Yoke arm indicator
1.To aim fixture, loosen both
2.When the fixture head is adjusted to the desired angle, re- tighten end screws to secure the position.
ADY071447 Rev A (ECN070295)