INSTALLATION INSTRUCTIONSV90168A

QUIET CEILING REMODEL W/ROUND TRIM Model: QCM504RM with QCM5001-5004 C UR L US

Avoid Fire or Electric Shock

*Installation Instructionsfor qualified electriciansonly. *Install per National Electrical Code and localregulations. *Read Installation Instructions completely before installation. *Failure tofollow Installation Instructions may void warranties.

THIS PRODUCT MUST BE INSTALLED IN

ACCORDANCE WITH THE APPLICABLE

INSTALLATION CODE BY A PERSON FAMILIAR

WITH THE CONSTRUCTION AND OPERATION OF

THE PRODUCT AND THE HAZARDS INVOLVED.

Pre-Installation Preparation

1.Check for Above Ceiling Clearanceof 5-1/2".See Fig.1.

2.Make 7-1/4" diameter Cutout in Ceiling. See Fig.1.

Above Ceiling Clearance

Fixture

5-1/2"


Ceiling

7-1/4" Cutout

Figure 1

Electrical Connection

1.Turn OFF Electrical Service.

2.All appropriate electrical"ro ugh" wiring should be completed.

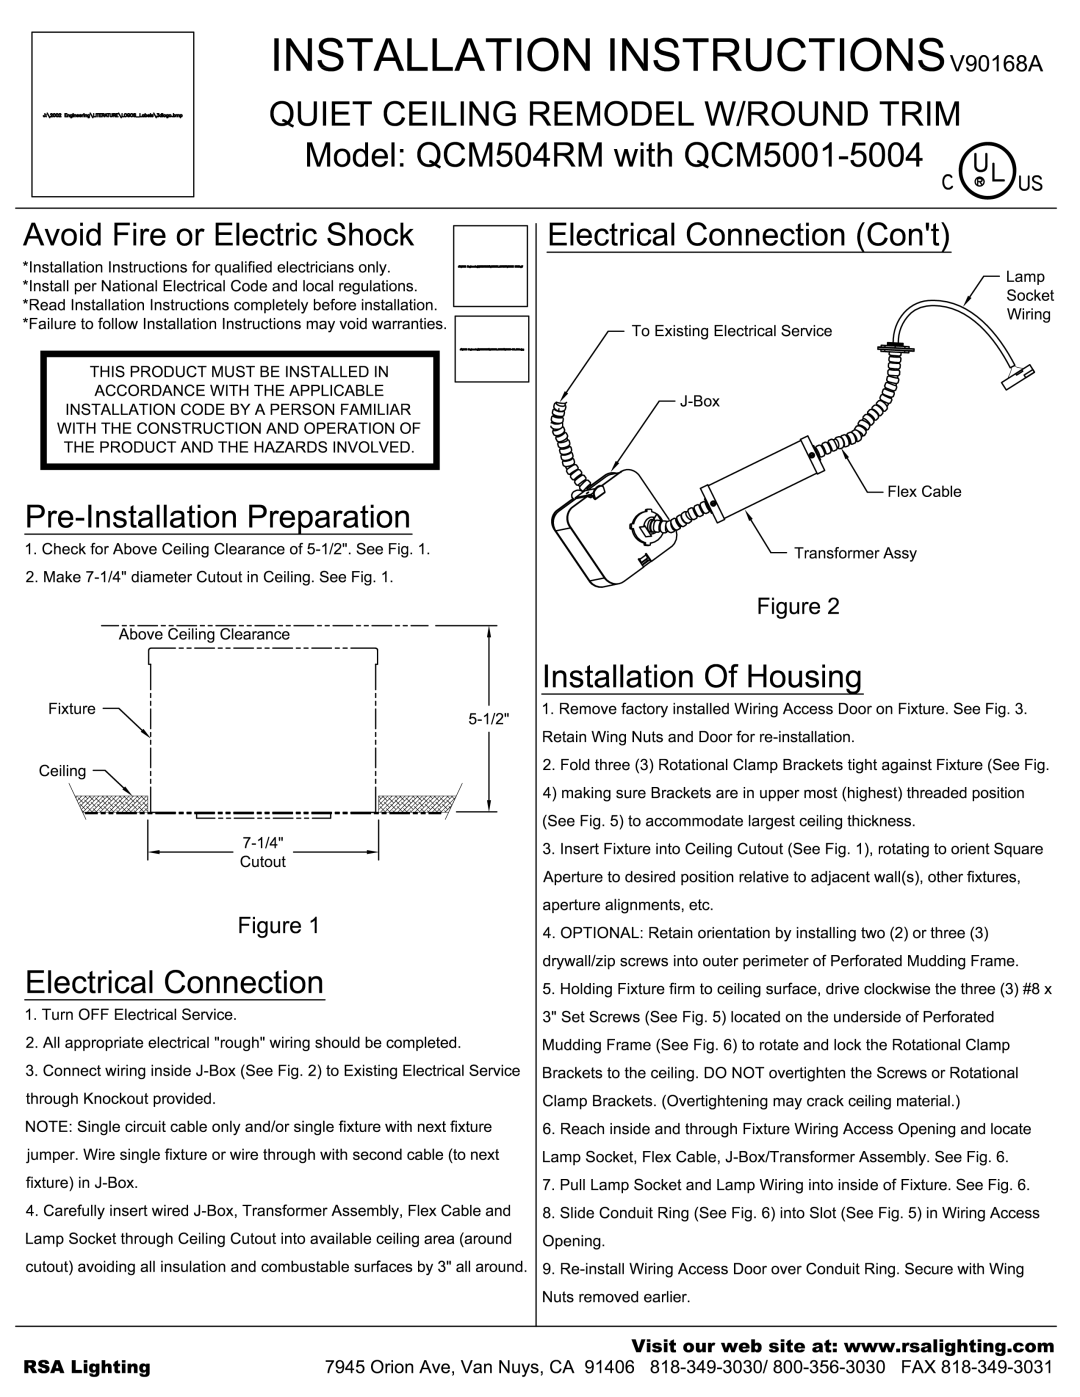
3.Connect wiring inside J-Box (See Fig. 2)to Existing ElectricalService through Knockout provided.

NOTE: Single circuit cable only and/or single fixture with nextfixture jumper. Wire singlefixtureor wirethrough with secondcable(tonext fixture) in J-Box.

4.Carefully insert wired J-Box, Transformer Assembly, Flex Cableand Lamp Socket through Ceiling Cutout into available ceiling area(around cutout) avoiding all insulation and combustable surfaces by 3"all around.

Electrical Connection (Con't)

Lamp

Socket

Wiring

To Existing Electrical Service

J-Box

Flex Cable

Transformer Assy

Figure 2

Installation Of Housing

1.Remove factory installed Wiring Access Dooron Fixture.See Fig.3. Retain Wing Nuts and Door forre-installation.

2.Fold three (3) Rotational Clamp Bracketstight against Fixture(See Fig.

4)making sure Brackets are in uppermost(highest)threaded position

(See Fig. 5) to accommodate largest ceilingthickness.

3.Insert Fixture into Ceiling Cutout (See Fig. 1), rotatingtoorientSquare Apertureto desired positionrelativeto adjacent wall(s),otherfixtures, aperture alignments, etc.

4.OPTIONAL: Retain orientation by installingtwo (2)orthree(3)

drywall/zip screws into outer perimeterof PerforatedMudding Frame.

5. Holding Fixture firmto ceiling surface, drive clockwisethethree(3)#8x 3" Set Screws (See Fig. 5) located on the undersideof Perforated Mudding Frame (See Fig. 6)to rotate and lockthe Rotational Clamp Brackets to the ceiling. DO NOT overtightenthe Screwsor Rotational Clamp Brackets. (Overtightening may crack ceilingmaterial.)

6.Reach inside and through Fixture Wiring Access Opening and locate Lamp Socket, Flex Cable, J-Box/Transformer Assembly.See Fig. 6.

7.Pull Lamp Socket and Lamp Wiring into inside of Fixture.See Fig. 6.

8.Slide Conduit Ring (See Fig. 6) into Slot (See Fig. 5) in Wiring Access Opening.

9.Re-install Wiring Access Doorover Conduit Ring. Secure with Wing

Nuts removed earlier.

Visit our web site at: www.rsalighting.com

RSA L


ght

ing

7945 Orion Ave, Van Nuys, CA 91406 818-349-3030/ 800-356-3030 FAX 818-349-3031

i


Page 1
Image 1
Cooper Lighting QCM5002, QCM5004 installation instructions Stallation in Struction SV90168A, Elec tri cal Connec tion

QCM5003, QCM504RM, QCM5001, QCM5002, QCM5004 specifications

Cooper Lighting, a leader in innovative lighting solutions, offers a range of cutting-edge products designed to meet various commercial and industrial needs. Among their prominent offerings are the QCM5004, QCM5002, QCM5001, QCM504RM, and QCM5003 models, each equipped with distinct features and technologies that enhance functionality and energy efficiency.

The QCM5004 model is renowned for its advanced optical design, delivering superior illumination while maintaining energy efficiency. Its robust construction ensures durability, making it suitable for various indoor applications, including warehouses and distribution centers. This model incorporates a high-performance LED light source that provides exceptional brightness with a low energy footprint, contributing to reduced operational costs.

Similarly, the QCM5002 excels in providing versatile lighting solutions, particularly in retail and commercial spaces. It features multiple mounting options and a sleek profile, allowing seamless integration into diverse environments. The QCM5002 is equipped with smart technology, enabling users to customize light intensity and color temperature according to specific needs, thereby improving the overall aesthetic and functionality of the space.

The QCM5001 model is designed with user-friendliness in mind. Its intuitive controls allow for easy installation and operation, making it a preferred choice for facility managers. This model is also compatible with advanced smart lighting systems, allowing for remote management and monitoring, which enhances ease of use and efficiency.

For those seeking a durable and efficient solution, the QCM504RM stands out. This model features a rugged design built to withstand harsh environments, making it ideal for outdoor applications. It benefits from high ingress protection ratings, ensuring reliable operation even in challenging conditions. Its robust LED technology provides long-lasting performance, significantly reducing maintenance needs.

Lastly, the QCM5003 model offers a balance of performance and elegance. It is designed specifically for architectural lighting, providing uniform light distribution and a modern aesthetic. The QCM5003 utilizes advanced thermal management technologies, ensuring longevity and consistent lighting performance over time.

Overall, the Cooper Lighting QCM series represents a commitment to innovative lighting solutions, merging technology and design for optimal performance across diverse applications. Each model's unique features cater to specific needs, delivering energy-efficient and reliable lighting for a brighter future.