INSTALLATION INSTRUCTIONS V90181
STEALTH GRAZE
FIXTURE MOUNTING
UR L
C US
Avoid Fire or Electric Shock
*Installation Instructions for qualified electricians only. *Install per National Electrical Code and local regulations. *Read Installation Instructions completely before installation. *Failure to follow Installation Instructions may void warranties.
FIXTURE MOUNTING
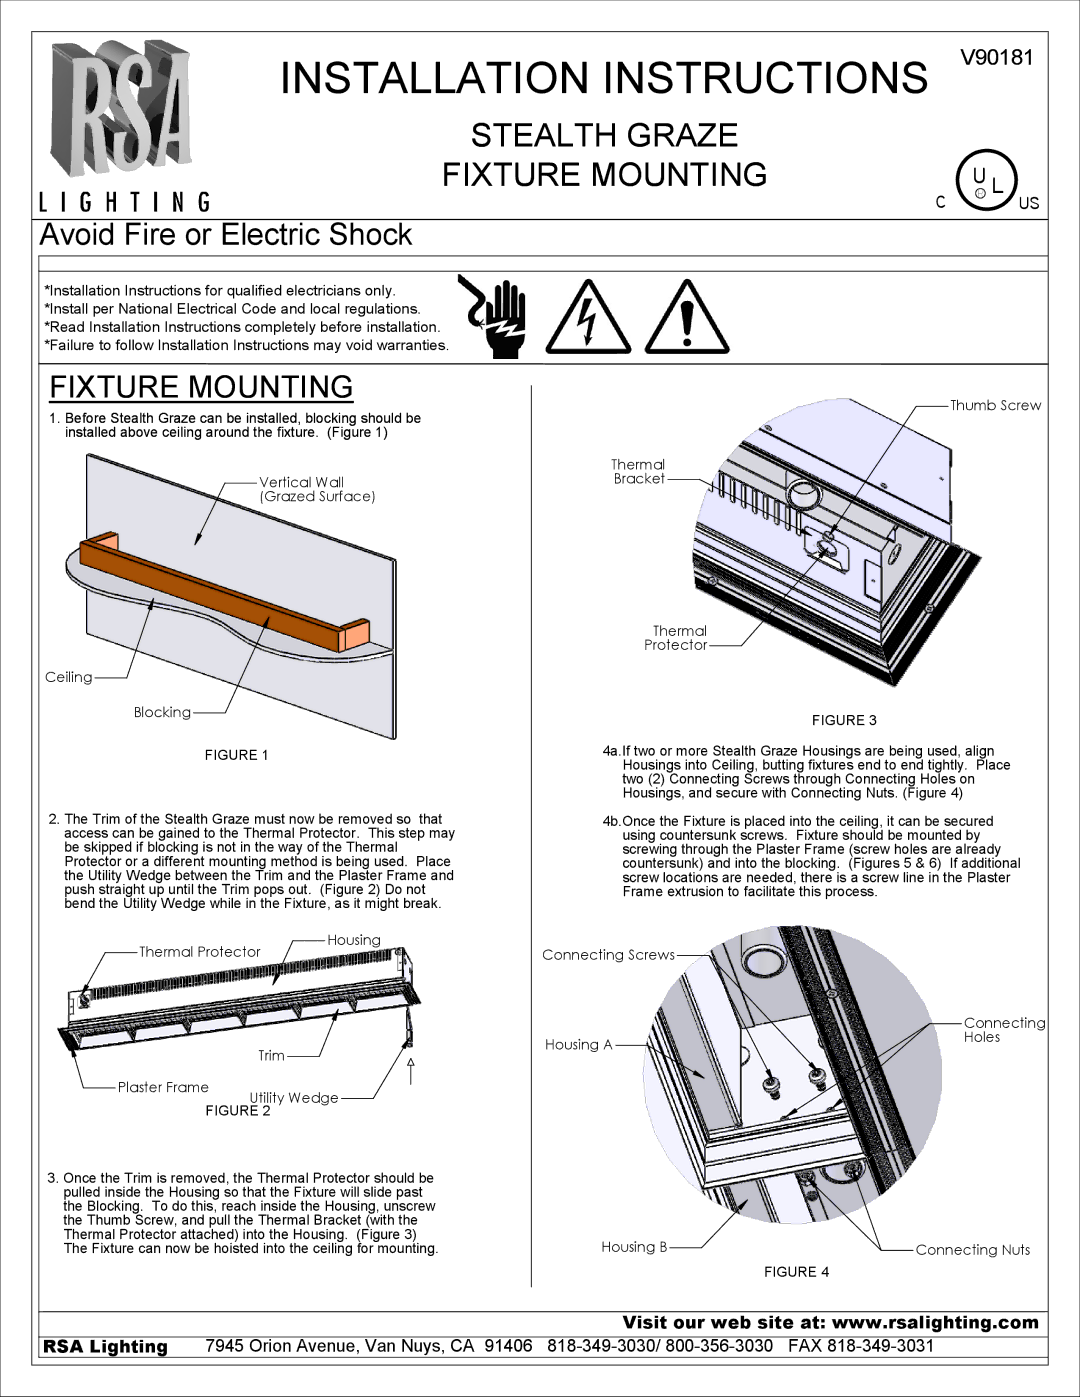
1.Before Stealth Graze can be installed, blocking should be installed above ceiling around the fixture. (Figure 1)
Vertical Wall
(Grazed Surface)
Ceiling
Blocking
FIGURE 1
2.The Trim of the Stealth Graze must now be removed so that access can be gained to the Thermal Protector. This step may be skipped if blocking is not in the way of the Thermal Protector or a different mounting method is being used. Place the Utility Wedge between the Trim and the Plaster Frame and push straight up until the Trim pops out. (Figure 2) Do not bend the Utility Wedge while in the Fixture, as it might break.
Housing
Thermal Protector
Thumb Screw
Thermal
Bracket
Thermal
Protector
FIGURE 3
4a.If two or more Stealth Graze Housings are being used, align Housings into Ceiling, butting fixtures end to end tightly. Place two (2) Connecting Screws through Connecting Holes on Housings, and secure with Connecting Nuts. (Figure 4)
4b.Once the Fixture is placed into the ceiling, it can be secured using countersunk screws. Fixture should be mounted by screwing through the Plaster Frame (screw holes are already countersunk) and into the blocking. (Figures 5 & 6) If additional screw locations are needed, there is a screw line in the Plaster Frame extrusion to facilitate this process.
Connecting Screws
| Connecting |
Housing A | Holes |
|
Plaster Frame
Trim
Utility Wedge
FIGURE 2
3.Once the Trim is removed, the Thermal Protector should be pulled inside the Housing so that the Fixture will slide past the Blocking. To do this, reach inside the Housing, unscrew the Thumb Screw, and pull the Thermal Bracket (with the Thermal Protector attached) into the Housing. (Figure 3) The Fixture can now be hoisted into the ceiling for mounting.
Housing B |
|
|
| Connecting Nuts |
|
| |||
|
FIGURE 4
Visit our web site at: www.rsalighting.com
RSA Lighting 7945 Orion Avenue, Van Nuys, CA 91406