Garage Door Opener
Introduction
Table of Contents
Tools needed
Preparing your garage door
Sectional Door Installation
Sectional Door Installations
Planning
Trolley Stop Bolt Trolley
ONE-PIECE Door Without Track
ONE-PIECE Door Installations
ONE-PIECE Door with Track
Trolley Stop Bolt
Keyless Entry Hanging Brackets Straight Door Arm Section
Carton Inventory
Hardware Inventory
Assembly Hardware
Installation Hardware
Assemble the Rail & Install the Trolley
Assembly Step
Hole on TOPTapered End
Clip Tapered End Rail
Fasten the Rail to the Motor Unit
Install the Idler Pulley
Install the Chain/Cable
Tighten the Chain
Installation
Determine the Header Bracket Location
Installation Step
Ceiling Header Bracket Installation
Install the Header Bracket
Wall Header Bracket Installation
Header Wall Header Bracket Idler Pulley Garage Door
Attach the Rail to the Header Bracket
Header Bracket Mounting Hole Existing Clevis Pin Spacer
Opener Carton or Temporary Support
Sectional Door or ONE-PIECE Door with Track
Position the Opener
Rail Door 2x4 is used to determine
From ceiling
Structural
Hang the Opener
Supports
Bolt 5/16-18x7/8 Nut 5/16-18 Lock Washer 5/16
To release wire, push
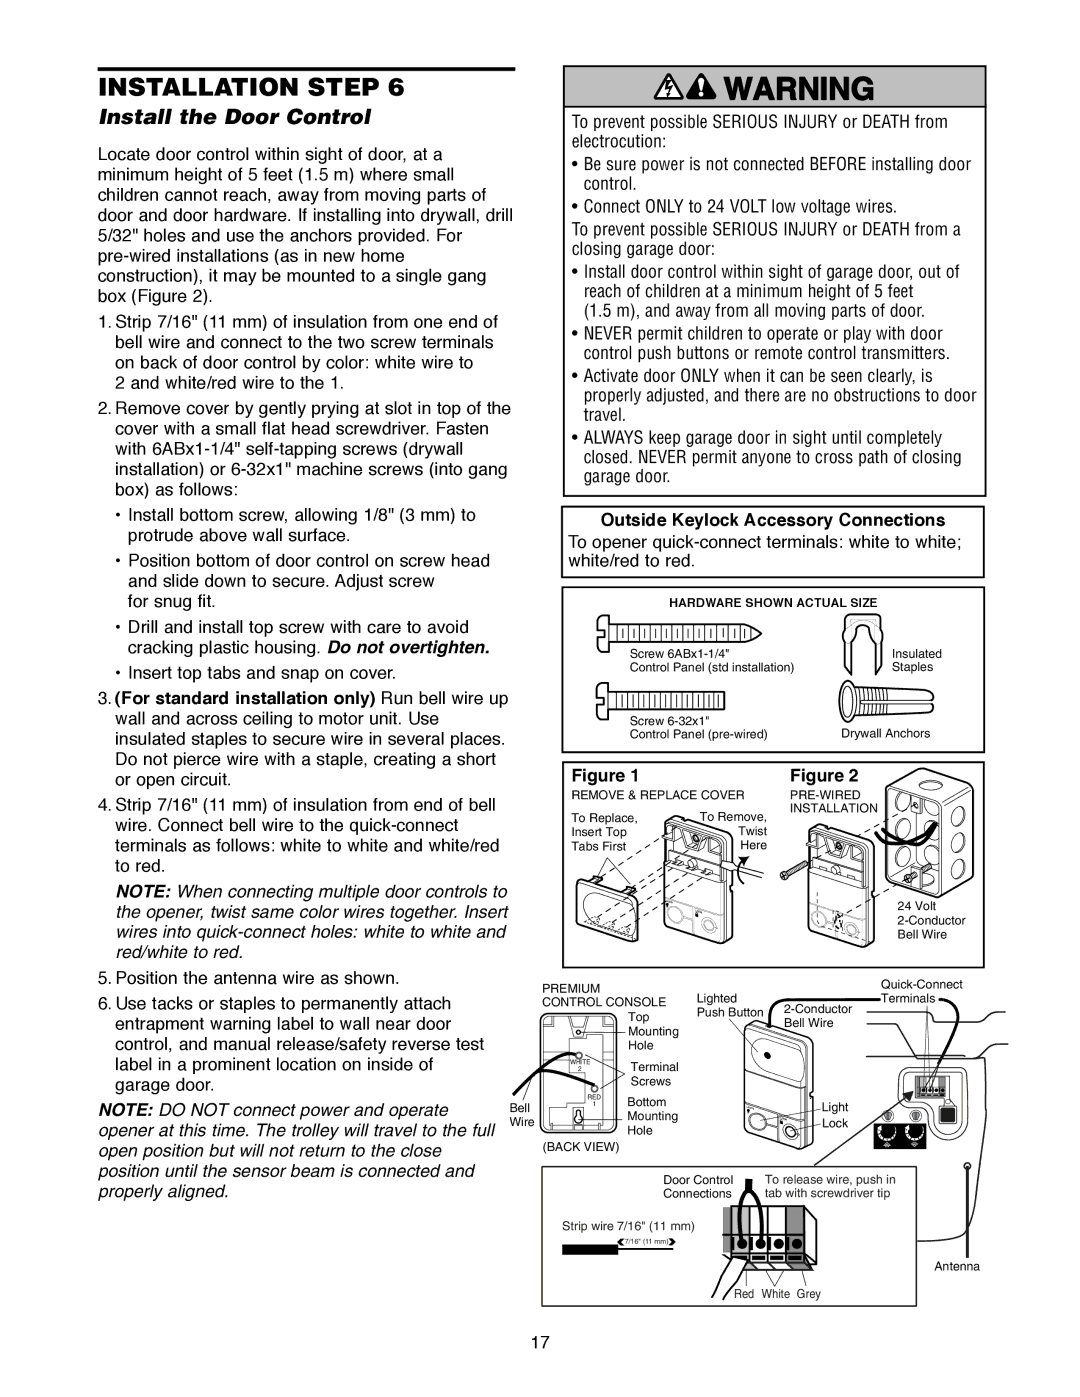
Install the Door Control
Strip wire 7/16 11 mm
Tab with screwdriver tip
Release Tab
Install the Lights
Attach the Emergency Release Rope and Handle
Electrical Requirements
Important Information about Safety Reversing Sensor
Install The Protector System
Sensor Beam Invisible Light Beam Cm max
Protection Area
Garage door track installation preferred
Installing the Brackets
Wall installation
Floor installation Figure
Aligning the Safety Sensors
Mounting and Wiring the Safety Sensors
Troubleshooting the Safety Sensors
Quick-Connect Terminals
Sectional Doors
Fasten the Door Bracket
Header Wall 2x4
ONE-PIECE Doors
Sectional Doors only
Connect Door Arm to Trolley
TrolleyTrolley
Emergency Release DoorHandle Bracket Straight Door Arm
ALL ONE-PIECE Doors
Adjustment procedures, Figure
Assemble the door arm, Figure
Connect the door arm to the trolley
Adjust the UP and Down Travel Limits
Adjustment Step
If door does not open at least 5 feet 1.5 m
If the door does not close completely
HOW and When to Adjust the Forces
Adjust the Force
Test the Down close force
Test the UP open force
Adjust
Test the Safety Reversal System
Important Safety Check
Test The Protector System
Activate your opener with any of the following
Using Your Garage Door Opener
Operation
Lock feature
Light feature
Premium Control Console
Disconnect the Trolley
Once a Month
Care of Your Opener
Twice a Year
Once a Year
My door will not close and the light bulbs blink
Having a PROBLEM?
Symptom Motor unit doesn’t operate
Symptom LED is not lit on door control
Using the Learn Button Using the Premium Control Console
To Add or Reprogram a Hand-held Remote Control
Programming
To Erase All Codes From Motor Unit Memory
To set a temporary PIN
To Add, Reprogram or Change a Keyless Entry PIN
To change an existing, known PIN
Rail Assembly Parts
Repair Parts
KEY Part Description
Not Shown
Bracket, bearing assembly, RPM Sensor
Motor Unit Assembly Parts
Complete with Spring washer
Complete with Motor, worm
Warranty
Accessories
Parts & Service
Sears Warranty
Get it fixed, at your home or ours
Le vérifier et le régler périodiquement
Pour un bon fonctionnement en toute
Sécurité de cet ouvre-porte de garage
Revue des symboles de sécurité et des mots de signalement
Accessoires Garantie Pièces de réparation et service
Introduction
Montage
Outils nécessaires
Préparation de votre porte de garage
Pour prévenir d’éventuelles Blessures Graves ou
Porte articulée Porte rigide
Pose DE Porte Articulée
Planification
Pose DE Portes Articulées
Pose DE Porte Rigide
Planification Suite
Et le bas de la porte ne doit De porte
Porte de Durgence
Inventaire de la boîte d’emballage
Fixations Pour LA Pose
Inventaire des fixations
Fixations Pour LE Montage
Montage du rail et pose du chariot
Montage 1re Opération
Montage 3e Opération
Montage 2e Opération
Fixation du rail au moteur
Pose de la poulie
Pose de la chaîne et du câble
Montage 4e Opération
Tension de la chaîne
Montage 5e Opération
Pose 1re Opération
Déterminer l’emplacement du support de linteau
Pose du support de linteau
Pose 2e Opération
Pose DU Support DE Linteau AU MUR
Pose DU Support DE Linteau AU Plafond
Fixation du rail sur le support de linteau
Pose 3e Opération
Positionnement de louvre-porte
Pose 4e Opération
Porte Articulée OU Porte Rigide Avec Guides
Porte Rigide Sans Guides
Accrochage de louvre-porte
Pose 5e Opération
Pose 6e Opération
Pose de la commande de porte
Placer le fil de l’antenne comme montré
Raccordements à une serrure à clé extérieure
Pose 8e Opération
Pose 7e Opération
Pose des ampoules
Languette de dégagement
Exigences électriques
Pose 9e Opération
Louvre-porte doit obligatoirement être mis à la terre
Reposer le couvercle
Faisant face à la porte depuis lintérieur du garage
Pose 10e Opération
Pose du Système Protector
Pose DES Supports
Pose aux guides de la porte de garage mode préférable
’assurer que l’ouvre-porte est hors tension
Pose murale et
Dépannage DES Détecteurs Inverseurs DE Sécurité
Montage ET Câblage DES Détecteurs Inverseurs
Alignement DES Détecteurs Inverseurs
Portes Articulées
Pose 11e Opération
Fixation du support de porte
Pour une porte sans cadre exposé
Portes Rigides
De la porte
Porte Articulée Seulement
Pose 12e Opération
Fixation de la biellette au chariot
Assemblage des biellettes, Figure
Pour Toutes LES Portes Rigides
Méthodes de réglage, Figure
De course
Réglage des courses d’ouverture et de fermeture
Réglages 1re Opération
Comment ET Quand Régler LES Courses
Si la porte ne souvre pas dau moins Pieds 1,5 m
Réglage de la force
Réglages 2e Opération
Comment ET Quand Régler LES Forces
Vérification de la force de fermeture Down
Réglages 4e Opération
Réglages 3e Opération
Essai du système d’inversion de sécurité
Essai du Systéme Protector
Actionner l’ouvre-porte suivant l’une des méthodes ci-après
Utilisation de votre ouvre-porte de garage
Ou un 2 x 4 posé à plat sur le sol
Ouverture manuelle de la porte
Utilisation de la commande de porte mural
Fonction déclairage
Fonction de verrouillage
Périodicités D’ENTRETIEN
Réglages DE Course ET DE Force LA Pile DE LA Télécommande
Une fois par mois
Deux fois par année
Le moteur de l’ouvre-porte ronfle brièvement
Mes télécommandes ne font pas fonctionner la porte
’éclairage ne s’éteint pas quand la porte est ouverte
Symptôme Le moteur ne fonctionne pas
Court-circuit de la commande de porte ou du fil
Pour effacer tous les codes de la Mémoire du moteur
Pour ajouter ou reprogrammer une télécommande à main
Télécommande à trois fonctions
Pour définir un NIP temporaire
Pour modifier un NIP connu, existant
Pièces pour la pose
Pièces d’assemblage du rail
RÉF Pièce Désignation
NON Illustrés
Retenue d’interrupteur de fin de
Comprend Rondelle de
108D67 Diffuseur Les étiquettes 30B532 Condensateur 1/2HP
NON Illustré
Sears
’entremise des Pièces et Service
Disponible uniquement par
LE-FOYERMD