i,

Installation Step 6

Install the Door Control

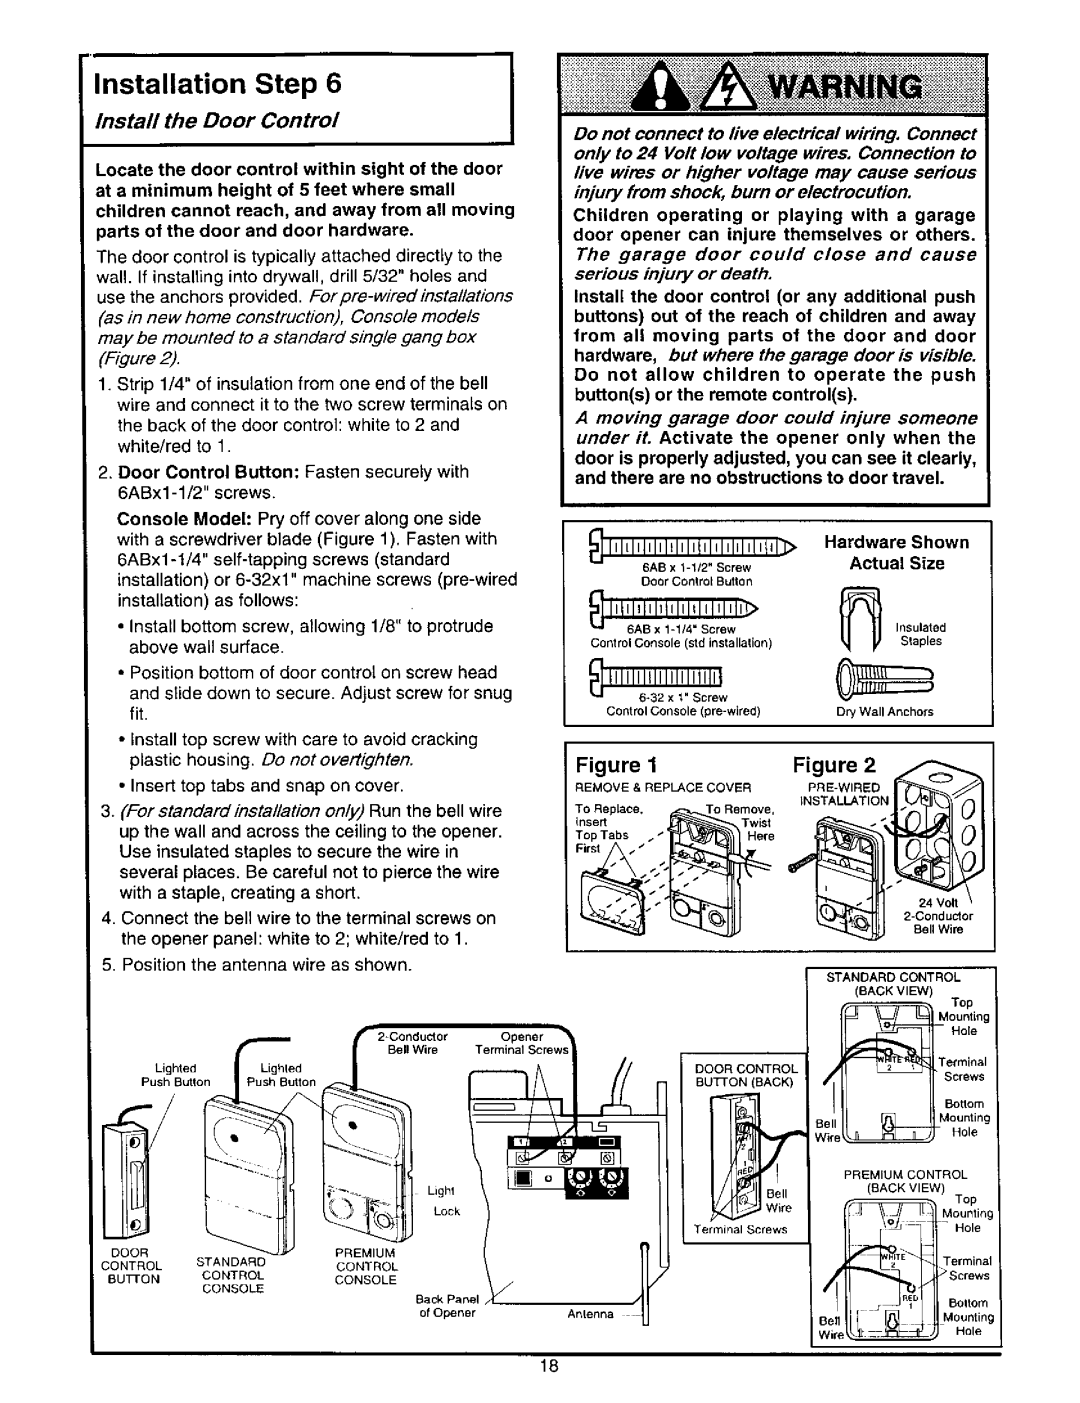
Locate the door control within sight of the door at a minimum height of 5 feet where small children cannot reach, and away from all moving parts of the door and door hardware.

The door control is typically attached directly to the wall. If installing into drywall, drill 5/32" holes and use the anchors provided. For pre-wirad installations 'as in new home construction.), Console models may be mounted to a standard single gang box "Figure 2).

1.Strip 1/4" of insulation from one end of the bell wire and connect it to the two screw terminals on the back of the door control: white to 2 and white/red to 1.

2.Door Control Button: Fasten securely with 6ABx1-1/2" screws.

Console Model: Pry off cover along one side with a screwdriver blade (Figure 1). Fasten with 6ABx1-1/4" self-tapping screws (standard installation) or 6-32x1" machine screws (pre-wired installation) as follows:

Install bottom screw, allowing 1/8" to protrude above wall surface.

Position bottom of door control on screw head

and slide down to secure. Adjust screw for snug fit.

Install top screw with care to avoid cracking plastic housing. Do not overtighten.

Insert top tabs and snap on cover.

3.(For standard installation only) Run the bell wire up the wall and across the ceiling to the opener. Use insulated staples to secure the wire in several places. Be careful not to pierce the wire with a staple, creating a short.

4.Connect the bell wire to the terminal screws on the opener panel: white to 2; white/red to 1.

5.Position the antenna wire as shown.

LightedLighted

P°shBotto :,

Lighl

Lock

DOORPREMIUM

CONTROL STANDARDCONTROL

BuTroNCONTROLCONSOLE

CONSOLE

Back Panel

of Opener

Do not connect to live electrical wiring. Connect

only to 24 Volt low voltage wires. Connection to live wires or higher voltage may cause setfous injury from shock, burn or electrocution.

Children operating or playing with a garage door opener can injure themselves or others. The garage door could close and cause serious injury or death.

Install the door control (or any additional push

buttons) out of the reach of children and away from all moving parts of the door and door hardware, but where the garage door is visible.

Do not allow children to operate the push button(s) or the remote control(s).

A moving garage door could injure someone under it. Activate the opener only when the door is properly adjusted, you can see it clearly, and there are no obstructions to door travel.

_.. IIlllllllll_lllltllllll=l


IIIt'll>

Hardware

Shown


Actual

Size


6AB x 1-1/2"

Screw


Door Control

Button


6AB x 1-1/4"

Screw


Insulated


_ Illllllllltllll_llllllll]>


Staples


Control

Console (std

installation)


Control Console (pre-wired)


Dry Wall Anchors


Figure

1


Figure

2


REMOVE

& REPLACE

COVER


PRE-WIRED


INSTALLATION


ToReplace,TopTabs

Firstinsert,*

ToRemove,TwistHere


//_

"*


__


2-Conductor


Bell Wire


STANDARD

CONTROL


(BACK

VIEW


_Mounting


Hole


Top


DOOR CONTROL


Terminal


"

Screws


BuTroN

(BACK)


Bottom


Bell

_.


Mounting


Wire


Hole


PREMIUM


CONTROL


(BACK

VIEW)


_


Top


Mountin_


Terminal

Screws


,v,


-

Hole


_'_=TE_"

Terminal

Antenna


......

Bottom


,1 =._:_


Mountin,


--


Hole

18

Page 18
Image 18
Craftsman 139.53834SRT3, 139.53646SRT2 Install the Door Control, Door Control Button Fasten securely with 6ABx1-1/2 screws

139.53648SRT2, 139.53645SRT3, 139.53834SRT3, 139.53335SRT3, 139.53646SRT2 specifications

The Craftsman 139.53660SRT1, 139.53646SRT2, 139.53335SRT3, 139.53834SRT3, and 139.53645SRT3 are a series of advanced garage door openers designed for homeowners looking to enhance convenience, security, and functionality in their daily lives. Each model is equipped with cutting-edge technologies that streamline garage access while ensuring safety and durability.

One of the standout features across these models is the use of a powerful motor system, providing reliable performance for heavy garage doors. The motor's horsepower rating varies across the models, but all ensure consistent lifting strength and rapid opening and closing speeds, catering to different door weights and sizes.

In terms of security, these Craftsman models incorporate advanced encryption technologies, making unauthorized access nearly impossible. The security features include rolling code technology, which changes the access code each time the remote is used, thus preventing cloning and ensuring that only authorized users can operate the door.

These openers also prioritize ease of use. With their compatible smartphone app integration, users can remotely control and monitor their garage doors. Whether they are at home or away, users can receive notifications, check the status of their doors, and even open or close them at the touch of a button, adding an extra layer of convenience.

The installation process is also user-friendly, with many of these models featuring an easy-to-follow instruction manual. Homeowners can typically complete the installation themselves, saving time and money compared to hiring a professional. The durable construction of these openers ensures that they withstand the test of time, with many units equipped with weather-resistant materials that protect against rust and corrosion.

In addition to their functional features, the aesthetic designs of the Craftsman series are noteworthy. They fit seamlessly into a variety of garage styles, with a sleek finish that enhances overall garage appeal.

Overall, the Craftsman 139.53660SRT1, 139.53646SRT2, 139.53335SRT3, 139.53834SRT3, and 139.53645SRT3 garage door openers represent a blend of functionality, security, and user convenience. Homeowners seeking reliable, smart, and efficient solutions for managing their garage doors will find these models highly effective, offering peace of mind and ease of use in their everyday lives.