User Instructions
Shop Phone
Model 27413
CALL BACK
TALK
FORMAT
1 | 2 abc | 3 def |
4 ghi | 5 jkl | 6 mno |
7pqrs | 8 tuv | 9 wxyz |
exit | | |
* tone | 0 oper | # pause |
redial | ringer | memory |
delete/channelprogram/flash
Sears, Roebuck and Co., Hoffman Estates, IL 60179 U.S.A. www.sears.com/craftsman
WARRANTY
ONE-YEAR FULL WARRANTY
If this Craftsman Shop Phone is defective in material or workmanship within one year from the date of purchase, RETURN IT TO YOUR NEAREST SEARS STORE in the United States, and it will be replaced free of charge. The batteries supplied with this phone are expendable parts not covered by this warranty. This warranty gives you specific legal rights, and you may also have other rights which vary from state to state.
Sears, Roebuck and Co., Dept. 817WA, Hoffman Estates, IL 60179
HELP LINE
For assistance in the use of this product, please call the following Toll-Free Help Line: 1-800-448-0329, and tell the representative that you have a Sears Craftsman Shop Phone.
If the equipment is causing harm to the telephone network, the telephone company may request that you disconnect the equipment until the problem is resolved.
Attach your sales receipt to this booklet for future reference or jot down the date this product was purchased or received as a gift. This information will be valuable in the unlikely even that the product develops problems during the warranty period.
Purchase Date:___________________________________________
Name of Store:____________________________________________
IMPORTANT SAFETY INSTRUCTIONS
Some of the following information may not apply to your particular product; however, when using telephone equipment, basic safety precautions should always be followed to reduce the risk of fire, electric shock and injury to persons, including the following:
1.Read and understand all instructions.
2.Follow all warnings and instructions marked on the product.
3.Unplug this product from the wall outlet before cleaning. Do not use liquid cleaners or aerosol cleaners. Use a damp cloth for cleaning.
4.Telephones should not be used while you are in a bathtub, shower or pool. Immersion of the telephone or handset in water could cause an electrical shock.
5.Slots and openings in the cabinet back or bottom are provided for ventilation, to protect it from overheating. These openings must not be blocked or covered. The openings should never be blocked by placing the product on the bed, sofa, rug, or other similar surface. This product should not be placed in a built-in installation unless proper ventilation is provided.
6.This product should be operated only from the type of power source indicated on the marking label. If you are not sure of the type of power supply to your home, consult your dealer or local power company.
7.Do not allow anything to rest on the power cord. Do not locate this product where the cord will be abused by persons walking on it.
8.Do not overload wall outlets and extension cords as this can result in the risk of fire or electric shock.
9.Never push objects of any kind into this product through cabinet slots as they may touch dangerous voltage points or short out parts that could result in a risk of fire or electric shock. Never spill liquid of any kind on the product.
10.To reduce the risk of electric shock, do not disassemble this product, but take it to a qualified serviceman when service or repair work is required. Opening or removing covers may expose you to dangerous voltages or other risks. Incorrect reassembly can cause electric shock when the telephone equipment is subsequently used.
11.Do not expose the product to extreme temperatures such as areas near a hot radiator or stove or in a hot car.
12.Do not place lighted candles, cigarettes, cigars, etc., on the telephone.
13.Never touch uninsulated telephone wires or terminals unless the telephone line has been disconnected at the network interface.
14.Never install or modify telephone wiring during a lightning storm.
15.Never install telephone jacks in wet locations unless the jack is specifically designed for wet locations.
16.Use caution when installing or modifying telephone lines to prevent electrical shock and/or fire.
17.Unplug this product from the wall outlet and refer servicing to qualified service personnel under the following conditions:
A.When the power supply cord or plug is damaged or frayed.
B.If the product has been exposed to rain or water.
C.If the product does not operate normally by following the operating instructions.
D.If the product's cabinet has been damaged.
E.If the product exhibits a distinct change in performance.
18.Avoid using a telephone (other than a cordless type) during an electrical storm. There may be a remote risk of electric shock from lightning.
19.Do not use the telephone to report a gas leak in the vicinity of the leak.
20.Do not place this product on an unstable cart, stand or table. The product may fall, causing serious damage to the product.
IF YOUR PRODUCT UTILIZES BATTERIES, THE FOLLOWING ADDITIONAL PRECAUTIONS SHOULD BE OBSERVED:
1.Use only the type and size battery(ies) specified in the user manual.
2.Do not dispose of the battery(ies) in fire. They may explode. Check with local codes for possible special disposal instructions.
3.Do not open or mutilate the battery(ies). Released electrolyte is corrosive and may cause damage to the eyes or skin. It may be toxic if swallowed.
4.Exercise care in handling battery(ies) in order not to short out the battery(ies) with conducting materials such as rings, bracelets, and keys. The battery(ies) or conductor may overheat and cause burns.
5.Do not attempt to recharge the battery(ies) provided with or identified for use with this product that are not intended to be charged. The battery(ies) may leak corrosive electrolyte or explode.
6.Do not attempt to rejuvenate the battery(ies) provided with or identified for use with this product by heating them. Sudden release of the battery(ies) electrolyte may occur causing burns or irritation to eyes or skin.
7.When replacing battery(ies), all batteries should be replaced at the same time. Mixing fresh and discharged batteries could increase internal cell pressure and rupture the discharged battery(ies). (Applies to products employing more than one separately replaceable primary battery.)
8.When inserting battery(ies) into this product, the proper polarity or direction must be observed. Reverse insertion of battery(ies) can cause charging, and that may result in leakage or explosion.
9.Remove battery(ies) from this product if storing over 30 days because the battery(ies) could leak and damage the product.
10.Discard "dead" battery(ies) as soon as possible since "dead" batteries are more likely to leak in a product.
11.Do not store this product, or the battery(ies) provided with or identified for use with this product, in high-temperature areas. Batteries that are stored in a freezer or refrigerator for the purpose of extending shelf life should be protected from condensation during storage and defrosting. Batteries should be stabilized at room temperature prior to use after cold storage.
12.If your product uses rechargeable battery(ies), charge the battery(ies) only in accordance with the instructions and limitation specified in the User Manual.
EQUIPMENT APPROVAL INFORMATION
Your telephone equipment is approved for connection to the Public Switched Telephone Network and is in compliance with parts 15 and 68, FCC Rules and Regulations and the Technical Requirements for Telephone Terminal Equipment published by ACTA.
1Notification to the Local Telephone Company
On the bottom of this equipment is a label indicating, among other information, the US number and Ringer Equivalence Number (REN) for the equipment. You must, upon request, provide this information to your telephone company.
The REN is useful in determining the number of devices you may connect to your telephone line and still have all of these devices ring when your telephone number is called. In most (but not all) areas, the sum of the RENs of all devices connected to one line should not exceed 5. To be certain of the number of devices you may connect to your line as determined by the REN, you should contact your local telephone company.
A plug and jack used to connect this equipment to the premises wiring and telephone network must comply with the applicable FCC Part 68 rules and requirements adopted by the ACTA. A compliant telephone cord and modular plug is provided with this product. It is designed to be connected to a compatible modular jack that is also compliant. See installation instructions for details.
Notes
•This equipment may not be used on coin service provided by the telephone company.
•Party lines are subject to state tariffs, and therefore, you may not be able to use your own telephone equipment if you are on a party line. Check with your local telephone company.
•Notice must be given to the telephone company upon permanent disconnection of your telephone from your line.
•If your home has specially wired alarm equipment connected to the telephone line, ensure the installation of this product does not disable your alarm equipment. If you have questions about what will disable alarm equipment, consult your telephone company or a qualified installer.
2Rights of the Telephone Company
Should your equipment cause trouble on your line which may harm the telephone network, the telephone company shall, where practicable, notify you that temporary discontinuance of service may be required. Where prior notice is not practicable and the circumstances warrant such action, the telephone company may temporarily discontinue service immediately. In case of such temporary discontinuance, the telephone company must: (1) promptly notify you of such temporary discontinuance; (2) afford you the opportunity to correct the situation; and (3) inform you of your right to bring a complaint to the Commission pursuant to procedures set forth in Subpart E of Part 68, FCC Rules and Regulations.
The telephone company may make changes in its communications facilities, equipment, operations or procedures where such action is required in the operation of its business and not inconsistent with FCC Rules and Regulations. If these changes are expected to affect the use or performance of your telephone equipment, the telephone company must give you adequate notice, in writing, to allow you to maintain uninterrupted service.
HEARING AID COMPATIBILITY (HAC)
This telephone system meets FCC standards for Hearing Aid Compatibility.
US Number is located on the cabinet bottom
REN number is located on the cabinet bottom
INTRODUCTION
CAUTION: When using telephone equipment, there are basic safety instructions that should always be followed. Refer to the IMPORTANT SAFETY INSTRUCTIONS provided with this product and save them for future reference.
This telephone has been designed to be simple to use, however, you can reach its full potential more quickly by taking a few minutes to read this user’s Guide. This telephone is a multifunction product for use with the Call Waiting Caller ID services available from your local telephone company.
Your Call Waiting Caller ID phone stores and displays specific information, provided by your local telephone company, to subscribers of Caller ID or similar caller identification services.
Your Call Waiting Caller ID phone allows you to:
•View the name and telephone number of a caller.
•Identify callers before you answer the phone.
•View the time and date of each incoming call.
•Store up to 40 Caller ID records sequentially.
•Know who is calling while you are on the phone or when you are away.
•Screen unwanted calls, eliminate harassment from annoying calls, or to get prepared before answering a call.
To get the most from your new phone, we suggest that you take a few minutes right now to read through this user's guide.
IMPORTANT: In order to use all of the Caller ID features of this phone, you must subscribe to either the standard Name/Number Caller ID Service or Call Waiting Caller ID Service. To know who is calling while you are on the phone, you must subscribe to Call Waiting Caller ID Service.
IMPORTANT: Because cordless phones operate on electricity, you should have at least one phone in your home that isn’t cordless, in case the power in your home goes out.
| | | | | | |
| | | | Caution: | | |
| | | | Risk of electric shock | | |
| | | | Do not open | | |
| | The lightning flash | Caution: To reduce the risk of | The exclamation |
| | and arrow head | electric shock, do not remove | point within the |
| | within the triangle is | cover (or back). No user | triangle is a warning |
| Warning:To prevent | a warning sign | serviceable parts inside. Refer | sign alerting you of |
| alerting you of | servicing to qualified service | important |
| fire or electrical shock | “dangerous voltage” | personnel. | instructions |
| hazard, do not | inside the product. | | | | accompanying the |
| expose this product | | | | | product. |
| See marking on bottom / Back of product |
| to rain or moisture. |
| | | | | |
| | | | | |
BEFORE YOU BEGIN
PARTS CHECKLIST
Make sure your package includes the items shown here.
Remote charger | Handset with | Base unit Telephone |
with battery pack | battery pack | line cord |
TELEPHONE JACK REQUIREMENTS
To use this phone, you need an RJ11C | Wall plate |
type modular telephone jack, which | |
might look like the one pictured here, | |
installed in your home. If you don’t | Modular |
have a modular jack, call your local | telephone |
phone company to find out how to | line jack |
get one installed. | |
INSTALLATION NOTE: Some cordless telephones operate at frequencies that may cause interference to nearby TVs, microwave ovens, and VCRs. To minimize or prevent such interference, the base of the cordless telephone should not be placed near or on top of a TV, microwave ovens, or VCR. If such interference continues, move the cordless telephone farther away from these appliances.
DIGITAL SECURITY SYSTEM
Your cordless phone uses a digital security system to provide protection against false ringing, unauthorized access, and charges to your phone line.
When you place the handset in the base, the unit verifies its security code. After a power outage or battery replacement, you should place the handset in the base for about 20 seconds to reset the code.
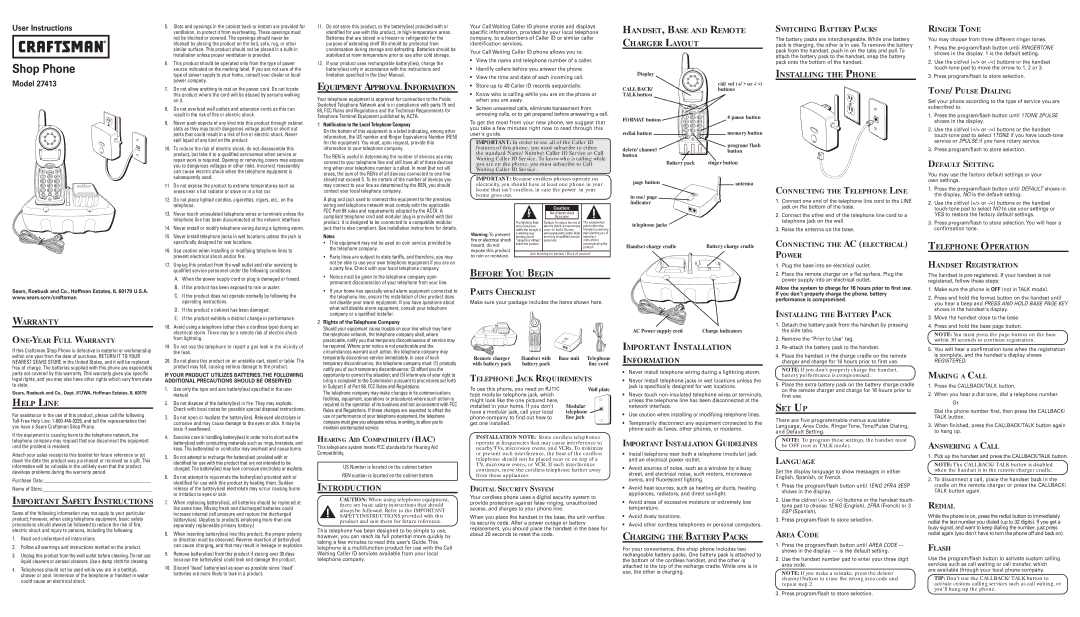
HANDSET, BASE AND REMOTE
CHARGER LAYOUT
Display | | | | |
CALL BACK/ | | | | cid/vol (+/> or -/<) |
| | | buttons |
TALK button | | | | |
| | CALL BACK | | |
| | TALK | | |
| | FORMAT | | # pause button |
FORMAT button | 1 | 2 abc | 3 def |
4 ghi | 5 jkl | 6 mno | |
| 7pqrs | 8 tuv | 9 wxyz | |
| exit | | | |
redial button | * tone | 0 oper | # pause | memory button |
delete/channel | program/flash |
| redial | ringer | memory | |
delete/channel | | | | program/flash |
| | | button |
button | | | | |
Battery pack | | ringer button |
page button | | | | antenna |
in use/page | | page | |
| | | |
indicator | | | | |
telephone jacks | | | | |
Handset charge cradle | | | | Battery charge cradle |
AC Power supply cord | Charge indicators |
IMPORTANT INSTALLATION
INFORMATION
•Never install telephone wiring during a lightning storm.
•Never install telephone jacks in wet locations unless the jack is specifically designed for wet locations.
•Never touch non-insulated telephone wires or terminals, unless the telephone line has been disconnected at the network interface.
•Use caution when installing or modifying telephone lines.
•Temporarily disconnect any equipment connected to the phone such as faxes, other phones, or modems.
IMPORTANT INSTALLATION GUIDELINES
•Install telephone near both a telephone (modular) jack and an electrical power outlet.
•Avoid sources of noise, such as a window by a busy street, and electrical noise, such motors, microwave ovens, and fluorescent lighting.
•Avoid heat sources, such as heating air ducts, heating appliances, radiators, and direct sunlight.
•Avoid areas of excessive moisture or extremely low temperature.
•Avoid dusty locations.
•Avoid other cordless telephones or personal computers.
CHARGING THE BATTERY PACKS
For your convenience, this shop phone includes two rechargeable battery packs. One battery pack is attached to the bottom of the cordless handset, and the other is attached to the top of the recharge cradle. While one is in use, the other is charging.
SWITCHING BATTERY PACKS
The battery packs are interchangeable. While one battery pack is charging, the other is in use. To remove the battery pack from the handset, push in on the tabs and pull. To attach the battery pack to the handset, snap the battery pack onto the bottom of the handset.
INSTALLING THE PHONE
CONNECTING THE TELEPHONE LINE
1.Connect one end of the telephone line cord to the LINE jack on the bottom of the base.
2.Connect the other end of the telephone line cord to a telephone jack on the wall.
3.Raise the antenna on the base.
CONNECTING THE AC (ELECTRICAL) POWER
1.Plug the base into an electrical outlet.
2.Place the remote charger on a flat surface. Plug the power supply into an electrical outlet.
Allow the system to charge for 16 hours prior to first use. If you don’t properly charge the phone, battery performance is compromised.
INSTALLING THE BATTERY PACK
1.Detach the battery pack from the handset by pressing the side tabs.
2.Remove the "Prior to Use" tag.
3.Re-attach the battery pack to the handset.
4.Place the handset in the charge cradle on the remote charger and charge for 16 hours prior to first use.
NOTE: If you don't properly charge the handset, battery performance is compromised.
5.Place the extra battery pack on the battery charge cradle on the remote charger and charge for 16 hours prior to first use.
SET UP
There are five programmable menus available: Language, Area Code, Ringer Tone, Tone/Pulse Dialing, and Default Setting.
NOTE: To program these settings, the handset must be OFF (not in TALK mode).
LANGUAGE
Set the display language to show messages in either English, Spanish, or French.
1.Press the program/flash button until 1ENG 2FRA 3ESP shows in the display.
2.Use the cid/vol (+/> or -/<) buttons or the handset touch- tone pad to choose 1ENG (English), 2FRA (French) or 3 ESP (Spanish).
3.Press program/flash to store selection.
AREA CODE
1.Press the program/flash button until AREA CODE ---
shows in the display. --- is the default setting.
2.Use the handset number pad to enter your three digit area code.
NOTE: If you make a mistake, press the delete/ channel button to erase the wrong area code and repeat step 2.
3.Press program/flash to store selection.
RINGER TONE
You may choose from three different ringer tones.
1.Press the program/flash button until RINGERTONE shows in the display. 1 is the default setting.
2.Use the cid/vol (+/> or -/<) buttons or the handset touch-tone pad to move the arrow to 1, 2 or 3.
3.Press program/flash to store selection.
TONE/PULSE DIALING
Set your phone according to the type of service you are subscribed to.
1.Press the program/flash button until 1TONE 2PULSE shows in the display.
2.Use the cid/vol (+/> or -/<) buttons or the handset touch-tone pad to select 1TONE if you have touch-tone service or 2PULSE if you have rotary service.
3.Press program/flash to store selection.
DEFAULT SETTING
You may use the factory default settings or your own settings.
1.Press the program/flash button until DEFAULT shows in the display, NO is the default setting.
2.Use the cid/vol (+/> or -/<) buttons or the handset touch-tone pad to select NO to use your settings or YES to restore the factory default settings.
3.Press program/flash to store selection. You will hear a confirmation tone.
TELEPHONE OPERATION
HANDSET REGISTRATION
The handset is pre-registered. If your handset is not registered, follow these steps:
1.Make sure the phone is OFF (not in TALK mode).
2.Press and hold the format button on the handset until you hear a beep and PRESS AND HOLD BASE PAGE KEY shows in the handset's display.
3.Move the handset close to the base.
4.Press and hold the base page button.
NOTE: You must press the page button on the base within 30 seconds to continue registration.
5.You will hear a confirmation tone when the registration is complete, and the handset's display shows
REGISTERED.
MAKING A CALL
1.Press the CALLBACK/TALK button.
2.When you hear a dial tone, dial a telephone number.
Or
Dial the phone number first, then press the CALLBACK/ TALK button.
3.When finished, press the CALLBACK/TALK button again to hang up.
ANSWERING A CALL
1.Pick up the handset and press the CALLBACK/TALK button.
NOTE: The CALLBACK/TALK button is disabled when the handset is in the remote charger cradle.
2.To disconnect a call, place the handset back in the cradle on the remote charger or press the CALLBACK/ TALK button again.
REDIAL
While the phone is on, press the redial button to immediately redial the last number you dialed (up to 32 digits). If you get a busy signal, and want to keep dialing the number, just press redial again (you don't have to turn the phone off and back on).
FLASH
Use the program/flash button to activate custom calling services such as call waiting or call transfer, which
are available through your local phone company.
TIP: Don’t use the CALLBACK/TALK button to activate custom calling services such as call waiting, or you’ll hang up the phone.