Installation & Assembly

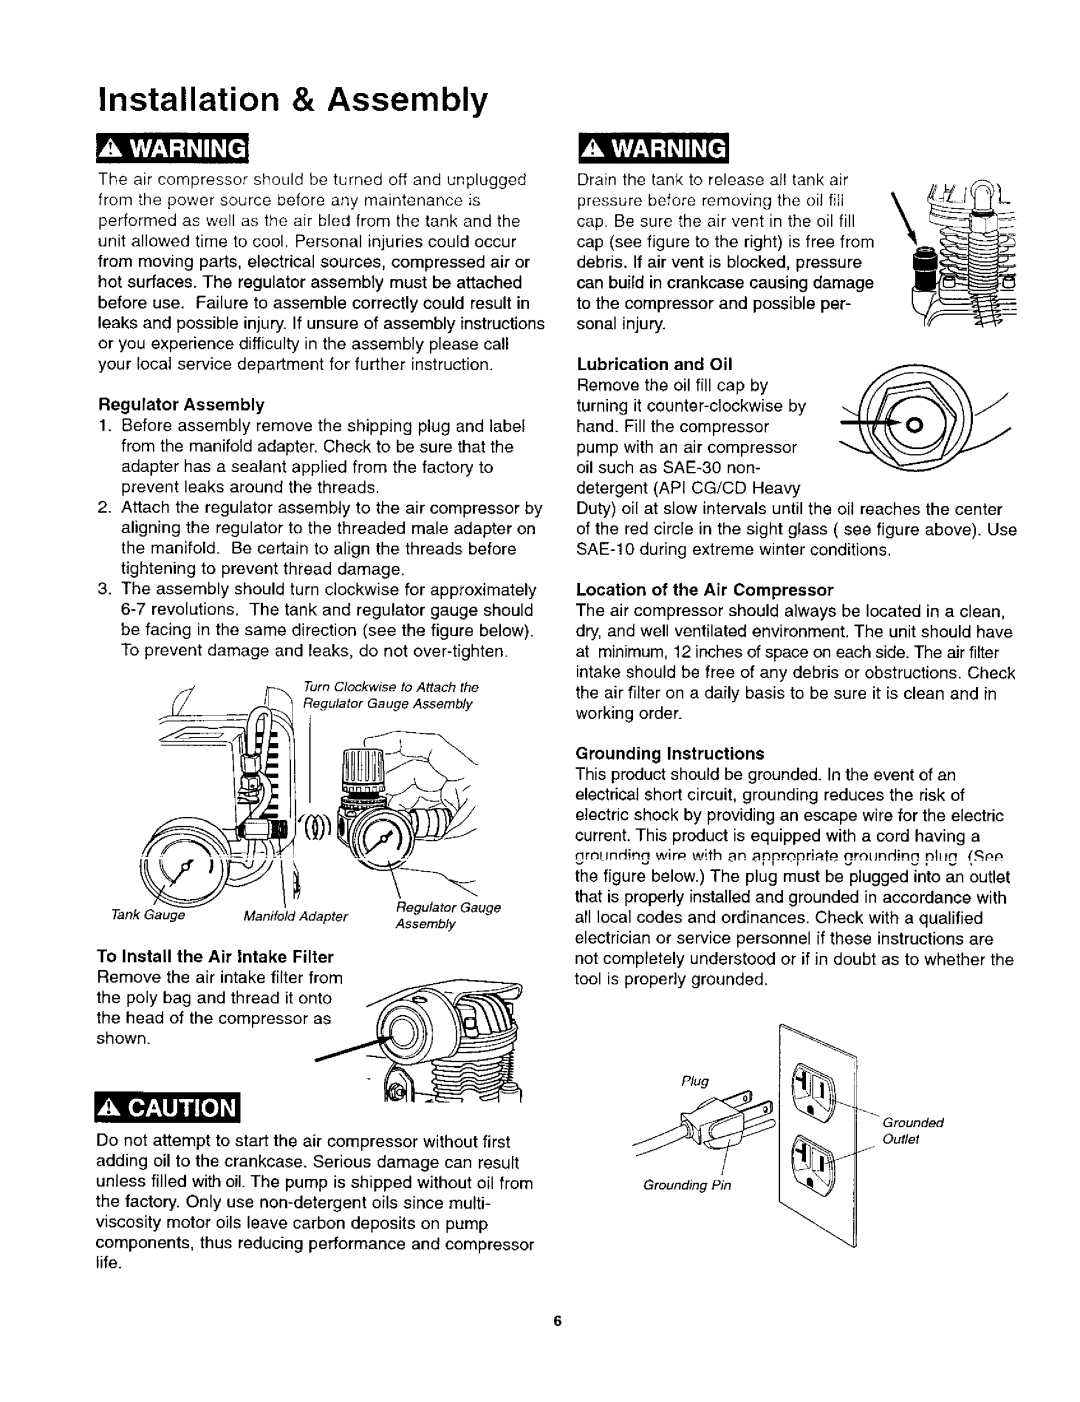
The air compressor should be turned off and unplugged from the power source before any maintenance is performed as well as the air bled from the tank and the unit allowed time to cool. Personal injuries could occur from moving parts, electrical sources, compressed air or hot surfaces. The regulator assembly must be attached before use. Failure to assemble correctly could result in leaks and possible injury. If unsure of assembly instructions or you experience difficulty in the assembly please call your local service department for further instruction.

Regulator Assembly

1.Before assembly remove the shipping plug and label from the manifold adapter. Check to be sure that the

adapter has a sealant applied from the factory to prevent leaks around the threads.

2.Attach the regulator assembly to the air compressor by aligning the regulator to the threaded male adapter on the manifold. Be certain to align the threads before tightening to prevent thread damage.

3.The assembly should turn clockwise for approximately 6-7 revolutions. The tank and regulator gauge should be facing in the same direction (see the figure below). To prevent damage and leaks, do not over-tighten.

Turn Clockwise to Attach the

Regulator Gauge Assembly

Drain the tank to release al! tank air pressure before removing the oil fill cap. Be sure the air vent in the oil fill cap (see figure to the right) is free from debris. If air vent is blocked, pressure can build in crankcase causing damage to the compressor and possible per- sonal injury.

Lubrication and Oil

Remove the oil fill cap by turning it counter-clockwise by hand. Fill the compressor pump with an air compressor oil such as SAE-30 non- detergent (API CG/CD Heavy

Duty) oil at slow intervals until the oil reaches the center of the red circle in the sight glass ( see figure above). Use SAE-lO during extreme winter conditions.

Location of the Air Compressor

The air compressor should always be located in a clean, dry, and well ventilated environment. The unit should have at minimum, 12 inches of space on each side. The air filter intake should be free of any debris or obstructions. Check the air filter on a daily basis to be sure it is clean and in working order.

Grounding Instructions

Tank Gauge

Manifold Adapter

To Install the Air Intake Filter Remove the air intake filter from the poly bag and thread

the head of the com f shown.

Regulator Gauge Assembly

This product should be grounded. In the event of an electrical short circuit, grounding reduces the risk of electric shock by providing an escape wire for the electric current. This product is equipped with a cord having a grnL!ndin_ wir_ with an appropriate grounding phlg (.£_, the figure below.) The plug must be plugged into an outlet that is properly installed and grounded in accordance with all local codes and ordinances. Check with a qualified electrician or service personnel if these instructions are not completely understood or if in doubt as to whether the tool is properly grounded.

Plug

_ Grounded

Do not attempt to start the air compressor without first adding oil to the crankcase. Serious damage can result unless filled with oil. The pump is shipped without oil from the factory. Only use non-detergent oils since multi- viscosity motor oils leave carbon deposits on pump

components, thus reducing performance and compressor life.

Outlet

Grounding Pin

6

Page 6
Image 6
Craftsman 921.1521 owner manual Installation & Assembly, Regulator Assembly

921.1521 specifications

The Craftsman 921.1521 is a powerful and versatile tool that has garnered attention among DIY enthusiasts and professionals alike. This air compressor is designed to tackle a variety of tasks, making it an essential addition to any workshop or garage. With its robust features and advanced technologies, the 921.1521 stands out in its category.

One of the key features of the Craftsman 921.1521 is its impressive power output. This air compressor is equipped with a 1.5-horsepower motor, providing a substantial amount of air pressure for a wide range of applications. It has a maximum pressure of 150 PSI, which allows it to handle demanding tasks such as powering nail guns, spray painting, and inflating tires with ease.

Additionally, the 921.1521 is designed with a 6-gallon tank, which ensures a steady air supply for longer periods of use. This feature minimizes downtime, allowing users to complete their projects more efficiently. The tank is also constructed from high-quality materials, ensuring durability and longevity over time.

Portability is another significant aspect of the Craftsman 921.1521. It features a lightweight design coupled with a convenient handle, making it easy to transport from one job site to another. The compressor also comes equipped with rubber feet that provide stability during operation, ensuring safety and reducing vibrations.

The Craftsman 921.1521 incorporates user-friendly technologies, such as an automatic shut-off feature that helps prevent over-pressurization. This not only protects the compressor but also enhances user safety. Furthermore, maintenance is straightforward, with easy access to all essential components for routine checks and upkeep.

Another notable characteristic of the 921.1521 is its noise reduction capabilities. With noise levels significantly lower than many competitors, it is suitable for use in residential areas without disturbing neighbors. This feature makes it ideal for home improvement projects and other tasks where noise may be a concern.

In conclusion, the Craftsman 921.1521 air compressor is a powerful, portable, and versatile tool equipped with essential features and technologies that cater to a wide range of tasks. Its combination of strength, efficiency, and ease of use makes it an excellent choice for both DIYers and professionals seeking reliable performance in their projects. Whether inflating tires, powering tools, or completing home improvement tasks, the Craftsman 921.1521 stands ready to meet the challenge.