Creative Broadband Blaster ADSL Router 8022
Quick Start
Product Registration
Registering your product ensures you receive the most appropriate service and product support available. You can register your product during installation or at www.creative.com/register.
Please note that your warranty rights are not dependent on registration.
Creative Knowledge Base
Resolve and troubleshoot technical queries at Creative's
Customer Support Services & Warranty
You can find Customer Support Services, Warranty and other information in the User Documentation CD.
Before You Begin
Write down your ADSL Router model and serial numbers, and the MAC address found at the bottom of your router.
You will need to provide the model and serial numbers when contacting Customer Support Services. You may also need to provide the MAC addresses to a network administrator if you plan to use your device for a large network, such as in a school or office.
System Requirements
Be sure that your computer meets the following minimum system requirements.
●Network Interface Card (NIC) installed
●
●Internet Explorer 6.0
●ADSL service running on your telephone line
1 Installing your Hardware
Before setting up your ADSL Router, be sure that the Network Interface Card in your computer is installed and functioning properly.
1.Connect the
2.Locate a telephone wall outlet with a running ADSL service and unplug any telephone cable that is connected to it.
3.Connect one end of the
4.Connect the other end to the ADSL port of your router.
5.Connect the small round plug of the power adapter to the router’s
6.Turn on the power supply and router.
Power connector
ADSL port | Ethernet ports |
Reset button | |
2 Configuring your Network Interface Card
Make sure that the computer you are using has a functioning Network Interface Card. The default settings of your ADSL Router are:
●IP address: 192.168.1.1
●Subnet Mask: 255.255.255.0
In Windows XP or Windows 2000
1.After setting up your ADSL Router, turn on your computer.
2.Click Start → Settings → Control Panel or Start → Control Panel.
3.For Microsoft![]() Windows
Windows ![]() XP users,
XP users,
4.
5.In the Local Area Connection Properties dialog box that appears, select Internet Protocol (TCP/IP) and then click the Properties button.
6.In the Internet Protocol (TCP/IP) Properties dialog box that appears, click the Obtain an IP address automatically option.
7.Click the OK button.
8.In the Local Area Connection Properties dialog box that appears, click the OK button.
To check the IP address assigned to your Network Adapter
i.Click Start → Programs (or All Programs, if you are in Windows XP Start menu mode) → Accessories → Command Prompt.
ii.When the Command Prompt dialog box appears, type ipconfig and press the ENTER key.
Verify that your IP address is 192.168.1.xxx and your Subnet Mask is 255.255.255.0. If not, go to steps iii and iv below.
iii.Type ipconfig/release and press the ENTER key.
iv.Type ipconfig/renew and press the ENTER key. Your IP address and Subnet Mask change to the above values.
In Windows 98 SE/Windows ME
1. | After setting up your ADSL Router, turn on your computer. |
2. | Click Start → Settings → Control Panel. |
3. | |
4. | In the Network dialog box that appears, click the Configuration tab. |
5. | Click the name of your Ethernet card, for example, TCP/IP → PRO/100+ Management |
| Adapter (10/100) and then click the Properties button. |
6. | In the TCP/IP Properties dialog box that appears, click the IP Address tab. |
7. | Click the Obtain an IP address automatically option to select it and click the OK button. |
8. | Click the OK button. |
9. | When Windows prompts you to restart your computer, click the Yes button. The computer |
| restarts. |
3 Configuring your ADSL Router
Before proceeding, make sure that you have configured your Network Interface Card successfully.
Your ADSL Router can have a number of different configurations. This section only covers the most common configuration, PPPoA/PPPoE Routed Configuration. Your ADSL service provider can tell you which configuration works best for you.
For more information on other configuraions, refer to your User's Guide.
PPPoA/PPPoE Configuration
DO NOT turn off the computer or router when the router configuration is being saved.
1.Start Internet Explorer.
2.In the Address box, type “http://192.168.1.1” and press the ENTER key.
A dialog box similar to Figure 1 appears, prompting you for a username and password.
3.Type admin in the User Name and Password boxes.
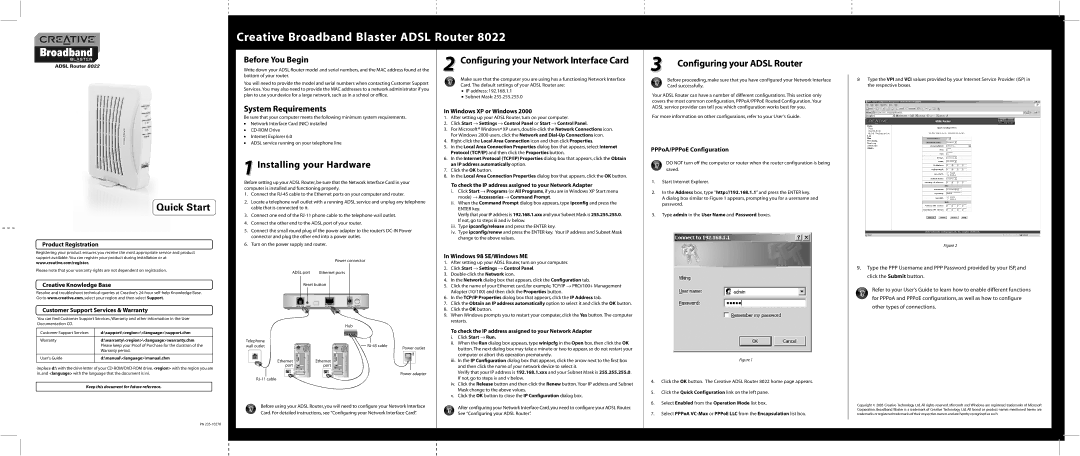
8Type the VPI and VCI values provided by your Internet Service Provider (ISP) in the respective boxes.
Figure 2
9.Type the PPP Username and PPP Password provided by your ISP, and click the Submit button.
Refer to your User’s Guide to learn how to enable different functions for PPPoA and PPPoE configurations, as well as how to configure other types of connections.
Customer Support Services | d:\support\<region>\<language>\support.chm |
|
|
Warranty | d:\warranty\<region>\<language>\warranty.chm |
| Please keep your Proof of Purchase for the duration of the |
| Warranty period. |
|
|
User's Guide | d:\manual\<language>\manual.chm |
|
|
(replace d:\ with the drive letter of your
Telephone wall outlet
Ethernet port
Hub
Ethernet port
Power outlet
ON
To check the IP address assigned to your Network Adapter | |
i. | Click Start → Run. |
ii. | When the Run dialog box appears, type winipcfg in the Open box, then click the OK |
| button. The next dialog box may take a minute or two to appear, so do not restart your |
| computer or abort this operation prematurely. |
iii. In the IP Configuration dialog box that appears, click the arrow next to the first box | |
| and then click the name of your network device to select it. |
| Verify that your IP address is 192.168.1.xxx and your Subnet Mask is 255.255.255.0. |
Figure 1
Figure 1
in, and <language> with the language that the document is in).
Keep this document for future reference.
Power adapter
If not, go to steps iv and v below. |
iv. Click the Release button and then click the Renew button. Your IP address and Subnet |
Mask change to the above values. |
v. Click the OK button to close the IP Configuration dialog box. |
4. | Click the OK button. The Creative ADSL Router 8022 home page appears. |
5. | Click the Quick Configuration link on the left pane. |
6. | Select Enabled from the Operation Mode list box. |
PN
Before using your ADSL Router, you will need to configure your Network Interface Card. For detailed instructions, see “Configuring your Network Interface Card”.
After configuring your Network Interface Card, you need to configure your ADSL Router. See “Configuring your ADSL Router”.
7. Select PPPoA |
Copyright © 2005 Creative Technology Ltd. All rights reserved. Microsoft and Windows are registered trademarks of Microsoft Corporation. Broadband Blaster is a trademark of Creative Technology Ltd. All brand or product names mentioned herein are trademarks or registered trademarks of their respective owners and are hereby recognised as such.