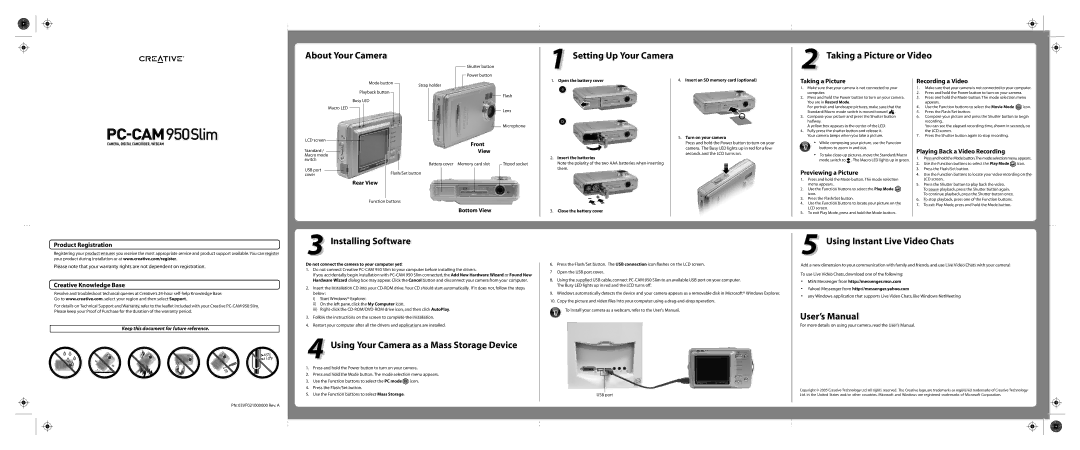
Mode button | | | Strap holder |
| |
| | | |
Playback button | | | | |
| | | |
Busy LED | | | |
Macro LED
LCD screen
| | | | | | | | | | | Front |
Standard / | | | | | | | | | | | View |
Macro mode | | | | | | | | | | |
switch | | | | | | | Battery cover | Memory card slot |
| | | | | | | | |
USB port | | | | | | | | | | | |
| | | | | | | | | | | |
| | | | | Flash/Set button | | | |
cover | | | | | | | |
| | | | | | | | | |
| | | | Rear View | | | | | | | |
| | | | | | | | | | | |
| | | | | | | | | | | | |
| | | | Function buttons | | |
| | | | | | | | | | | Bottom View |
Flash
Lens
Microphone
Tripod socket
1.Open the battery cover a
b
2.Insert the batteries
Note the polarity of the two AAA batteries when inserting them.
3.Close the battery cover
4.Insert an SD memory card (optional)
5.Turn on your camera
Press and hold the Power button to turn on your camera. The Busy LED lights up in red for a few seconds and the LCD turns on.
Taking a Picture
1. Make sure that your camera is not connected to your computer.
2. Press and hold the Power button to turn on your camera. You are in Record Mode.
For portrait and landscape pictures, make sure that the Standard/Macro mode switch is moved toward  .
.
3. Compose your picture and press the Shutter button halfway.
A yellow box appears in the center of the LCD.
4. Fully press the shutter button and release it. Your.camera beeps when you take a picture.
.
Previewing a Picture
1.Press and hold the Mode button. The mode selection menu appears.
2.Use the Function buttons to select the Play Mode  icon.
icon.
3.Press the Flash/Set button.
4.Use the Function buttons to locate your picture on the LCD screen.
5.To exit Play Mode, press and hold the Mode button.
Recording a Video
1.Make sure that your camera is not connected to your computer.
2.Press and hold the Power button to turn on your camera.
3.Press and hold the Mode button. The mode selection menu appears.
4.Use the Function buttons to select the Movie Mode  icon.
icon.
5.Press the Flash/Set button.
6.Compose your picture and press the Shutter button to begin recording.
You can see the elapsed recording time, shown in seconds, on the LCD screen.
7.Press the Shutter button again to stop recording.
Playing Back a Video Recording
1.Press and hold the Mode button. The mode selection menu appears.
2.Use the Function buttons to select the Play Mode  icon.
icon.
3.Press the Flash/Set button.
4.Use the Function buttons to locate your video recording on the LCD screen.
5.Press the Shutter button to play back the video. To pause playback, press the Shutter button again. To continue playback, press the Shutter button once.
6.To stop playback, press one of the Function buttons.
7.To exit Play Mode, press and hold the Mode button.
Product Registration
Registering your product ensures you receive the most appropriate service and product support available. You can register your product during installation or at www.creative.com/register.
Please note that your warranty rights are not dependent on registration.
Creative Knowledge Base
Resolve and troubleshoot technical queries at Creative's 24-hour self-help Knowledge Base.
Go to www.creative.com, select your region and then select Support.
For details on Technical Support and Warranty, refer to the leaflet included with your Creative PC-CAM 950 Slim. Please keep your Proof of Purchase for the duration of the warranty period.
Keep this document for future reference.

 45
45 C
C 
 113
113 F
F
PN: 03VF021000000 Rev. A
3 Installing Software
Do not connect the camera to your computer yet!
1.Do not connect Creative PC-CAM 950 Slim to your computer before installing the drivers.
If you accidentally begin installation with PC-CAM 950 Slim connected, the Add New Hardware Wizard or Found New Hardware Wizard dialog box may appear. Click the Cancel button and disconnect your camera from your computer.
2.Insert the Installation CD into your CD-ROM drive. Your CD should start automatically. If it does not, follow the steps below:
i)Start Windows® Explorer.
ii)On the left pane, click the My Computer icon.
iii)Right-click the CD-ROM/DVD-ROM drive icon, and then click AutoPlay.
3.Follow the instructions on the screen to complete the installation.
4.Restart your computer after all the drivers and applications are installed.
4 Using Your Camera as a Mass Storage Device
1.Press and hold the Power button to turn on your camera.
2.Press and hold the Mode button. The mode selection menu appears.
3.Use the Function buttons to select the PC mode icon.
icon.
4.Press the Flash/Set button.
5.Use the Function buttons to select Mass Storage.
6.Press the Flash/Set button. The USB connection icon flashes on the LCD screen.
7Open the USB port cover.
8.Using the supplied USB cable, connect PC-CAM 950 Slim to an available USB port on your computer. The Busy LED lights up in red and the LCD turns off.
9.Windows automatically detects the device and your camera appears as a removable disk in Microsoft® Windows Explorer.
10.Copy the picture and video files into your computer using a drag-and-drop operation.
To install your camera as a webcam, refer to the User's Manual.
USB port
5 Using Instant Live Video Chats
Add a new dimension to your communication with family and friends, and use Live Video Chats with your camera!
To use Live Video Chats, download one of the following: |
. | MSN Messenger from http://messenger.msn.com |
. | Yahoo! Messenger from http://messenger.yahoo.com |
. | any Windows application that supports Live Video Chats, like Windows NetMeeting |
User’s Manual
For more details on using your camera, read the User’s Manual.
Copyright © 2005 Creative Technology Ltd. All rights reserved. The Creative logo, are trademarks or registered trademarks of Creative Technology Ltd. in the United States and/or other countries. Microsoft and Windows are registered trademarks of Microsoft Corporation.