SET UP
DIAL MODE
The DIAL MODE switch is located at the back of the telephone. Slide the switch to TONE unless you have
MECHANICAL BELL RINGER
CONTROL
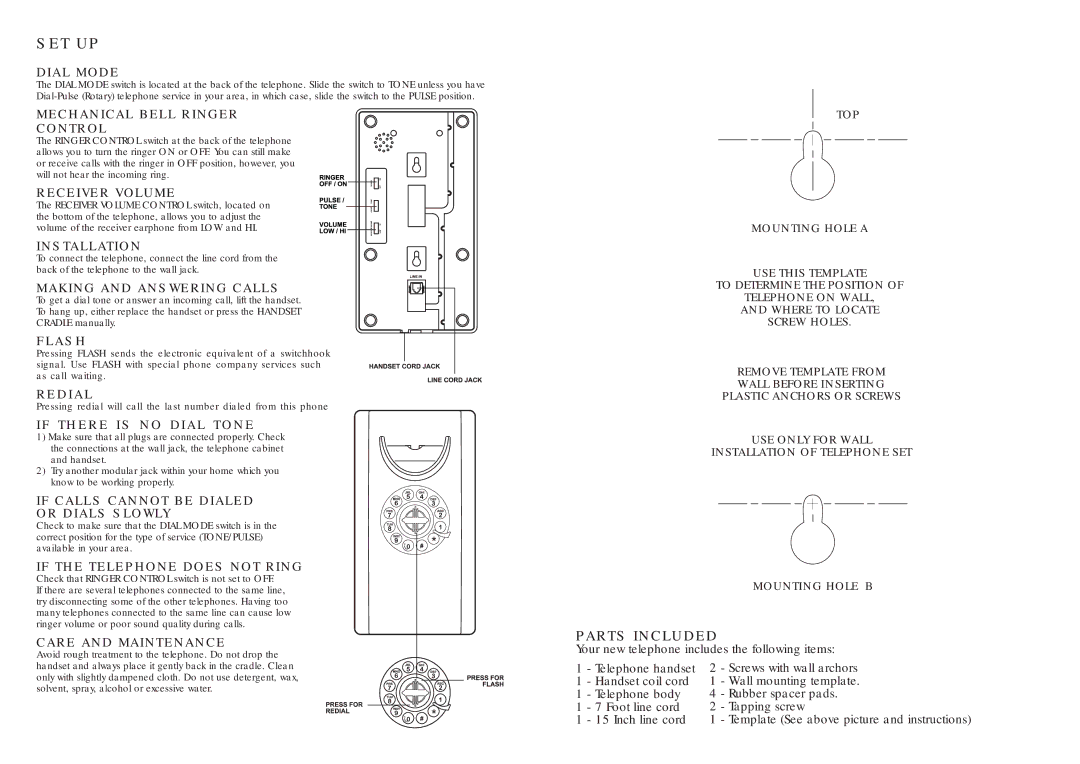
The RINGER CONTROL switch at the back of the telephone allows you to turn the ringer ON or OFF. You can still make or receive calls with the ringer in OFF position, however, you will not hear the incoming ring.
RECEIVER VOLUME
The RECEIVER VOLUME CONTROL switch, located on the bottom of the telephone, allows you to adjust the volume of the receiver earphone from LOW and HI.
INSTALLATION
To connect the telephone, connect the line cord from the back of the telephone to the wall jack.
MAKING AND ANSWERING CALLS
To get a dial tone or answer an incoming call, lift the handset.
To hang up, either replace the handset or press the HANDSET
CRADLE manually.
FLASH
Pressing FLASH sends the electronic equivalent of a switchhook signal. Use FLASH with special phone company services such as call waiting.
REDIAL
Pressing redial will call the last number dialed from this phone
IF THERE IS NO DIAL TONE
1) Make sure that all plugs are connected properly. Check the connections at the wall jack, the telephone cabinet and handset.
2)Try another modular jack within your home which you know to be working properly.
IF CALLS CANNOT BE DIALED
OR DIALS SLOWLY
Check to make sure that the DIAL MODE switch is in the correct position for the type of service (TONE/PULSE) available in your area.
IF THE TELEPHONE DOES NOT RING
Check that RINGER CONTROL switch is not set to OFF.
If there are several telephones connected to the same line, try disconnecting some of the other telephones. Having too many telephones connected to the same line can cause low ringer volume or poor sound quality during calls.
CARE AND MAINTENANCE
Avoid rough treatment to the telephone. Do not drop the handset and always place it gently back in the cradle. Clean only with slightly dampened cloth. Do not use detergent, wax, solvent, spray, alcohol or excessive water.
TOP
MOUNTING HOLE A
USE THIS TEMPLATE
TO DETERMINE THE POSITION OF
TELEPHONE ON WALL,
AND WHERE TO LOCATE
SCREW HOLES.
REMOVE TEMPLATE FROM
WALL BEFORE INSERTING
PLASTIC ANCHORS OR SCREWS
USE ONLY FOR WALL
INSTALLATION OF TELEPHONE SET
MOUNTING HOLE B
PARTS INCLUDED
Your new telephone includes the following items:
1 | - Telephone handset | 2 | - Screws with wall archors |
1 | - Handset coil cord | 1 | - Wall mounting template. |
1 | - Telephone body | 4 | - Rubber spacer pads. |
1 | - 7 Foot line cord | 2 | - Tapping screw |
1 | - 15 Inch line cord | 1 | - Template (See above picture and instructions) |