POWER SOURCE

Unwind the AC power cord at the back of the unit and connect it to a power outlet.

TURNTABLE OPERATION

Turn the unit on by switching the VOLUME ON/OFF SWITCH (3) to the ON position.

1.Select the function switch to the PHONO position

2.Set the speed control switch to desire speed (331/3 or 45 , 78rpm).Place the record on the turntable.

3.Adjust the Volume switch (3) set to the mid range.

4.Pull the TONE ARM (14) slightly to the right side until hear the “click” sound to activate the turntable.

5.Manually move the tone arm over the record and gently place at the beginning of the desired track. Readjust the VOLUME control

6.At the end of the record, the tone arm will automatically return to its arm rest. The

red power light will remain on until the unit is turned off.

.

Accessory: ADAPTER FOR 45RPM

TO PLAY THE 45RPM RECORD, PLACE THE ADAPTER (10) ON THE SPINDLE(19).

UNPACKING THE TURNTABLE

1.Carefully remove unit from it's styro-foam and take it out of the plastic bag.

2.Open lid and remove black tie-wrap by untwisting and gently sliding out from under

tone arm.

3. Remove cardboard shipper.

4. Remove white protective needle cover by gently pulling towards front of unit.

5.Using your fingers, turn large chrome screw clockwise until it is all the way down. Do not force it. This allows turntable to float on its shock absorbers.

6.Release tone arm hold down clip by gently pushing to the right.

This will unlock tone arm from its arm rest. Re-lock the hold down clip when moving the unit to another location.

POLARIZED ELECTRICAL PLUG INSTRUCTIONS

This product is equipped with a polarized alternating current line plug (a plug having one blade wider than the other). This plug will fit into the power outlet only one way. This is a safety feature, If you are unable to insert the plug fully into the outlet, try reversing the plug. If the plug should still fail to fit, contact you electrician to replace your obsolete outlet. Do not defeat the purpose of the polarized plug.

RADIO OPERATION

1.Switch the unit ON by turning the POWER switch (3) to the ON position.

2.Place the VOLUME controls (3) in mid-range position.

3.Select the desired wave band by placing the BAND selector (5) in either the FM or AM position.

4.Readjust the VOLUME controls (3) to suit your personal preference.

5.Switch the unit OFF by turning the POWER switch (3) to the OFF position.

6.For FM operation, the unit is provided with a wire antenna. Move the wire until the reception is clear and with no interference. Do not connect external FM antenna to an outside antenna. The AM reception may be improved by relocating the entire radio or turning it side to side.

ANTENNA

For FM reception, a wire is provided. Move the wire until the reception is clear. Do not connect the external FM antenna to any other antenna.

CASSETTE OPERATION

1.Turn the POWER switch (3) to the ON position.

2.Insert a pre-recorded cassette tape into the tape slot, with the exposed piece of tape facing to the bottom, by pushing the cassette against the CASSETTE DOOR (8). The cassette will slide into the tape mechanism and the radio which will be automatically cut-off, once this occurs.

Note: One end of the cassette tape will remain visible.

3.Readjust the VOLUME controls (3) to suit your personal preference.

4.The cassette can be advanced in the fast forward mode, by depressing the EJECT/F.F. button (9) half-way in. Pushing the EJECT/F.F. Button (9) again will stop the fast forward mode and return the tape mechanism to the play mode.

5.Depressing the EJECT/F.F. Button (9) completely in, will eject the cassette from the unit. At this time, radio operation will resume.

6.When the tape reaches its end in the play mode, the cassette will automatically stop and radio operation will resume.

TROUBLE SHOOTING GUIDE

TURNTABLE

The unit does not operate.

The AC power cord is not connected to a power outlet.

The unit is not turned on : rotate the VOLUME knob from the OFF position

No sound is coming from unit.

The white protective needle cover was not removed.

The volume is not turned up.

Tone arm will not move.

Black tie-wrap was not removed from underneath tone arm

Tone arm hold down clip was not released.

RADIO

No radio

The function switch is not in the correct position. Turn function switch insert to

RADIO.

Adjust the VOLUME knob.

Rotate the TUNING knob to find a radio station.

CASSETTE TAPE

Cassette tape cannot be inserted

The cassette tape is inserted in the wrong position.

No cassette playback

The cassette tape is not pushed all the way in.

Adjust the volume knob.

The cassette has reached the end of the side being played. Open cassette tape door, take out tape, flip over the cassette and reinsert.

Needles are available for additional charges, please call us at 1-800-926-7801 for assistance

www.crosleyradio.com

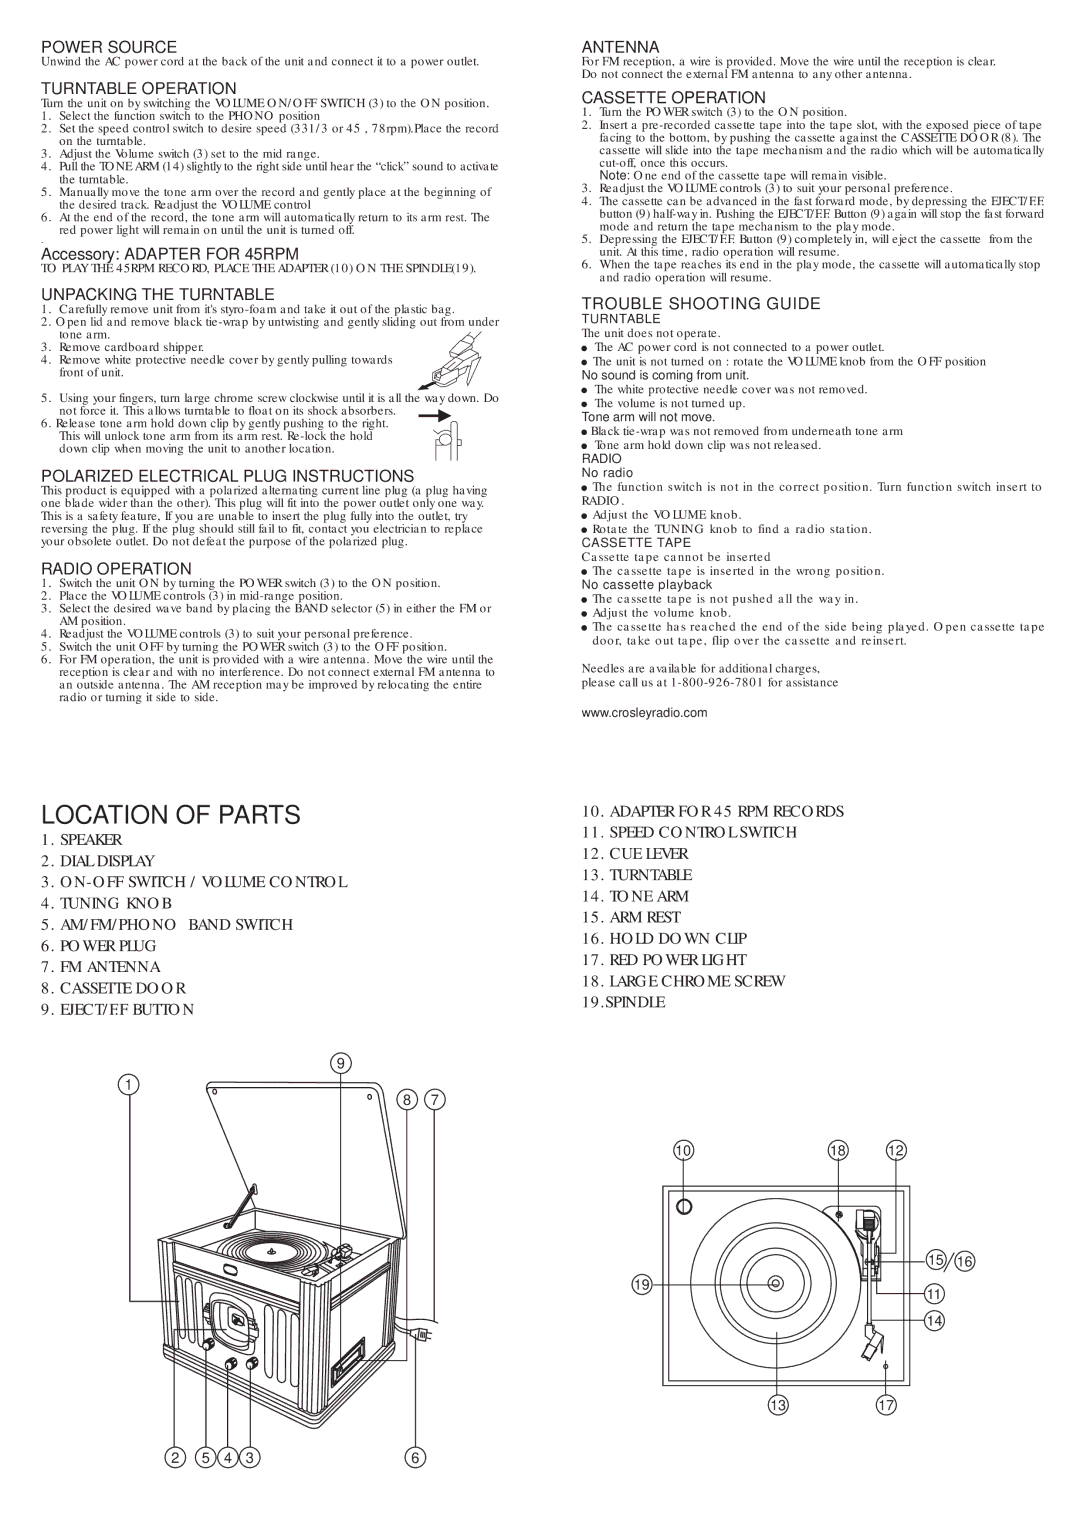
LOCATION OF PARTS

1.SPEAKER

2.DIAL DISPLAY

3.ON-OFF SWITCH / VOLUME CONTROL

4.TUNING KNOB

5.AM/FM/PHONO BAND SWITCH

6.POWER PLUG

7.FM ANTENNA

8.CASSETTE DOOR

9.EJECT/F.F BUTTON

9

1

8 7

10.ADAPTER FOR 45 RPM RECORDS

11.SPEED CONTROL SWITCH

12.CUE LEVER

13.TURNTABLE

14.TONE ARM

15.ARM REST

16.HOLD DOWN CLIP

17.RED POWER LIGHT

18.LARGE CHROME SCREW 19.SPINDLE

10

18

12

19

13

15

16

11


14


17


2

5

4

3

6

Page 2
Image 2
Crosley Radio CR67 Power Source, Turntable Operation, Unpacking the Turntable, Polarized Electrical Plug Instructions

CR67 specifications

The Crosley Radio CR67 is an embodiment of vintage charm and modern technology, designed for those who appreciate classic aesthetics blended with contemporary functionality. This turntable is not merely a device for playing records; it is a statement piece that evokes nostalgia while offering the versatility demanded by today’s music enthusiasts.

One of the standout features of the CR67 is its minimalistic design. Inspired by the traditional mid-century style, the turntable showcases a sleek, stylish hardwood cabinet available in various finishes complemented by a stylish, protective dust cover. This attention to design details ensures that the CR67 becomes a focal point in any room, appealing to both collectors and casual listeners alike.

At the heart of the CR67 lies its high-quality belt-driven turntable mechanism. This technology is renowned for delivering superior sound quality by minimizing vibrations, which is crucial for an optimal listening experience. With the capability to play both 33 1/3 and 45 RPM records, users can enjoy a vast array of vinyl from different eras, thus catering to diverse music tastes.

The CR67 is equipped with an adjustable counterweight and anti-skate control, allowing users to customize their setup for the best possible sound. It also features a ceramic cartridge that provides clear and vivid audio reproduction, ensuring fidelity to the original recording. These audio advancements cater to both seasoned audiophiles and those new to vinyl.

In addition to its turntable functionalities, the Crosley CR67 also features built-in Bluetooth technology, allowing users to stream music wirelessly from their smartphones or other devices. This dual functionality enables users to enjoy the warmth of vinyl records while also accessing modern digital music, creating a seamless listening experience.

Moreover, the CR67 includes RCA outputs for connecting to external speakers or amplifiers, enhancing the listening experience further. With built-in speakers, the device ensures that you can enjoy your favorite tunes without needing additional equipment.

Overall, the Crosley Radio CR67 is a well-rounded turntable that grips the essence of nostalgia while delivering modern conveniences. Its blend of vintage aesthetics, quality sound, and contemporary features makes it an ideal choice for music lovers who cherish both the art of vinyl and the advancements of today’s audio technologies.