IMPORTANT SAFEGUARDS
When using electrical appliances, basic safety precautions should always be followed, including the following:
1.Read all instructions.
2.To protect against risk of electrical shock, do not immerse cord, plug or grinder in water or other liquid.
3.Close supervision is necessary when any appliance is used by or near children.
4.Unplug from outlet when not in use, before putting on or taking off parts, before removing coffee and before cleaning.
5.Avoid contact with moving parts.
6.Do not operate any appliance with a damaged cord or plug, or after the appliance malfunctions, or is dropped or damaged in any manner. Return appliance to the nearest authorized Cuisinart service facility for examination, repair, or mechanical or electrical adjustment.
7.The use of attachments not recommended or sold by Cuisinart may cause fire, electrical shock, or risk of injury.
8.Do not use outdoors.
9.Do not let cord hang over edge of table or counter, or touch hot surfaces.
10.Before using, check hopper for presence of foreign objects.
11.Use this appliance to grind roasted coffee beans only. Grinding other substances, such as nuts, spices or unroasted beans, may dull the blade and cause poor grinding or injury.
12.Do not use appliance for other than intended use.
13.Do not place this appliance on or near a hot gas or electric burner, or in a heated oven.
SAVE THESE INSTRUCTIONS FOR HOUSEHOLD USE ONLY
NOTICE
This appliance has a polarized plug (one blade is wider than the other). To reduce the risk of electric shock, this plug will fit in a polarized outlet only one way. If the plug does not fit fully in the outlet, reverse the plug. If it still does not fit, contact a qualified electrician. Do not modify the plug in any way.
INTRODUCTION
The next generation of coffee grinders has arrived to deliver the new standard in
OPERATING INSTRUCTIONS
1.Remove bean hopper lid.
2.Fill bean hopper, making sure that the lid closes securely. Maximum capacity is 8 oz, be sure you have enough beans to grind your desired amount of coffee.
3.Plug cord into outlet.
4.Select grind setting – turn the hopper to your desired grind setting. The higher the number the coarser the grind. Use
5.Select cup setting – press the # of Cups Button repeatedly until your desired number of cups is displayed on the LCD, from 2 to 14 cups. Press and hold the button to scroll through the numbers quickly.
6.Press the Start/Stop button to begin grinding.
A safety interlock system prevents the unit from operating unless the hopper and grind chamber are properly in place.
Note: If the grind chamber is overfilled the chute can get clogged and the unit will not work. The LCD will flash. To unclog, use the scoop brush to clear out the chute of excess grounds.
Also note: If the grinder stops and displays HHH in the LCD screen at any point, the motor has likely
7.Grinding will automatically stop upon completion. Note: to pause or cancel operation during use, see below.
8.Pull the grind chamber toward you to remove from unit.
To Pause or Cancel Grinding
a. To pause the grinding, press the Start/Stop button. The grinder will stop and the countdown timer will flash. Press the Start/Stop button again to resume.
b. To cancel the grinding, press and hold the Start/Stop button for
NOTE: The unit will pause for up to 5 minutes before cancelling the grind.
1.
2.
5. | 4. | |
| ||
6. | 7. | |
8. | ||
|
9.
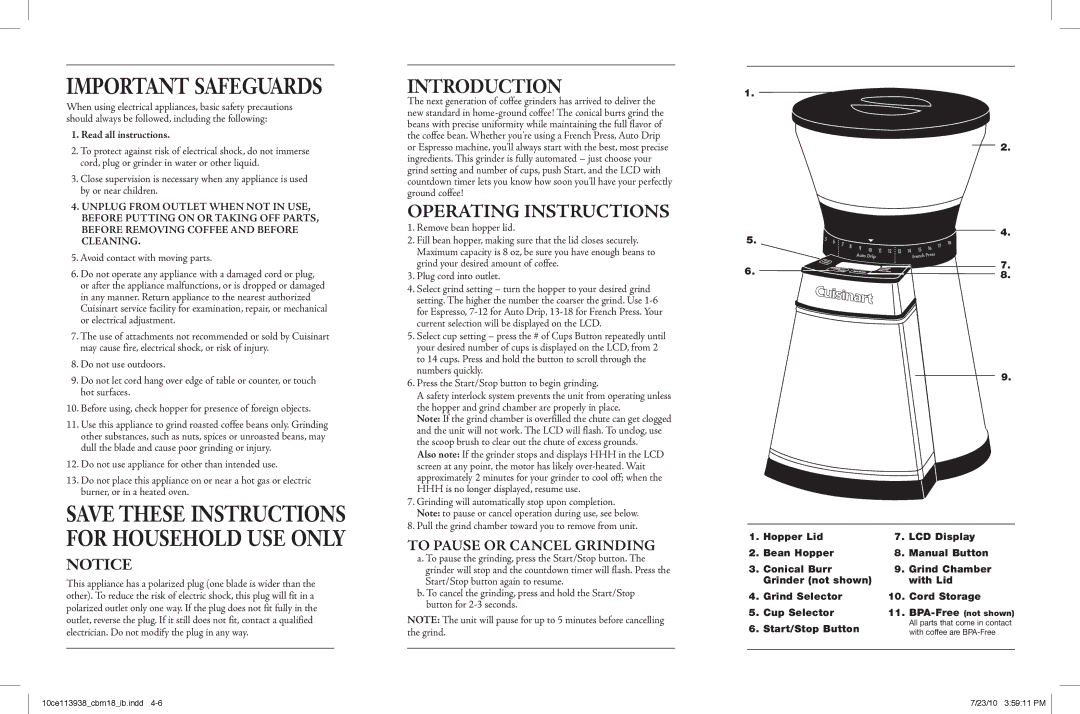
1. | Hopper Lid | 7. | LCD Display |
2. | Bean Hopper | 8. | Manual Button |
3. | Conical Burr | 9. | Grind Chamber |
| Grinder (not shown) |
| with Lid |
4. | Grind Selector | 10. Cord Storage | |
5. | Cup Selector | 11. | |
6. | Start/Stop Button |
| All parts that come in contact |
| with coffee are | ||
|
|
|
|
10ce113938_cbm18_ib.indd | 7/23/10 3:59:11 PM |