Réglage de la MINUTERIE EN MARCHE AUTO : Vous devez choisir tous les réglages appropriés qui sont requis de fonctionner sous le programme de MINUTERIE AUTO avant d’activer le programme EN MARCHE AUTO.
•Choisir le MODE approprié de fonctionnement désiré de l’unité (Frais–Sec–Ventilateur).
•Choisir le réglage de la VITESSE DU VENTILATEUR appropriée pour le fonctionnement désiré de l’unité; Haute,
Moyenne ou Basse. (La vitesse du ventilateur est préréglée à ‘Haute’ dans mode de déshumidification).
•Pour régler la minuterie EN MARCHE AUTO, l’unité doit être hors de service.
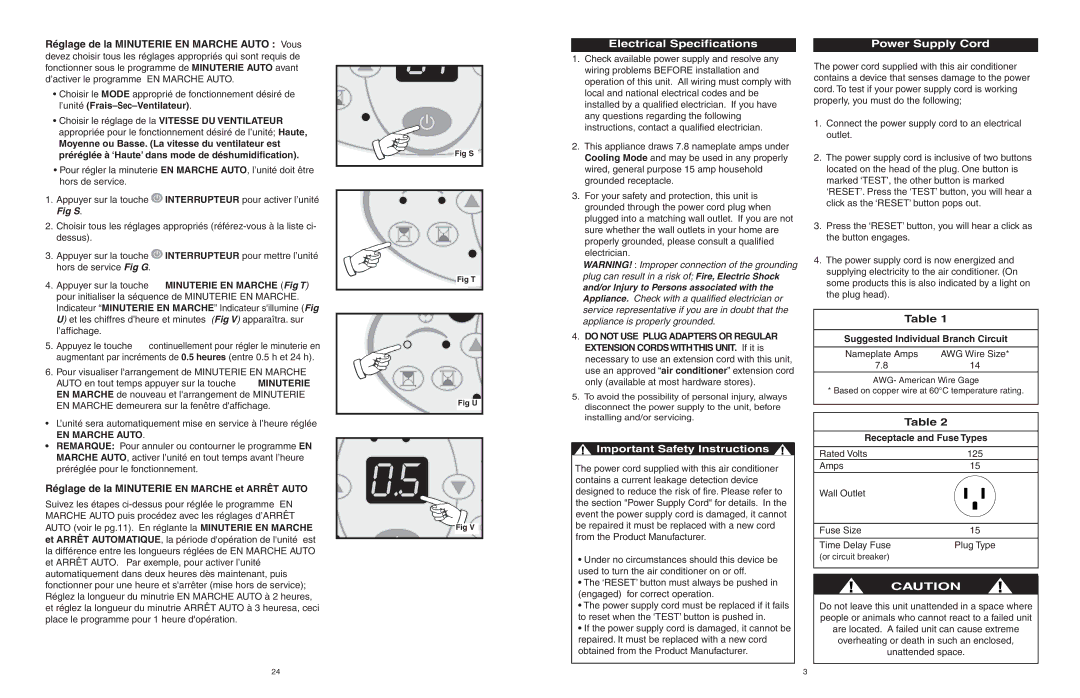
1.Appuyer sur la touche  INTERRUPTEUR pour activer l’unité Fig S.
2.Choisir tous les réglages appropriés (référez-vous à la liste ci- dessus).
3.Appuyer sur la touche  INTERRUPTEUR pour mettre l’unité hors de service Fig G.
4.Appuyer sur la touche MINUTERIE EN MARCHE (Fig T) pour initialiser la séquence de MINUTERIE EN MARCHE. Indicateur “MINUTERIE EN MARCHE” Indicateur s'illumine (Fig U) et les chiffres d’heure et minutes (Fig V) apparaîtra. sur l’affichage.
5. Appuyez le touche continuellement pour régler le minuterie en augmentant par incréments de 0.5 heures (entre 0.5 h et 24 h).
6. Pour visualiser l'arrangement de MINUTERIE EN MARCHE
AUTO en tout temps appuyer sur la touche MINUTERIE EN MARCHE de nouveau et l'arrangement de MINUTERIE EN MARCHE demeurera sur la fenêtre d'affichage.
•L’unité sera automatiquement mise en service à l’heure réglée
EN MARCHE AUTO.
•REMARQUE: Pour annuler ou contourner le programme EN MARCHE AUTO, activer l’unité en tout temps avant l’heure préréglée pour le fonctionnement.
Réglage de la MINUTERIE EN MARCHE et ARRÊT AUTO
Suivez les étapes ci-dessus pour réglée le programme EN MARCHE AUTO puis procédez avec les réglages d’ARRÊT AUTO (voir le pg.11). En réglante la MINUTERIE EN MARCHE et ARRÊT AUTOMATIQUE, la période d'opération de l'unité est la différence entre les longueurs réglées de EN MARCHE AUTO et ARRÊT AUTO. Par exemple, pour activer l’unité automatiquement dans deux heures dès maintenant, puis fonctionner pour une heure et s'arrêter (mise hors de service); Réglez la longueur du minutrie EN MARCHE AUTO à 2 heures, et réglez la longueur du minutrie ARRÊT AUTO à 3 heuresa, ceci place le programme pour 1 heure d'opération.
Fig S
Fig T
Fig U
 C
C  F
F
Fig VMO
Electrical Specifications
1.Check available power supply and resolve any wiring problems BEFORE installation and operation of this unit. All wiring must comply with local and national electrical codes and be installed by a qualified electrician. If you have any questions regarding the following instructions, contact a qualified electrician.
2.This appliance draws 7.8 nameplate amps under Cooling Mode and may be used in any properly wired, general purpose 15 amp household grounded receptacle.
3.For your safety and protection, this unit is grounded through the power cord plug when plugged into a matching wall outlet. If you are not sure whether the wall outlets in your home are properly grounded, please consult a qualified electrician.
WARNING! : Improper connection of the grounding plug can result in a risk of; Fire, Electric Shock and/or Injury to Persons associated with the Appliance. Check with a qualified electrician or service representative if you are in doubt that the appliance is properly grounded.
4.DO NOT USE PLUG ADAPTERS OR REGULAR EXTENSION CORDSWITHTHIS UNIT. If it is necessary to use an extension cord with this unit, use an approved “air conditioner” extension cord only (available at most hardware stores).
5.To avoid the possibility of personal injury, always disconnect the power supply to the unit, before installing and/or servicing.
 Important Safety Instructions
The power cord supplied with this air conditioner contains a current leakage detection device designed to reduce the risk of fire. Please refer to the section "Power Supply Cord" for details. In the event the power supply cord is damaged, it cannot be repaired it must be replaced with a new cord from the Product Manufacturer.
•Under no circumstances should this device be used to turn the air conditioner on or off.
•The ‘RESET’ button must always be pushed in (engaged) for correct operation.
•The power supply cord must be replaced if it fails to reset when the ‘TEST’ button is pushed in.
•If the power supply cord is damaged, it cannot be repaired. It must be replaced with a new cord obtained from the Product Manufacturer.
TfPower Supply Cord
The power cord supplied with this air conditioner contains a device that senses damage to the power cord. To test if your power supply cord is working properly, you must do the following;
1.Connect the power supply cord to an electrical outlet.
2.The power supply cord is inclusive of two buttons located on the head of the plug. One button is marked ‘TEST’, the other button is marked ‘RESET’. Press the ‘TEST’ button, you will hear a click as the ‘RESET’ button pops out.
3.Press the ‘RESET’ button, you will hear a click as the button engages.
4.The power supply cord is now energized and supplying electricity to the air conditioner. (On some products this is also indicated by a light on the plug head).
Table 1
Suggested Individual Branch Circuit
Nameplate Amps | AWG Wire Size* |
7.8 | 14 |
AWG- American Wire Gage
* Based on copper wire at 60°C temperature rating.
| Table 2 |
| | | | |
Receptacle and Fuse Types |
| | | | | |
Rated Volts | 125 | |
Amps | 15 | | |
Wall Outlet | | | | | |
| | | | |
| | | | | |
Fuse Size | 15 | | |
| | | | | |
Time Delay Fuse | Plug Type |
(or circuit breaker) | | | | | |
| | | | | |
CAUTION
Do not leave this unit unattended in a space where people or animals who cannot react to a failed unit are located. A failed unit can cause extreme overheating or death in such an enclosed, unattended space.