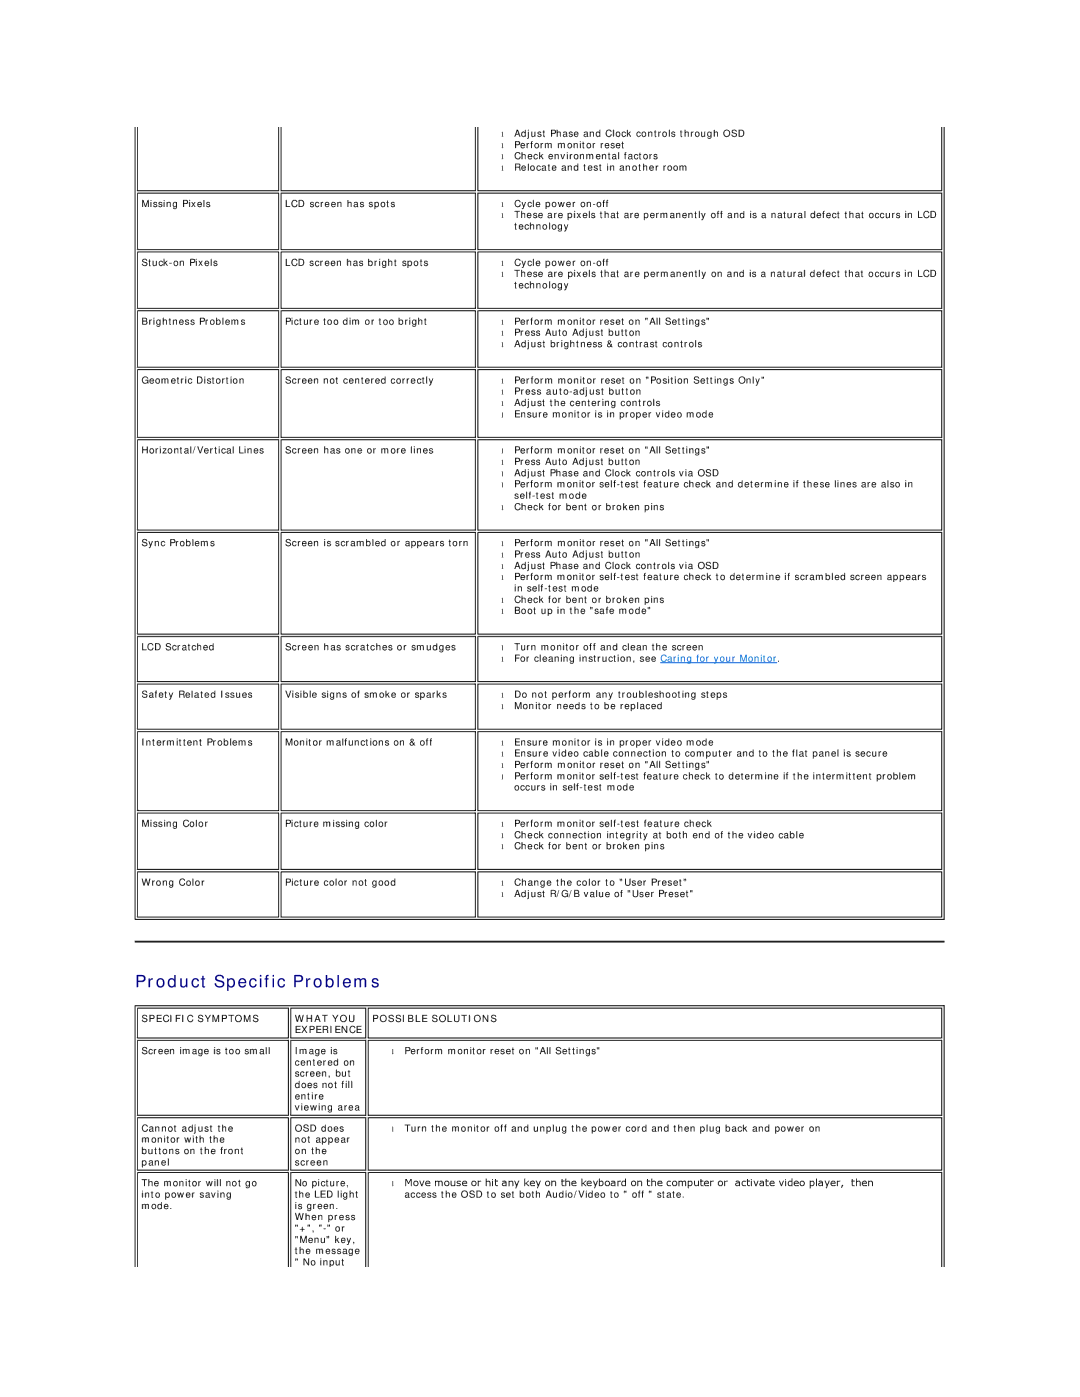
Missing Pixels
Brightness Problems
Geometric Distortion
Horizontal/Vertical Lines
Sync Problems
LCD Scratched
Safety Related Issues
Intermittent Problems
Missing Color
Wrong Color
LCD screen has spots
LCD screen has bright spots
Picture too dim or too bright
Screen not centered correctly
Screen has one or more lines
Screen is scrambled or appears torn
Screen has scratches or smudges
Visible signs of smoke or sparks
Monitor malfunctions on & off
Picture missing color
Picture color not good
•Adjust Phase and Clock controls through OSD
•Perform monitor reset
•Check environmental factors
•Relocate and test in another room
•Cycle power
•These are pixels that are permanently off and is a natural defect that occurs in LCD technology
•Cycle power
•These are pixels that are permanently on and is a natural defect that occurs in LCD technology
•Perform monitor reset on "All Settings"
•Press Auto Adjust button
•Adjust brightness & contrast controls
•Perform monitor reset on "Position Settings Only"
•Press
•Adjust the centering controls
•Ensure monitor is in proper video mode
•Perform monitor reset on "All Settings"
•Press Auto Adjust button
•Adjust Phase and Clock controls via OSD
•Perform monitor
•Check for bent or broken pins
•Perform monitor reset on "All Settings"
•Press Auto Adjust button
•Adjust Phase and Clock controls via OSD
•Perform monitor
•Check for bent or broken pins
•Boot up in the "safe mode"
•Turn monitor off and clean the screen
•For cleaning instruction, see Caring for your Monitor.
•Do not perform any troubleshooting steps
•Monitor needs to be replaced
•Ensure monitor is in proper video mode
•Ensure video cable connection to computer and to the flat panel is secure
•Perform monitor reset on "All Settings"
•Perform monitor
•Perform monitor
•Check connection integrity at both end of the video cable
•Check for bent or broken pins
•Change the color to "User Preset"
•Adjust R/G/B value of "User Preset"
Product Specific Problems
SPECIFIC SYMPTOMS
Screen image is too small
Cannot adjust the monitor with the buttons on the front panel
The monitor will not go into power saving mode.
WHAT YOU | POSSIBLE SOLUTIONS | |
EXPERIENCE |
|
|
|
|
|
|
|
|
Image is | • | Perform monitor reset on "All Settings" |
centered on |
|
|
screen, but |
|
|
does not fill |
|
|
entire |
|
|
viewing area |
|
|
|
|
|
|
|
|
OSD does | • | Turn the monitor off and unplug the power cord and then plug back and power on |
not appear |
|
|
on the |
|
|
screen |
|
|
|
|
|
|
|
|
No picture, | • | Move mouse or hit any key on the keyboard on the computer or activate video player, then |
the LED light |
| access the OSD to set both Audio/Video to " off " state. |
is green. |
|
|
When press |
|
|
"+", |
|
|
"Menu" key, |
|
|
the message |
|
|
" No input |
|
|