4.Carefully inspect the screen for abnormalities.
5.Press Button 4 on the front panel again. The color of the screen changes to red.
6.Inspect the display for any abnormalities.
7.Repeat steps 5 and 6 to inspect the display in green, blue, black, white and text screens.
The test is complete when the white screen appears. To exit, press Button 4 again.
If you do not detect any screen abnormalities upon using the
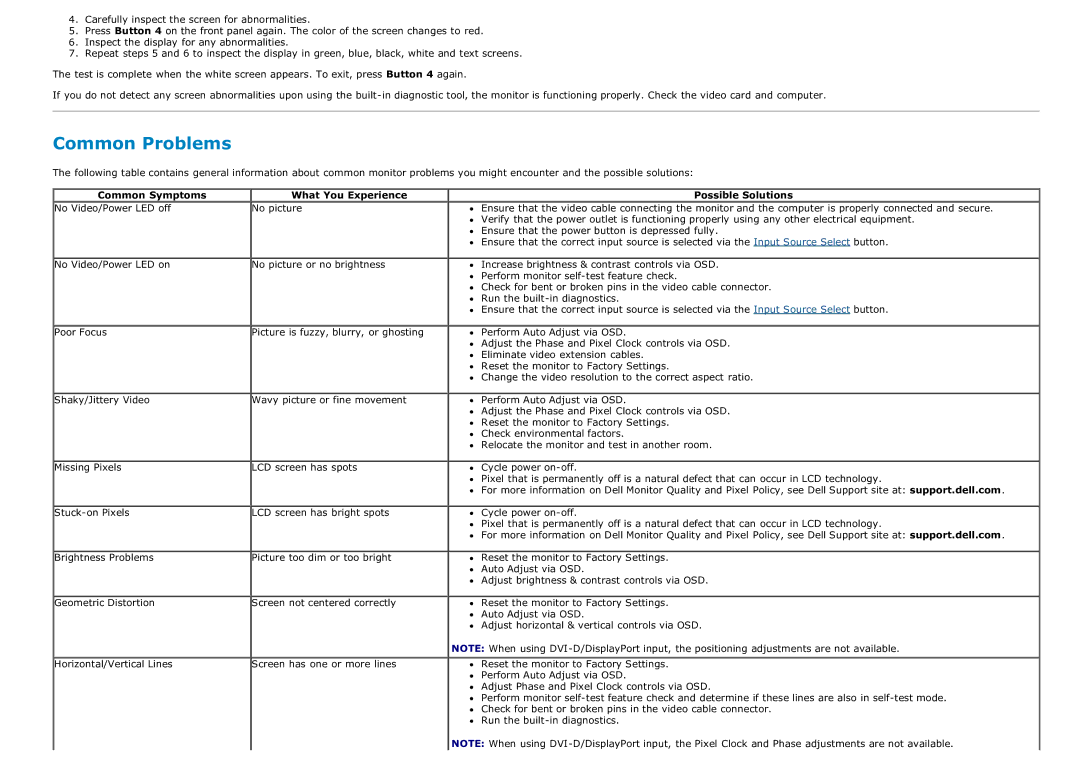
Common Problems
The following table contains general information about common monitor problems you might encounter and the possible solutions:
Common Symptoms | What You Experience | Possible Solutions |
No Video/Power LED off | No picture | Ensure that the video cable connecting the monitor and the computer is properly connected and secure. |
|
| Verify that the power outlet is functioning properly using any other electrical equipment. |
|
| Ensure that the power button is depressed fully. |
|
| Ensure that the correct input source is selected via the Input Source Select button. |
No Video/Power LED on | No picture or no brightness | Increase brightness & contrast controls via OSD. |
|
| Perform monitor |
|
| Check for bent or broken pins in the video cable connector. |
|
| Run the |
|
| Ensure that the correct input source is selected via the Input Source Select button. |
Poor Focus | Picture is fuzzy, blurry, or ghosting | Perform Auto Adjust via OSD. |
|
| Adjust the Phase and Pixel Clock controls via OSD. |
|
| Eliminate video extension cables. |
|
| Reset the monitor to Factory Settings. |
|
| Change the video resolution to the correct aspect ratio. |
Shaky/Jittery Video | Wavy picture or fine movement | Perform Auto Adjust via OSD. |
|
| Adjust the Phase and Pixel Clock controls via OSD. |
|
| Reset the monitor to Factory Settings. |
|
| Check environmental factors. |
|
| Relocate the monitor and test in another room. |
Missing Pixels | LCD screen has spots | Cycle power |
|
| Pixel that is permanently off is a natural defect that can occur in LCD technology. |
|
| For more information on Dell Monitor Quality and Pixel Policy, see Dell Support site at: support.dell.com. |
LCD screen has bright spots | Cycle power | |
|
| Pixel that is permanently off is a natural defect that can occur in LCD technology. |
|
| For more information on Dell Monitor Quality and Pixel Policy, see Dell Support site at: support.dell.com. |
Brightness Problems | Picture too dim or too bright | Reset the monitor to Factory Settings. |
|
| Auto Adjust via OSD. |
|
| Adjust brightness & contrast controls via OSD. |
Geometric Distortion | Screen not centered correctly | Reset the monitor to Factory Settings. |
|
| Auto Adjust via OSD. |
|
| Adjust horizontal & vertical controls via OSD. |
|
| NOTE: When using |
Horizontal/Vertical Lines | Screen has one or more lines | Reset the monitor to Factory Settings. |
|
| Perform Auto Adjust via OSD. |
|
| Adjust Phase and Pixel Clock controls via OSD. |
|
| Perform monitor |
|
| Check for bent or broken pins in the video cable connector. |
|
| Run the |
|
| NOTE: When using |
|
|
|