18
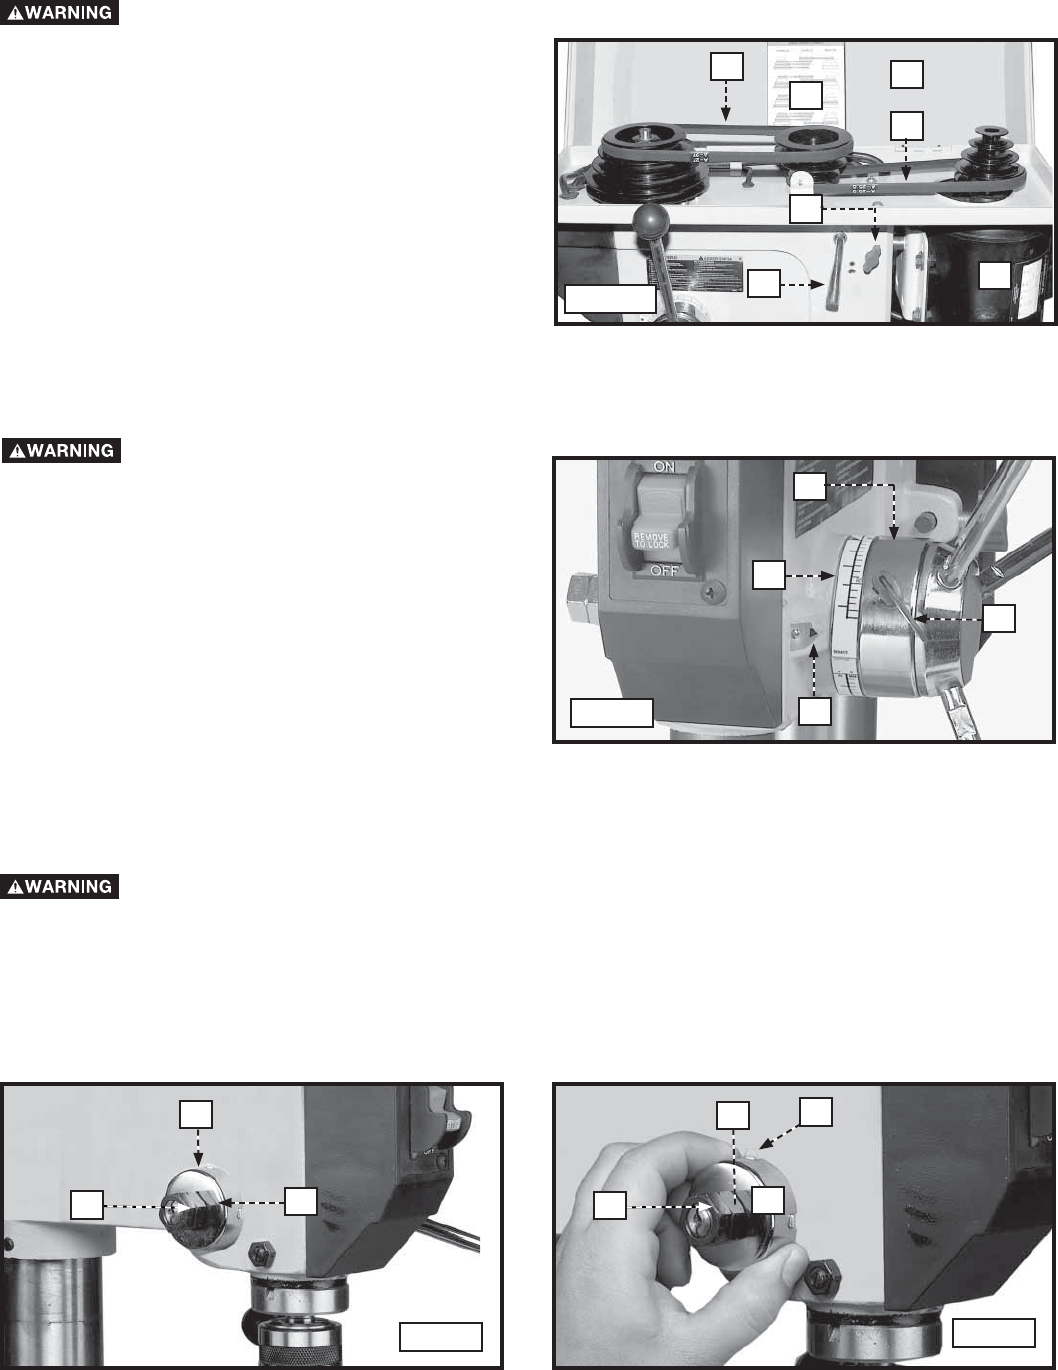
1. Open the belt and pulley guard (A) Fig. 28B.
2. Loosen the tension lock knobs located on both
sides of the head casting (one shown at (B) Fig.
28B). Move the tension lever (C) forward. Pivot the
motor (D) toward the front of the drill press.
3. Hold the motor toward the front of the drill press,
and position the belts (F) on the desired steps of the
motor and spindle pulleys (Figs. 28A & 28B).
4. Move the motor (D) Fig. 28B to the rear until the belt
is properly tensioned. Tighten the tension lock knob
(B). The belt should be just tight enough to prevent
slipping. Excessive tension will reduce the life of the
belt, the pulleys, and the bearings. When you can
flex the belts approximately 1" at the midway point
between the pulleys, the tension will be correct.
DRILLING HOLES TO DEPTHA depth-stop is provided for projects that require a number of holes at the same depth. To use:
ADJUSTING SPINDLE RETURN SPRINGThe spindle will automatically return to its upper-most position when the handle is released. Allow the handle to return
slowly to the top position after each hole has been drilled. This spindle-return spring was adjusted at the factory.
However, to adjust (if necessary):
1. Loosen the nuts (B) and (E) Fig. 30. Make sure that the spring housing (A) stays engaged with the head casting.
2. FIRMLY HOLD the spring housing (A) Fig. 31, pull it out, and rotate it until the boss (D) is engaged with the next
notch in the housing. Turn the housing counter-clockwise to increase or clockwise to decrease the spring tension.
Turn the nut (E) until it contacts the spring housing (A), then back the nut (E) out 1/4 turn. Tighten the nut (B) against
the nut (E) to hold the housing in place.
IMPORTANT: Do not allow the inside nut (E) to contact the spring housing (A).
CHANGING SPEEDS AND ADJUSTING THE BELT TENSIONNOTE: A belt-positioning speed chart (E) Fig. 28B is located on the inside top cover of the drill press.
Disconnect the machine from the power source!
A
E
F
F
C
B
D
Fig. 28B
1. Install your bit in the chuck.
2. Loosen the lock screw (A) Fig. 29. Rotate the pinion
assembly (B) until the pointer (C) aligns (on the scale
(D) Fig. 29) with your desired depth. Tighten the lock
screw (A).
3. Place the workpiece on the drill press table. Raise the
drill press table until the workpiece barely touches
the drill bit.
4. Drill a test hole to check the depth.
NOTE: The scale (D) is calibrated in both inches and
millimeters.
Disconnect the machine from the power
source! B
D
B
B
Fig. 29
Disconnect the machine from the power source!
B
A
EB
ED
A
Fig. 30 Fig. 31