A.

1

2

4 3

5

B.

1

C.

1

2

8

4

3

D.

2

3

1

4


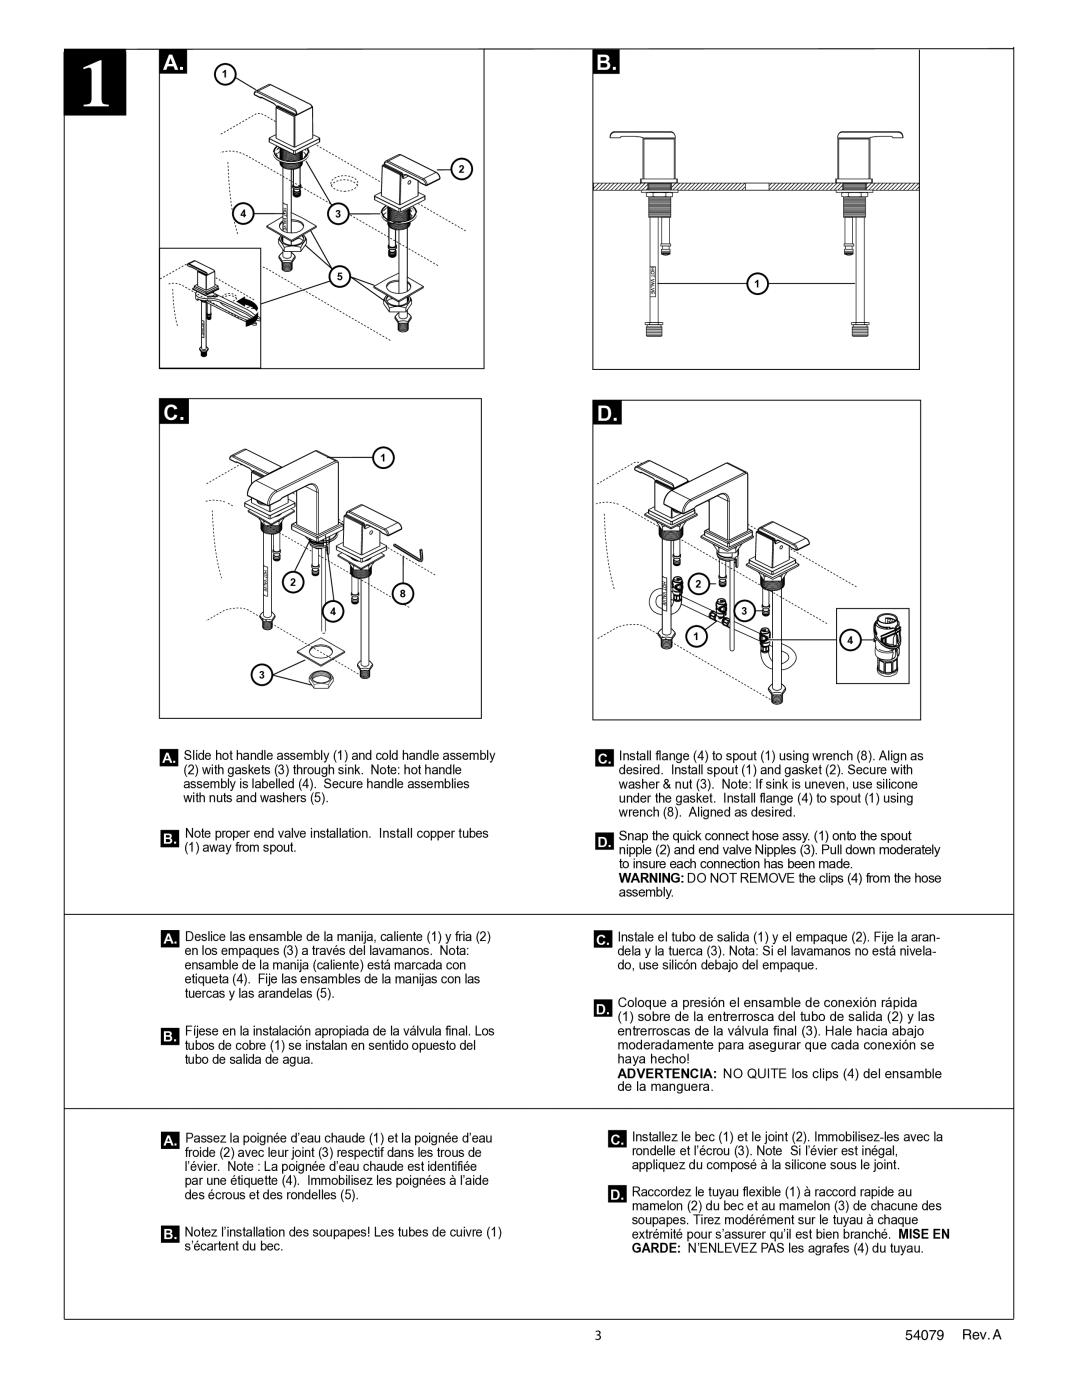
A.Slide hot handle assembly (1) and cold handle assembly

(2)with gaskets (3) through sink. Note: hot handle assembly is labelled (4). Secure handle assemblies with nuts and washers (5).

B.Note proper end valve installation. Install copper tubes

(1)away from spout.

C.Install flange (4) to spout (1) using wrench (8). Align as desired. Install spout (1) and gasket (2). Secure with washer & nut (3). Note: If sink is uneven, use silicone under the gasket. Install flange (4) to spout (1) using wrench (8). Aligned as desired.

D.Snap the quick connect hose assy. (1) onto the spout nipple (2) and end valve Nipples (3). Pull down moderately to insure each connection has been made.

WARNING: DO NOT REMOVE the clips (4) from the hose assembly.

A.

Deslice las ensamble de la manija, caliente (1) y fria (2)

C.

Instale el tubo de salida (1) y el empaque (2). Fije la aran-


en los empaques (3) a través del lavamanos. Nota:


dela y la tuerca (3). Nota: Si el lavamanos no está nivela-


ensamble de la manija (caliente) está marcada con


do, use silicón debajo del empaque.


etiqueta (4). Fije las ensambles de la manijas con las


tuercas y las arandelas (5).

D.

Coloque a presión el ensamble de conexión rápida


(1) sobre de la entrerrosca del tubo de salida (2) y las

B.

Fíjese en la instalación apropiada de la válvula final. Los


entrerroscas de la válvula final (3). Hale hacia abajo


tubos de cobre (1) se instalan en sentido opuesto del


moderadamente para asegurar que cada conexión se


tubo de salida de agua.


haya hecho!


ADVERTENCIA: NO QUITE los clips (4) del ensamble


de la manguera.

A.Passez la poignée d’eau chaude (1) et la poignée d’eau froide (2) avec leur joint (3) respectif dans les trous de l’évier. Note : La poignée d’eau chaude est identifiée par une étiquette (4). Immobilisez les poignées à l’aide des écrous et des rondelles (5).

B.Notez l’installation des soupapes! Les tubes de cuivre (1) s’écartent du bec.

C.Installez le bec (1) et le joint (2). Immobilisez-les avec la rondelle et l’écrou (3). Note Si l’évier est inégal, appliquez du composé à la silicone sous le joint.

D.Raccordez le tuyau flexible (1) à raccord rapide au mamelon (2) du bec et au mamelon (3) de chacune des soupapes. Tirez modérément sur le tuyau à chaque extrémité pour s’assurer qu’il est bien branché. MISE EN GARDE: N’ENLEVEZ PAS les agrafes (4) du tuyau.

3

54079 Rev. A

Page 3
Image 3
Delta 3586 Series Slide hot handle assembly 1 and cold handle assembly, Away from spout, Tubo de salida de agua Haya hecho

3586 Series specifications

The Delta 3586 Series represents a significant advancement in the world of multi-functional tools, specifically designed for those seeking versatility without compromising on performance. This series stands out for its robust construction, innovative features, and user-friendly design, making it a preferred choice for both professionals and DIY enthusiasts alike.

One of the main highlights of the Delta 3586 Series is its powerful motor, which offers high torque and reliable performance across a variety of applications. This motor is engineered to deliver consistent power, allowing users to tackle challenging tasks with ease. Furthermore, the series is equipped with an advanced cooling system that prevents overheating during extended use, ensuring durability and longevity.

An essential characteristic of the Delta 3586 Series is its ergonomic design. The tools are built with user comfort in mind, featuring anti-slip grips and lightweight materials that reduce fatigue during prolonged operation. Additionally, the balanced weight distribution enhances control and precision, making it easier for users to achieve professional-quality results.

In terms of versatility, the Delta 3586 Series is designed to accommodate a wide range of attachments and accessories. This modular design allows users to switch between different tools seamlessly, making it ideal for various tasks such as sanding, drilling, and cutting. The quick-change mechanism simplifies the process of switching attachments, minimizing downtime and improving efficiency.

Another notable feature of the Delta 3586 Series is its integrated safety technologies. The tools are equipped with advanced safety features such as overload protection and electronic brakes, which enhance user safety and prevent accidental injuries. The inclusion of LED indicators further aids in providing real-time feedback on power and performance levels, allowing users to monitor their work effectively.

In conclusion, the Delta 3586 Series embodies a perfect blend of power, versatility, and safety. With its innovative technologies and thoughtful design features, it caters to the diverse needs of users across various industries. Whether for professional use or home improvement projects, the Delta 3586 Series delivers exceptional performance and reliability, making it a worthy investment for anyone in need of high-quality tools.