1

A.

1

2

B.

C.

2

4

3


5


6


2

1


7


1

2


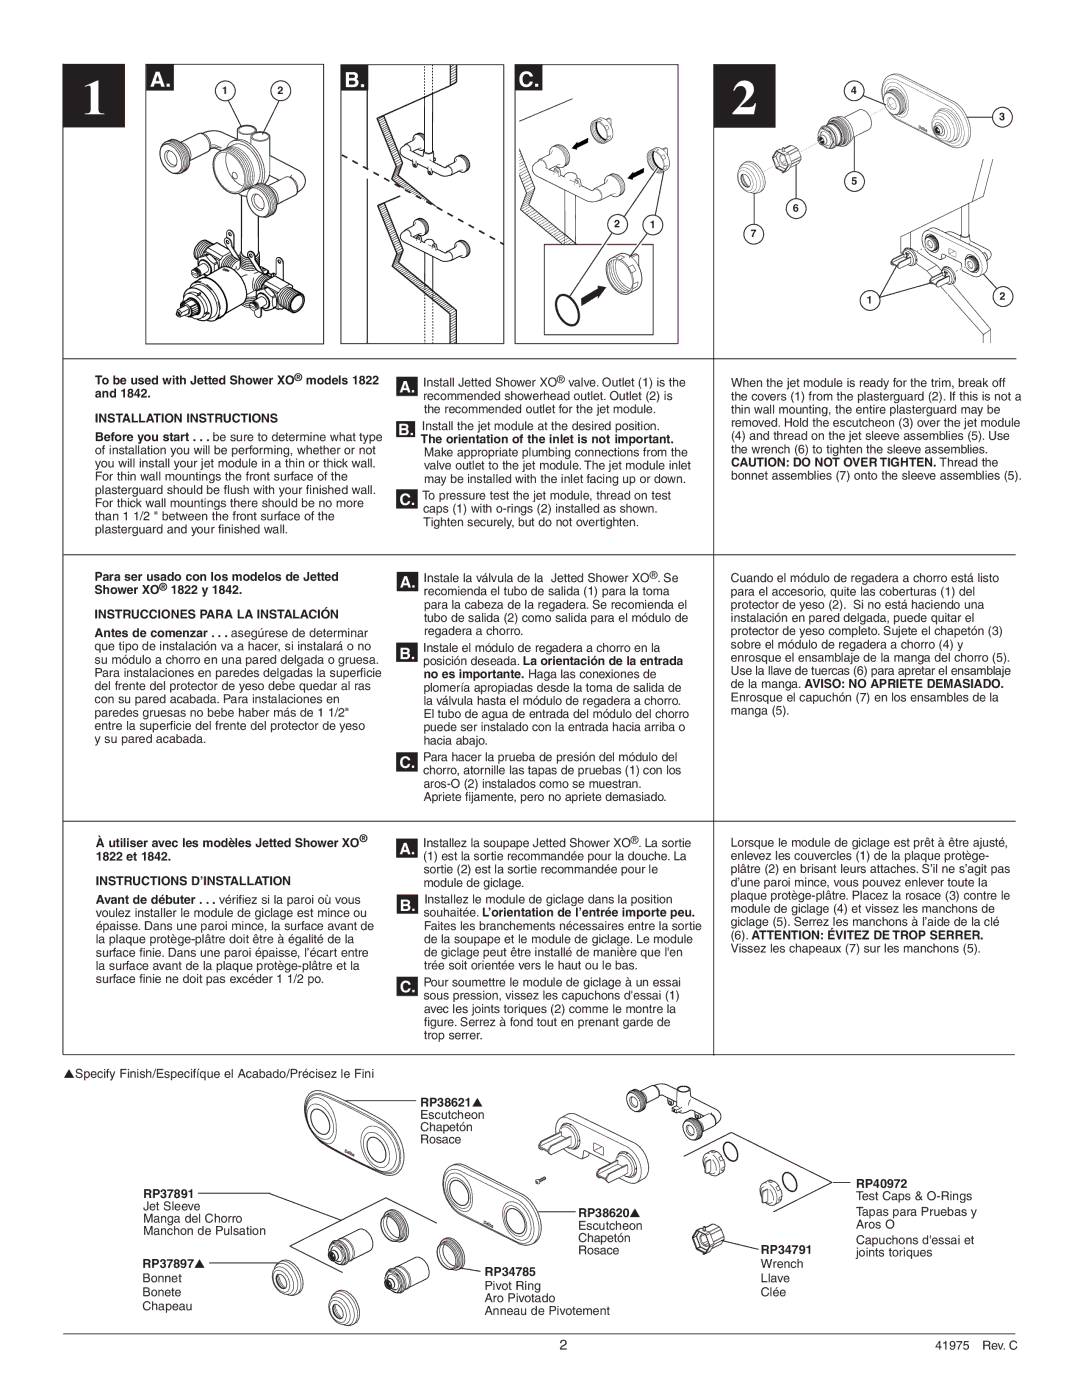
To be used with Jetted Shower XO® models 1822


Install Jetted Shower XO® valve. Outlet (1) is the

When the jet module is ready for the trim, break off

A.

and 1842.


recommended showerhead outlet. Outlet (2) is

the covers (1) from the plasterguard (2). If this is not a

Installation instructions


the recommended outlet for the jet module.

thin wall mounting, the entire plasterguard may be


Install the jet module at the desired position.

removed. Hold the escutcheon (3) over the jet module

Before you start . . . be sure to determine what type


B.


(4) and thread on the jet sleeve assemblies (5). Use


The orientation of the inlet is not important.


of installation you will be performing, whether or not


Make appropriate plumbing connections from the

the wrench (6) to tighten the sleeve assemblies.

you will install your jet module in a thin or thick wall.


valve outlet to the jet module. The jet module inlet

CAUTION: DO NOT OVER TIGHTEN. Thread the

For thin wall mountings the front surface of the


may be installed with the inlet facing up or down.

bonnet assemblies (7) onto the sleeve assemblies (5).

plasterguard should be flush with your finished wall.


To pressure test the jet module, thread on test


C.


For thick wall mountings there should be no more


than 1 1/2 " between the front surface of the


caps (1) with o-rings (2) installed as shown.


Tighten securely, but do not overtighten.


plasterguard and your finished wall.


Para ser usado con los modelos de Jetted


Instale la válvula de la Jetted Shower XO®. Se

Cuando el módulo de regadera a chorro está listo

A.


Shower XO® 1822 y 1842.


recomienda el tubo de salida (1) para la toma

para el accesorio, quite las coberturas (1) del


Instrucciones para la Instalación


para la cabeza de la regadera. Se recomienda el

protector de yeso (2). Si no está haciendo una


tubo de salida (2) como salida para el módulo de

instalación en pared delgada, puede quitar el

Antes de comenzar . . . asegúrese de determinar


regadera a chorro.

protector de yeso completo. Sujete el chapetón (3)

que tipo de instalación va a hacer, si instalará o no


Instale el módulo de regadera a chorro en la

sobre el módulo de regadera a chorro (4) y


B.


su módulo a chorro en una pared delgada o gruesa.


posición deseada. La orientación de la entrada

enrosque el ensamblaje de la manga del chorro (5).


Para instalaciones en paredes delgadas la superficie


no es importante. Haga las conexiones de

Use la llave de tuercas (6) para apretar el ensamblaje

del frente del protector de yeso debe quedar al ras


plomería apropiadas desde la toma de salida de

de la manga. AVISO: NO APRIETE DEMASIADO.

con su pared acabada. Para instalaciones en


la válvula hasta el módulo de regadera a chorro.

Enrosque el capuchón (7) en los ensambles de la

paredes gruesas no bebe haber más de 1 1/2"


El tubo de agua de entrada del módulo del chorro

manga (5).

entre la superficie del frente del protector de yeso


puede ser instalado con la entrada hacia arriba o


y su pared acabada.


hacia abajo.


C.Para hacer la prueba de presión del módulo del chorro, atornille las tapas de pruebas (1) con los aros-O (2) instalados como se muestran.

Apriete fijamente, pero no apriete demasiado.

À utiliser avec les modèles Jetted Shower XO®


Installez la soupape Jetted Shower XO®. La sortie

Lorsque le module de giclage est prêt à être ajusté,

A.

1822 et 1842.


(1) est la sortie recommandée pour la douche. La

enlevez les couvercles (1) de la plaque protège-

Instructions d’installation


sortie (2) est la sortie recommandée pour le

plâtre (2) en brisant leurs attaches. S’il ne s’agit pas


module de giclage.

d’une paroi mince, vous pouvez enlever toute la

Avant de débuter . . . vérifiez si la paroi où vous


Installez le module de giclage dans la position

plaque protège-plâtre. Placez la rosace (3) contre le

B.


module de giclage (4) et vissez les manchons de

voulez installer le module de giclage est mince ou


souhaitée. L’orientation de l’entrée importe peu.


épaisse. Dans une paroi mince, la surface avant de


Faites les branchements nécessaires entre la sortie

giclage (5). Serrez les manchons à l’aide de la clé


(6). ATTENTION: ÉVITEZ DE TROP SERRER.

la plaque protège-plâtre doit être à égalité de la


de la soupape et le module de giclage. Le module


Vissez les chapeaux (7) sur les manchons (5).

surface finie. Dans une paroi épaisse, l’écart entre


de giclage peut être installé de manière que l'en


la surface avant de la plaque protège-plâtre et la


trée soit orientée vers le haut ou le bas.


surface finie ne doit pas excéder 1 1/2 po.


Pour soumettre le module de giclage à un essai


C.


sous pression, vissez les capuchons d'essai (1)


avec les joints toriques (2) comme le montre la


figure. Serrez à fond tout en prenant garde de


trop serrer.


Specify Finish/Especifíque el Acabado/Précisez le Fini

RP38621▲

Escutcheon

Chapetón

Rosace

RP37891


RP40972


Test Caps & O-Rings

Jet Sleeve

RP38620▲


Tapas para Pruebas y

Manga del Chorro


Escutcheon


Aros O

Manchon de Pulsation


Chapetón


Capuchons d'essai et


RP34791

RP37897▲

Rosace

joints toriques

RP34785

Wrench


Bonnet

Llave


Pivot Ring


Bonete

Clée


Aro Pivotado


Chapeau


Anneau de Pivotement


2


41975    Rev. C

Page 2
Image 2
Delta T1817 Series To be used with Jetted Shower XO models, Installation instructions, Shower XO 1822 y, 1822 et, RP38621

T1837 Series, T1817 Series specifications

The Delta T1817 and T1837 Series are two innovative lineups of thermostats designed to enhance energy efficiency and user control in HVAC systems. These advanced products offer a blend of modern technology and user-friendly features that cater to both residential and commercial applications.

The T1817 Series is known for its sleek design and intuitive interface. It includes a large, easy-to-read display that shows the current temperature alongside set-point adjustments. With a simple touchscreen interface, users can easily navigate through different settings, allowing for quick modifications without compromising on comfort. One of the standout features is its Wi-Fi connectivity, enabling users to control their thermostat remotely via smartphones or tablets through an intuitive app. This integration not only allows for on-the-go adjustments but also supports energy-saving scheduling.

The T1837 Series builds on the functionality of the T1817 with several enhancements. With support for both heating and cooling systems, it is versatile enough to support diverse HVAC setups. A key characteristic of the T1837 is its advanced learning capability. The thermostat can adapt to users’ routines over time, automatically adjusting temperature settings based on historical usage patterns. This leads to significant energy savings without sacrificing comfort.

Both series incorporate smart technology that allows for voice control through popular smart home systems such as Amazon Alexa and Google Assistant. This feature adds another layer of convenience, as users can make adjustments simply by using their voice.

Moreover, the Delta T1817 and T1837 Series are equipped with energy monitoring features. Users can track their energy consumption over time, allowing for better management of usage and costs. These thermostats are designed to comply with energy efficiency standards, making them a responsible choice for eco-conscious consumers.

Another noteworthy characteristic is the integration of a humidity sensor in the T1837 Series. This allows it to monitor not just the temperature, but the humidity levels in a space as well. By managing both climate factors, users can create a healthier indoor environment while further optimizing energy consumption.

In summary, the Delta T1817 and T1837 Series represent a significant leap in thermostat technology. With their user-friendly interfaces, smart connectivity, learning capabilities, and energy monitoring features, they provide a comprehensive solution for modern temperature control needs. Whether for individual homes or larger commercial projects, these thermostats are built to deliver functionality, convenience, and efficiency.