D.

6

4

1/8" (3.17 mm)

3 5

1

2 6

E.

2

3/32" (2.38mm)

2

1

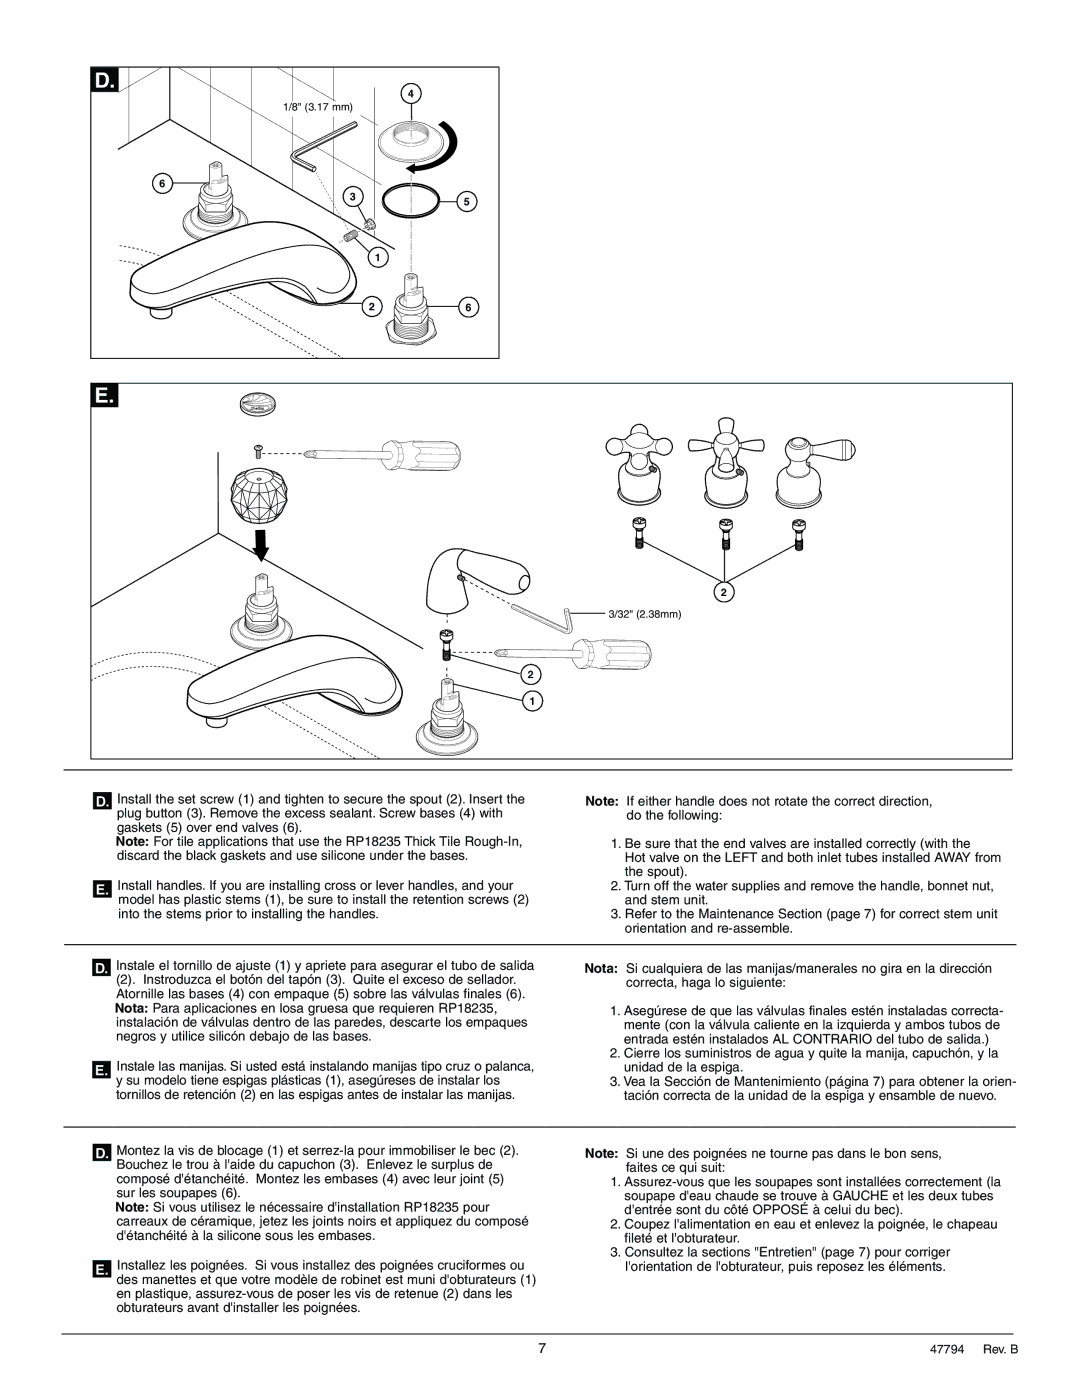
D.Install the set screw (1) and tighten to secure the spout (2). Insert the plug button (3). Remove the excess sealant. Screw bases (4) with gaskets (5) over end valves (6).

Note: For tile applications that use the RP18235 Thick Tile Rough-In, discard the black gaskets and use silicone under the bases.

E.Install handles. If you are installing cross or lever handles, and your model has plastic stems (1), be sure to install the retention screws (2) into the stems prior to installing the handles.

D.Instale el tornillo de ajuste (1) y apriete para asegurar el tubo de salida

(2). Instroduzca el botón del tapón (3). Quite el exceso de sellador. Atornille las bases (4) con empaque (5) sobre las válvulas finales (6). Nota: Para aplicaciones en losa gruesa que requieren RP18235, instalación de válvulas dentro de las paredes, descarte los empaques negros y utilice silicón debajo de las bases.

E.Instale las manijas. Si usted está instalando manijas tipo cruz o palanca, y su modelo tiene espigas plásticas (1), asegúreses de instalar los tornillos de retención (2) en las espigas antes de instalar las manijas.

D.Montez la vis de blocage (1) et serrez-la pour immobiliser le bec (2). Bouchez le trou à l'aide du capuchon (3). Enlevez le surplus de composé d'étanchéité. Montez les embases (4) avec leur joint (5) sur les soupapes (6).

Note: Si vous utilisez le nécessaire d'installation RP18235 pour carreaux de céramique, jetez les joints noirs et appliquez du composé d'étanchéité à la silicone sous les embases.

E.Installez les poignées. Si vous installez des poignées cruciformes ou des manettes et que votre modèle de robinet est muni d'obturateurs (1) en plastique, assurez-vous de poser les vis de retenue (2) dans les obturateurs avant d'installer les poignées.

Note: If either handle does not rotate the correct direction, do the following:

1.Be sure that the end valves are installed correctly (with the

Hot valve on the LEFT and both inlet tubes installed AWAY from the spout).

2.Turn off the water supplies and remove the handle, bonnet nut, and stem unit.

3.Refer to the Maintenance Section (page 7) for correct stem unit orientation and re-assemble.

Nota: Si cualquiera de las manijas/manerales no gira en la dirección correcta, haga lo siguiente:

1.Asegúrese de que las válvulas finales estén instaladas correcta- mente (con la válvula caliente en la izquierda y ambos tubos de entrada estén instalados AL CONTRARIO del tubo de salida.)

2.Cierre los suministros de agua y quite la manija, capuchón, y la unidad de la espiga.

3.Vea la Sección de Mantenimiento (página 7) para obtener la orien- tación correcta de la unidad de la espiga y ensamble de nuevo.

Note: Si une des poignées ne tourne pas dans le bon sens, faites ce qui suit:

1.Assurez-vous que les soupapes sont installées correctement (la soupape d'eau chaude se trouve à GAUCHE et les deux tubes d'entrée sont du côté OPPOSÉ à celui du bec).

2.Coupez l'alimentation en eau et enlevez la poignée, le chapeau fileté et l'obturateur.

3.Consultez la sections "Entretien" (page 7) pour corriger l'orientation de l'obturateur, puis reposez les éléments.

7

47794 Rev. B

Page 7
Image 7
Delta T2710 Series manual 3.17 mm 32 2.38mm

T2710 Series specifications

The Delta T2710 Series is a sophisticated line of thermoregulators designed to meet the demands of modern thermal management in various industrial applications. Building on Delta's established reputation for innovation, this series offers a range of advanced features and technologies that enhance both performance and reliability.

One of the standout characteristics of the T2710 Series is its precision control capabilities. The device employs advanced algorithmic control methods to ensure accurate temperature regulation. This level of precision is essential for processes requiring exact temperature settings, which can significantly influence product quality and operational efficiency.

The T2710 Series incorporates state-of-the-art communication technologies, ensuring seamless integration into existing automation systems. It supports multiple communication protocols including Modbus, Ethernet, and Profibus, allowing for easy connectivity with other devices and systems in a network. This versatility not only optimizes workflow but also enhances data monitoring and analysis, empowering users to make informed operational decisions based on real-time data.

Energy efficiency is another critical feature of the T2710 Series. Equipped with an intelligent energy management system, it minimizes power consumption while maintaining optimal performance. This attribute helps businesses lower operational costs and reduce their environmental footprint, aligning with the growing trend towards sustainability in industry.

In terms of design, the T2710 Series is built with durability in mind. The robust construction materials are resistant to harsh conditions, ensuring longevity and reliability even in demanding environments. Moreover, the user-friendly interface simplifies operation, featuring a clear display and intuitive controls that allow for easy adjustments and monitoring.

Safety features are paramount in the T2710 Series. It comes equipped with multiple safety alarms and protective measures to prevent overheating or system failures, ensuring that operations can continue smoothly without unforeseen disruptions.

Overall, the Delta T2710 Series stands out as a comprehensive solution for thermal regulation, combining precision, communication flexibility, energy efficiency, durability, and safety. These attributes make it an ideal choice for industries such as pharmaceuticals, food processing, and manufacturing, where reliable and efficient temperature control is indispensable. As businesses continue to seek innovative solutions for improved operational performance, the T2710 Series is poised to meet these challenges with excellence.