C.

2

3/32" (2.38 mm) 3/32 po

1

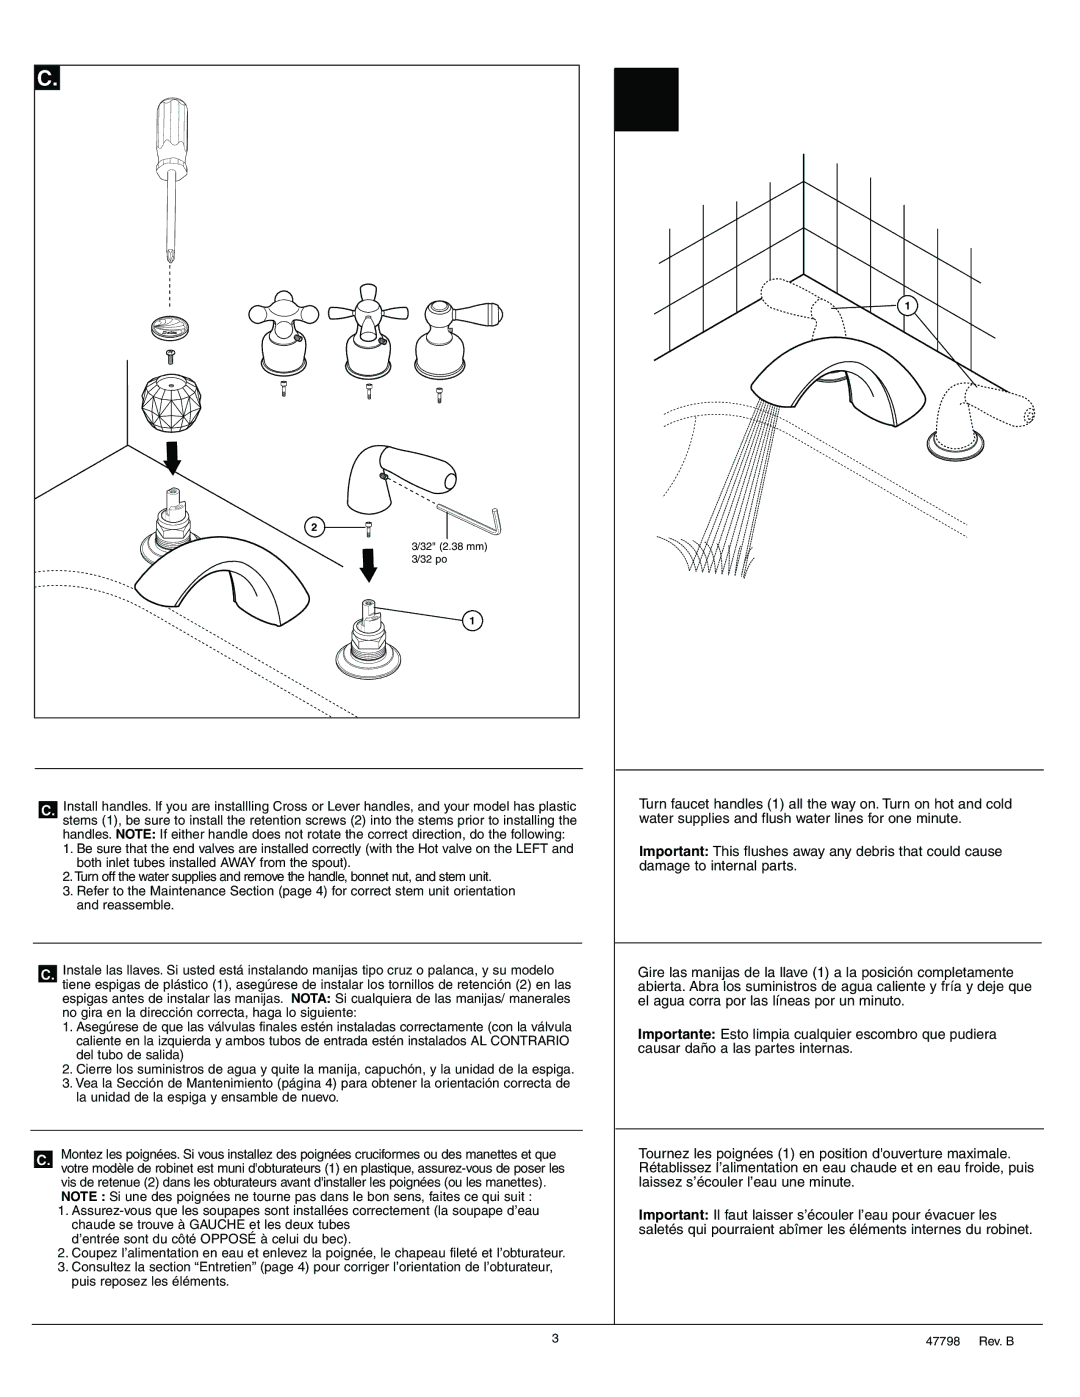
C.Install handles. If you are installling Cross or Lever handles, and your model has plastic stems (1), be sure to install the retention screws (2) into the stems prior to installing the handles. NOTE: If either handle does not rotate the correct direction, do the following:

1.Be sure that the end valves are installed correctly (with the Hot valve on the LEFT and both inlet tubes installed AWAY from the spout).

2.Turn off the water supplies and remove the handle, bonnet nut, and stem unit.

3.Refer to the Maintenance Section (page 4) for correct stem unit orientation and reassemble.

C.Instale las llaves. Si usted está instalando manijas tipo cruz o palanca, y su modelo tiene espigas de plástico (1), asegúrese de instalar los tornillos de retención (2) en las espigas antes de instalar las manijas. NOTA: Si cualquiera de las manijas/ manerales no gira en la dirección correcta, haga lo siguiente:

1.Asegúrese de que las válvulas finales estén instaladas correctamente (con la válvula caliente en la izquierda y ambos tubos de entrada estén instalados AL CONTRARIO del tubo de salida)

2.Cierre los suministros de agua y quite la manija, capuchón, y la unidad de la espiga.

3.Vea la Sección de Mantenimiento (página 4) para obtener la orientación correcta de la unidad de la espiga y ensamble de nuevo.

C.Montez les poignées. Si vous installez des poignées cruciformes ou des manettes et que votre modèle de robinet est muni d'obturateurs (1) en plastique, assurez-vous de poser les vis de retenue (2) dans les obturateurs avant d'installer les poignées (ou les manettes). NOTE : Si une des poignées ne tourne pas dans le bon sens, faites ce qui suit :

1.Assurez-vous que les soupapes sont installées correctement (la soupape d’eau chaude se trouve à GAUCHE et les deux tubes

d’entrée sont du côté OPPOSÉ à celui du bec).

2.Coupez l’alimentation en eau et enlevez la poignée, le chapeau fileté et l’obturateur.

3.Consultez la section “Entretien” (page 4) pour corriger l’orientation de l’obturateur, puis reposez les éléments.

2

1

Turn faucet handles (1) all the way on. Turn on hot and cold water supplies and flush water lines for one minute.

Important: This flushes away any debris that could cause damage to internal parts.

Gire las manijas de la llave (1) a la posición completamente abierta. Abra los suministros de agua caliente y fría y deje que el agua corra por las líneas por un minuto.

Importante: Esto limpia cualquier escombro que pudiera causar daño a las partes internas.

Tournez les poignées (1) en position d'ouverture maximale. Rétablissez l’alimentation en eau chaude et en eau froide, puis laissez s’écouler l’eau une minute.

Important: Il faut laisser s’écouler l’eau pour évacuer les saletés qui pourraient abîmer les éléments internes du robinet.

3

47798 Rev. B

Page 3
Image 3
Delta T2783 Series, T2730 Series manual 32 2.38 mm 3/32 po

T2783 Series, T2730 Series specifications

The Delta T2783 and T2730 Series thermostats are innovative solutions designed for residential and commercial heating and cooling systems. These devices are distinguished by their user-friendly interfaces, advanced features, and robust performance, making them ideal choices for energy management and climate control.

The Delta T2783 Series boasts a sleek design that fits seamlessly into modern spaces. One of its standout features is a large, easy-to-read full-color touchscreen display. This intuitive interface allows users to navigate settings effortlessly, providing an appealing aesthetic while maintaining functionality. The touch controls enhance user interaction, setting it apart from traditional thermostats.

A hallmark of the T2783 Series is its smart scheduling capability. Users can easily program daily or weekly schedules, optimizing energy usage based on individual routines. This feature promotes energy efficiency as it allows the thermostat to adjust temperatures only when needed, leading to significant cost savings over time. Additionally, the series supports remote control via mobile devices, providing convenience and peace of mind for users on the go.

On the other hand, the Delta T2730 Series is designed for those seeking a more straightforward option while still incorporating advanced technologies. This series features a backlit display that ensures visibility, even in low light conditions. The T2730 is equipped with adaptive learning functionality, which adjusts settings based on user behavior and preferences. This smart technology not only enhances comfort but also streamlines energy consumption.

Both the T2783 and T2730 Series are compatible with various HVAC systems, including heat pumps, central heating, and cooling systems. They incorporate energy-saving technologies, such as precise temperature sensing and adaptive algorithms that respond to changes in the environment. Furthermore, both models come with built-in Wi-Fi connectivity, allowing users to monitor and manage their home's climate remotely through a compatible smartphone app.

In terms of characteristics, both series are designed with user flexibility in mind. They include features such as vacation mode, filter change reminders, and system alerts, which boost the overall usability and reliability of the devices. They also support integration with home automation systems, enabling enhanced control and coordination with other smart devices within the household.

In summary, the Delta T2783 and T2730 Series thermostats stand out for their combination of advanced features, user-friendly designs, and energy efficiency. With the integration of smart technologies, these thermostats represent an innovative leap forward in temperature control, making them essential tools for modern homes and businesses.