OWNER’S MANUAL

INSTALLATION

Continued

Attaching Mounting Bracket To Wall

Note: Wall anchors, mounting screws, and spacers are in hardware package. The hard- ware package is provided with heater.

Attaching To Wall Stud Method

For attaching mounting bracket to wall studs

1.Drill holes at marked locations using 9/64" drill bit.

2.Place mounting bracket onto wall. Line up last hole on each end of bracket with holes drilled in wall.

3.Insert mounting screws through bracket and into wall studs.

4.Tighten screws until mounting bracket is firmly fastened to wall studs.

Attaching To Wall Anchor Method

For attaching mounting bracket to hollow walls (wall areas between studs) or solid walls (concrete or masonry)

1.Drill holes at marked locations using 5/16" drill bit. For solid walls (concrete or masonry), drill at least 1" deep.

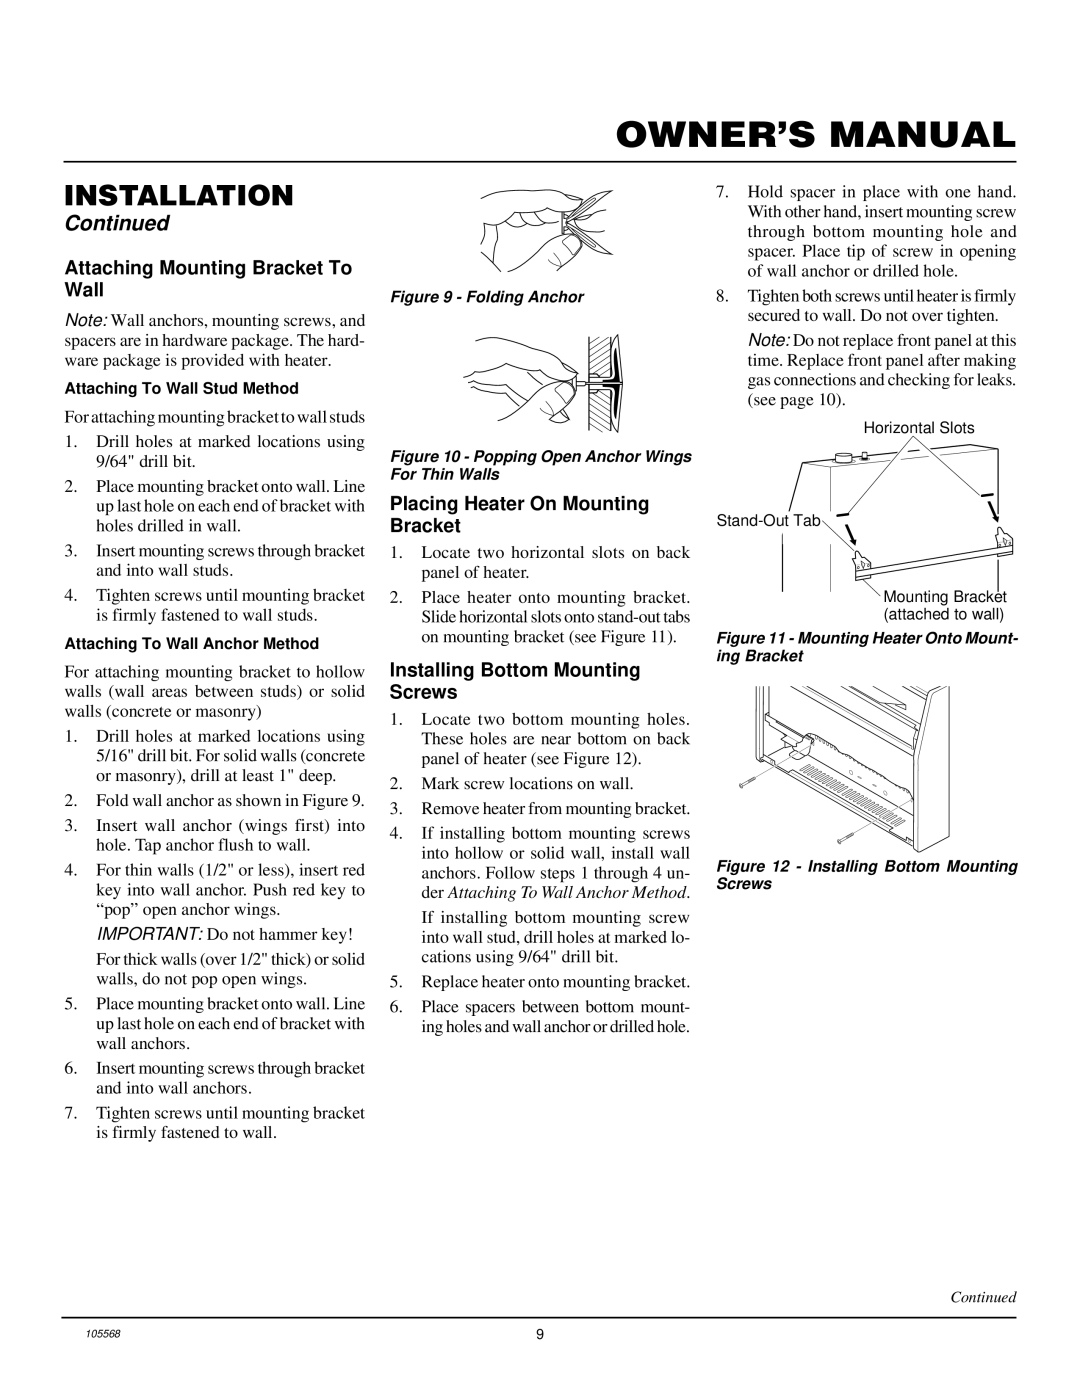
2.Fold wall anchor as shown in Figure 9.

3.Insert wall anchor (wings first) into hole. Tap anchor flush to wall.

4.For thin walls (1/2" or less), insert red key into wall anchor. Push red key to “pop” open anchor wings.

IMPORTANT: Do not hammer key!

For thick walls (over 1/2" thick) or solid walls, do not pop open wings.

5.Place mounting bracket onto wall. Line up last hole on each end of bracket with wall anchors.

6.Insert mounting screws through bracket and into wall anchors.

7.Tighten screws until mounting bracket is firmly fastened to wall.

Figure 9 - Folding Anchor

Figure 10 - Popping Open Anchor Wings For Thin Walls

Placing Heater On Mounting Bracket

1.Locate two horizontal slots on back panel of heater.

2.Place heater onto mounting bracket. Slide horizontal slots onto stand-out tabs on mounting bracket (see Figure 11).

Installing Bottom Mounting Screws

1.Locate two bottom mounting holes. These holes are near bottom on back panel of heater (see Figure 12).

2.Mark screw locations on wall.

3.Remove heater from mounting bracket.

4.If installing bottom mounting screws into hollow or solid wall, install wall anchors. Follow steps 1 through 4 un- der Attaching To Wall Anchor Method.

If installing bottom mounting screw into wall stud, drill holes at marked lo- cations using 9/64" drill bit.

5.Replace heater onto mounting bracket.

6.Place spacers between bottom mount- ing holes and wall anchor or drilled hole.

7.Hold spacer in place with one hand. With other hand, insert mounting screw through bottom mounting hole and spacer. Place tip of screw in opening of wall anchor or drilled hole.

8.Tighten both screws until heater is firmly secured to wall. Do not over tighten.

Note: Do not replace front panel at this time. Replace front panel after making gas connections and checking for leaks. (see page 10).

Horizontal Slots

Stand-Out Tab

Mounting Bracket (attached to wall)

Figure 11 - Mounting Heater Onto Mount- ing Bracket

Figure 12 - Installing Bottom Mounting Screws

Continued

105568

9

Page 9
Image 9
Desa FA-30BB Attaching Mounting Bracket To Wall, Placing Heater On Mounting Bracket, Installing Bottom Mounting Screws

FA-30BB, FAS-20BB, FGH-30NGB, FA-20BB, FAS-30BB specifications

Desa FGH-30NGB, FA-20BB, FAS-30BB, FAS-20BB, and FA-30BB represent a compelling lineup of advanced heating solutions, engineered to cater to diverse consumer needs for efficient heating and functionality. Each model stands out with unique features and technologies that set them apart in the competitive market.

The FGH-30NGB model is particularly commendable for its innovative design and energy efficiency. It integrates advanced gas burner technology, which ensures optimal heat output while minimizing energy consumption. This model is equipped with an automatic ignition system, adding convenience for users who prioritize ease of use. Additionally, the FGH-30NGB features a robust safety mechanism, including automatic shut-off in case of overheating, which enhances user confidence.

In contrast, the FA-20BB model showcases versatility with its multifaceted heating settings. Ideal for both residential and commercial environments, this model incorporates state-of-the-art electronic controls that allow users to adjust temperatures with precision. The FA-20BB also prioritizes user comfort through its Quiet Mode operation, which significantly reduces noise during heating cycles, making it suitable for quiet settings like bedrooms and libraries.

The FAS-30BB takes technology a step further with its integration of smart features. This model is Wi-Fi enabled, allowing users to control the heater remotely through a mobile app. This capability is particularly advantageous for tech-savvy consumers who wish to manage their heating systems efficiently from anywhere. Moreover, the FAS-30BB boasts a sleek, modern design, making it an aesthetic addition to any space.

Meanwhile, the FAS-20BB offers a compact design without compromising heating power. Ideal for smaller spaces, it combines efficiency with a lightweight build, making it easy to move when needed. Its user-friendly digital interface provides valuable feedback and allows users to easily monitor performance.

Finally, the FA-30BB model caters to those needing a high-performance solution. With dual heating modes, this model stands out in versatility and effectiveness. It utilizes advanced thermal insulation technologies that enhance heat retention, ensuring maximum efficiency.

In conclusion, the Desa FGH-30NGB, FA-20BB, FAS-30BB, FAS-20BB, and FA-30BB models present a broad spectrum of features and technologies that address various heating requirements. From smart technology integration to energy-efficient designs, each model is crafted to offer performance, reliability, and user satisfaction in any setting.