OWNER’S MANUAL

SERVICE

PROCEDURES

WARNING: Never service heater while it is plugged in, con- nected to propane supply, oper- ating, or hot. Severe burns and electrical shock can occur.

MOTOR

1.While on heaters side Remove base tray.

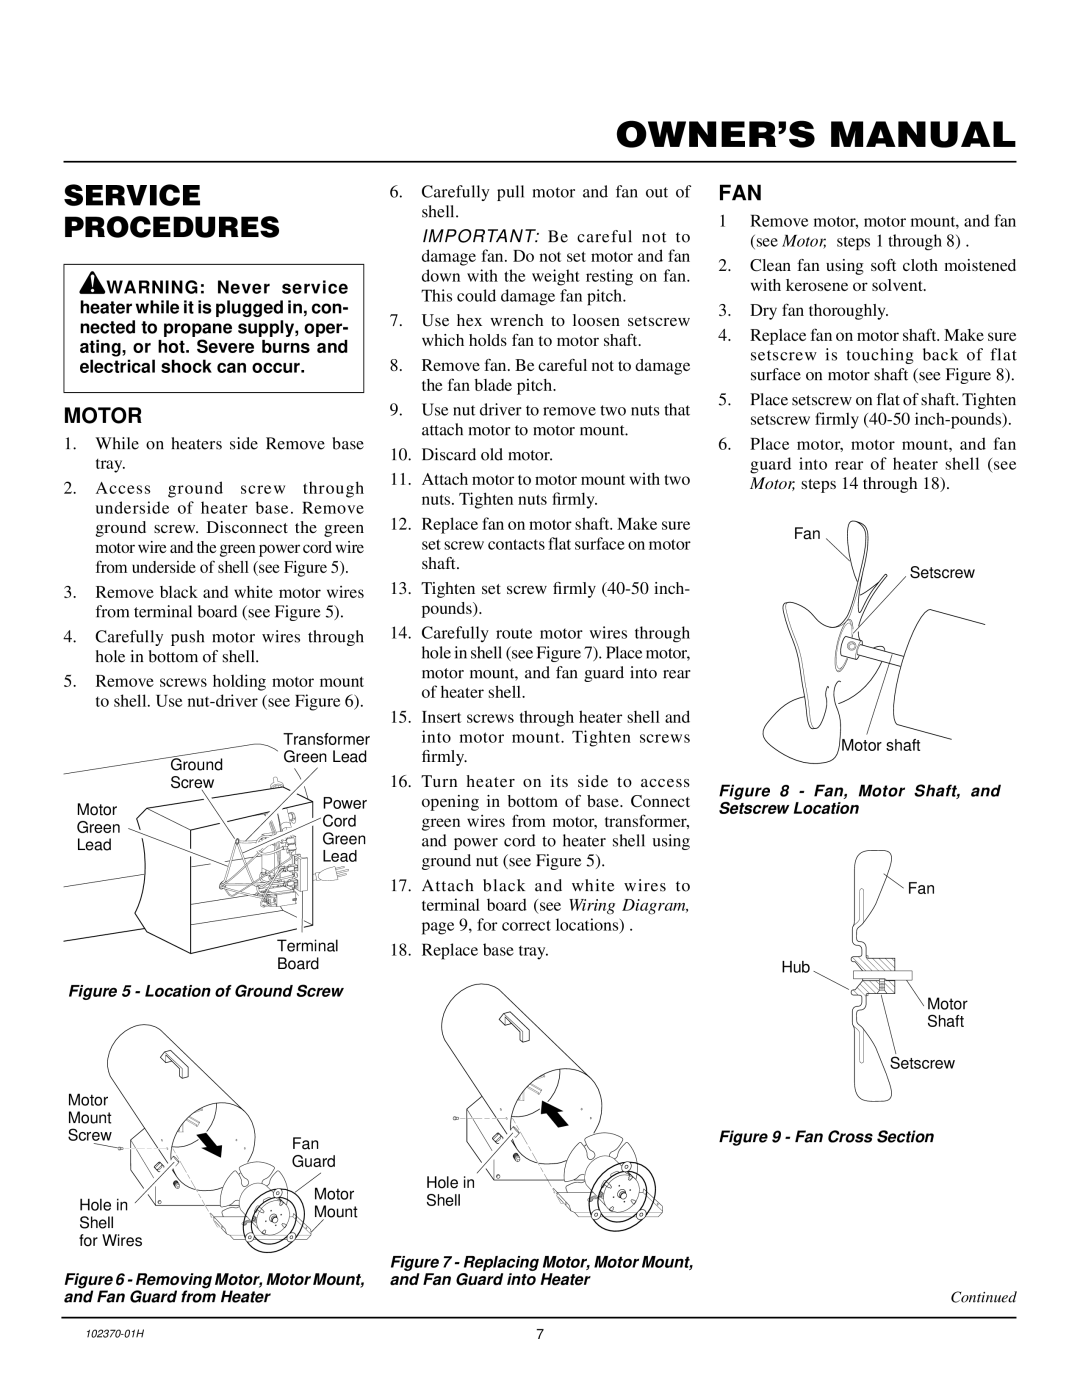
2.Access ground screw through underside of heater base. Remove ground screw. Disconnect the green motor wire and the green power cord wire from underside of shell (see Figure 5).

3.Remove black and white motor wires from terminal board (see Figure 5).

4.Carefully push motor wires through hole in bottom of shell.

5.Remove screws holding motor mount to shell. Use nut-driver (see Figure 6).


Transformer


Ground

Green Lead


Screw


Motor


Power


Cord

Green


Green

Lead


Lead


Terminal

Board

Figure 5 - Location of Ground Screw

Motor


Mount


Screw

Fan


Guard

Hole in

Motor

Mount

Shell


for Wires


Figure 6 - Removing Motor, Motor Mount, and Fan Guard from Heater

6.Carefully pull motor and fan out of shell.

IMPORTANT: Be careful not to damage fan. Do not set motor and fan down with the weight resting on fan. This could damage fan pitch.

7.Use hex wrench to loosen setscrew which holds fan to motor shaft.

8.Remove fan. Be careful not to damage the fan blade pitch.

9.Use nut driver to remove two nuts that attach motor to motor mount.

10.Discard old motor.

11.Attach motor to motor mount with two nuts. Tighten nuts firmly.

12.Replace fan on motor shaft. Make sure set screw contacts flat surface on motor shaft.

13.Tighten set screw firmly (40-50 inch- pounds).

14.Carefully route motor wires through hole in shell (see Figure 7). Place motor, motor mount, and fan guard into rear of heater shell.

15.Insert screws through heater shell and into motor mount. Tighten screws firmly.

16.Turn heater on its side to access opening in bottom of base. Connect green wires from motor, transformer, and power cord to heater shell using ground nut (see Figure 5).

17.Attach black and white wires to terminal board (see Wiring Diagram, page 9, for correct locations) .

18.Replace base tray.

Hole in

Shell

Figure 7 - Replacing Motor, Motor Mount, and Fan Guard into Heater

FAN

1Remove motor, motor mount, and fan (see Motor, steps 1 through 8) .

2.Clean fan using soft cloth moistened with kerosene or solvent.

3.Dry fan thoroughly.

4.Replace fan on motor shaft. Make sure setscrew is touching back of flat surface on motor shaft (see Figure 8).

5.Place setscrew on flat of shaft. Tighten setscrew firmly (40-50 inch-pounds).

6.Place motor, motor mount, and fan guard into rear of heater shell (see Motor, steps 14 through 18).

Fan

Setscrew

Motor shaft

Figure 8 - Fan, Motor Shaft, and Setscrew Location

Fan

Hub

Motor

Shaft

Setscrew

Figure 9 - Fan Cross Section

Continued

102370-01H

7

Page 7
Image 7
Desa PROPANE CONSTRUCTION HEATERS owner manual Service Procedures, Motor, Fan

PROPANE CONSTRUCTION HEATERS specifications

Desa propane construction heaters are an essential tool for contractors and builders, especially during cold weather conditions, providing a reliable and efficient heating solution on job sites. Known for their robust construction and advanced features, these heaters ensure that projects remain on schedule without the distractions of cold weather.

One of the standout features of Desa propane heaters is their portable design, making them easy to transport and position wherever heat is needed. This mobility is crucial on construction sites where workspaces are often changing and vary in size. Desa offers a range of models with varying heat outputs, allowing users to select the right heater based on the specific requirements of the job site.

These heaters utilize propane gas as their primary fuel source, allowing them to deliver immediate heat without the need for cords or electrical connections. This characteristic makes them particularly valuable in outdoor settings or in areas where electricity access is limited. Furthermore, propane is generally more cost-effective than electricity for heating large areas, thus providing significant savings over time.

Desa construction heaters also feature advanced safety mechanisms. Many models are equipped with built-in safety shut-off systems that activate in the event of low oxygen levels or overheating, ensuring a safe working environment. Additionally, the heaters often come with adjustable heat settings, allowing users to tailor the output to their specific needs, whether they require a gentle warmth or a robust heating solution.

The construction of Desa propane heaters is designed for durability. Made from high-quality materials, these heaters can withstand the rigors of outdoor use and resist corrosion and impacts. The stainless steel burners are designed for longevity and optimal performance, providing consistent heat generation over extended periods.

In terms of technology, most Desa propane heaters include features such as a thermostat for temperature regulation and a fan-forced design that distributes heat evenly across larger areas. This ensures that workers are kept comfortable, which can boost productivity and morale on the job site.

By choosing Desa propane construction heaters, contractors invest in a versatile and efficient heating solution that meets the demanding needs of construction projects. With their combination of portability, safety features, and durable design, Desa heaters stand out as a reliable choice for anyone looking to maintain a productive work environment in challenging weather conditions.