drill is mounted in a drill stand or otherwise firmly held. THE LOCKING FEATURE IS NOT FOR USE WHEN DRILLING BY HAND. Be sure to release the switch lock button before disconnect- ing the tool from the power supply. Failure to do so will cause the tool to start immediately the next time it is plugged in. Damage or injury could result.
Chuck
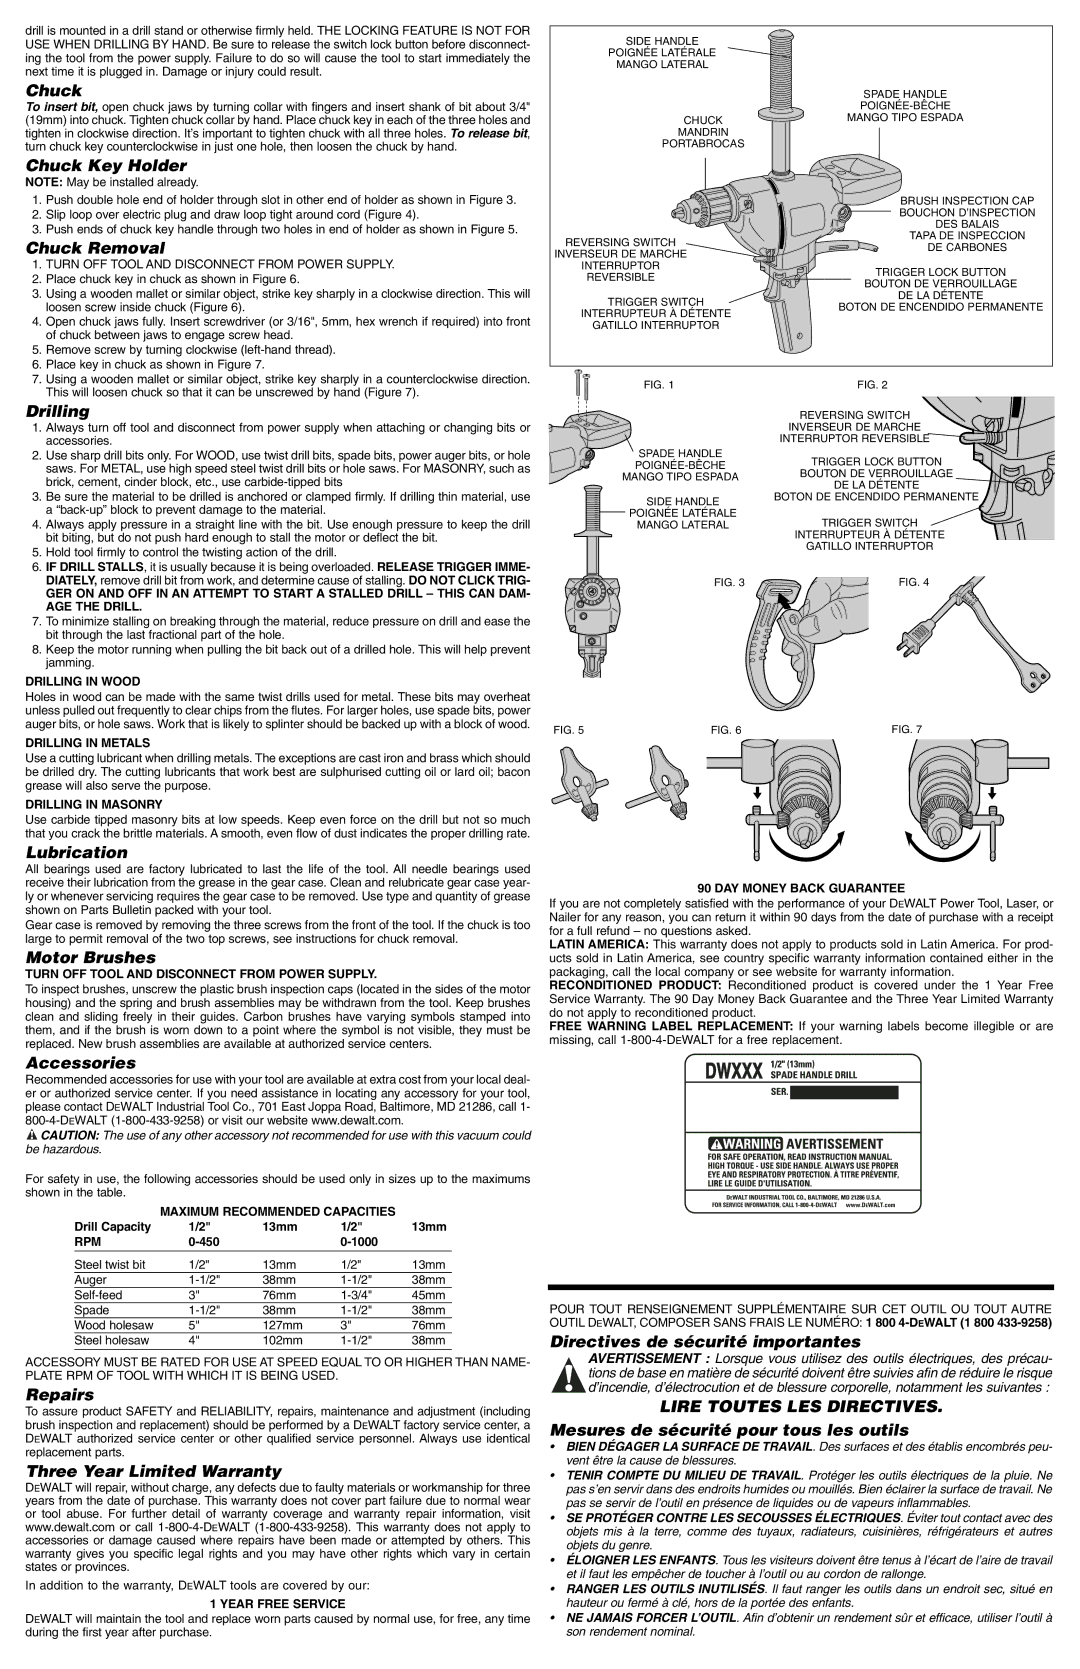
To insert bit, open chuck jaws by turning collar with fingers and insert shank of bit about 3/4" (19mm) into chuck. Tighten chuck collar by hand. Place chuck key in each of the three holes and tighten in clockwise direction. It’s important to tighten chuck with all three holes. To release bit, turn chuck key counterclockwise in just one hole, then loosen the chuck by hand.
Chuck Key Holder
NOTE: May be installed already.
1.Push double hole end of holder through slot in other end of holder as shown in Figure 3.
2.Slip loop over electric plug and draw loop tight around cord (Figure 4).
3.Push ends of chuck key handle through two holes in end of holder as shown in Figure 5.
Chuck Removal
1. TURN OFF TOOL AND DISCONNECT FROM POWER SUPPLY. | |
2. | Place chuck key in chuck as shown in Figure 6. |
3. | Using a wooden mallet or similar object, strike key sharply in a clockwise direction. This will |
| loosen screw inside chuck (Figure 6). |
4. | Open chuck jaws fully. Insert screwdriver (or 3/16", 5mm, hex wrench if required) into front |
| of chuck between jaws to engage screw head. |
5. | Remove screw by turning clockwise |
6. | Place key in chuck as shown in Figure 7. |
SIDE HANDLE
POIGNÉE LATÉRALE
MANGO LATERAL
CHUCK
MANDRIN
PORTABROCAS
REVERSING SWITCH
INVERSEUR DE MARCHE
INTERRUPTOR
REVERSIBLE
TRIGGER SWITCH ![]() INTERRUPTEUR À DÉTENTE
INTERRUPTEUR À DÉTENTE
GATILLO INTERRUPTOR
SPADE HANDLE
MANGO TIPO ESPADA
BRUSH INSPECTION CAP
BOUCHON D’INSPECTION
DES BALAIS
TAPA DE INSPECCION
DE CARBONES
TRIGGER LOCK BUTTON
BOUTON DE VERROUILLAGE
DE LA DÉTENTE
BOTON DE ENCENDIDO PERMANENTE
7. Using a wooden mallet or similar object, strike key sharply in a counterclockwise direction. |
This will loosen chuck so that it can be unscrewed by hand (Figure 7). |
Drilling
1.Always turn off tool and disconnect from power supply when attaching or changing bits or accessories.
2.Use sharp drill bits only. For WOOD, use twist drill bits, spade bits, power auger bits, or hole saws. For METAL, use high speed steel twist drill bits or hole saws. For MASONRY, such as brick, cement, cinder block, etc., use
3.Be sure the material to be drilled is anchored or clamped firmly. If drilling thin material, use a
4.Always apply pressure in a straight line with the bit. Use enough pressure to keep the drill bit biting, but do not push hard enough to stall the motor or deflect the bit.
5.Hold tool firmly to control the twisting action of the drill.
6.IF DRILL STALLS, it is usually because it is being overloaded. RELEASE TRIGGER IMME- DIATELY, remove drill bit from work, and determine cause of stalling. DO NOT CLICK TRIG-
GER ON AND OFF IN AN ATTEMPT TO START A STALLED DRILL – THIS CAN DAM- AGE THE DRILL.
7.To minimize stalling on breaking through the material, reduce pressure on drill and ease the bit through the last fractional part of the hole.
8.Keep the motor running when pulling the bit back out of a drilled hole. This will help prevent jamming.
DRILLING IN WOOD
Holes in wood can be made with the same twist drills used for metal. These bits may overheat unless pulled out frequently to clear chips from the flutes. For larger holes, use spade bits, power auger bits, or hole saws. Work that is likely to splinter should be backed up with a block of wood.
DRILLING IN METALS
Use a cutting lubricant when drilling metals. The exceptions are cast iron and brass which should be drilled dry. The cutting lubricants that work best are sulphurised cutting oil or lard oil; bacon grease will also serve the purpose.
DRILLING IN MASONRY
Use carbide tipped masonry bits at low speeds. Keep even force on the drill but not so much that you crack the brittle materials. A smooth, even flow of dust indicates the proper drilling rate.
Lubrication
All bearings used are factory lubricated to last the life of the tool. All needle bearings used receive their lubrication from the grease in the gear case. Clean and relubricate gear case year- ly or whenever servicing requires the gear case to be removed. Use type and quantity of grease shown on Parts Bulletin packed with your tool.
Gear case is removed by removing the three screws from the front of the tool. If the chuck is too large to permit removal of the two top screws, see instructions for chuck removal.
Motor Brushes
TURN OFF TOOL AND DISCONNECT FROM POWER SUPPLY.
To inspect brushes, unscrew the plastic brush inspection caps (located in the sides of the motor housing) and the spring and brush assemblies may be withdrawn from the tool. Keep brushes clean and sliding freely in their guides. Carbon brushes have varying symbols stamped into them, and if the brush is worn down to a point where the symbol is not visible, they must be replaced. New brush assemblies are available at authorized service centers.
Accessories
Recommended accessories for use with your tool are available at extra cost from your local deal- er or authorized service center. If you need assistance in locating any accessory for your tool, please contact DEWALT Industrial Tool Co., 701 East Joppa Road, Baltimore, MD 21286, call 1-
![]() CAUTION: The use of any other accessory not recommended for use with this vacuum could be hazardous.
CAUTION: The use of any other accessory not recommended for use with this vacuum could be hazardous.
For safety in use, the following accessories should be used only in sizes up to the maximums shown in the table.
| MAXIMUM RECOMMENDED CAPACITIES |
| ||
Drill Capacity | 1/2" | 13mm | 1/2" | 13mm |
RPM |
|
|
|
|
|
|
|
|
|
Steel twist bit | 1/2" | 13mm | 1/2" | 13mm |
Auger | 38mm | 38mm | ||
3" | 76mm | 45mm | ||
Spade | 38mm | 38mm | ||
Wood holesaw | 5" | 127mm | 3" | 76mm |
Steel holesaw | 4" | 102mm | 38mm | |
|
|
|
|
|
ACCESSORY MUST BE RATED FOR USE AT SPEED EQUAL TO OR HIGHER THAN NAME- PLATE RPM OF TOOL WITH WHICH IT IS BEING USED.
Repairs
To assure product SAFETY and RELIABILITY, repairs, maintenance and adjustment (including brush inspection and replacement) should be performed by a DEWALT factory service center, a DEWALT authorized service center or other qualified service personnel. Always use identical replacement parts.
Three Year Limited Warranty
DEWALT will repair, without charge, any defects due to faulty materials or workmanship for three years from the date of purchase. This warranty does not cover part failure due to normal wear or tool abuse. For further detail of warranty coverage and warranty repair information, visit www.dewalt.com or call
In addition to the warranty, DEWALT tools are covered by our:
1 YEAR FREE SERVICE
DEWALT will maintain the tool and replace worn parts caused by normal use, for free, any time during the first year after purchase.
FIG. 1 | FIG. 2 | |
| REVERSING SWITCH | |
| INVERSEUR DE MARCHE | |
| INTERRUPTOR REVERSIBLE | |
SPADE HANDLE | TRIGGER LOCK BUTTON | |
BOUTON DE VERROUILLAGE | ||
MANGO TIPO ESPADA | ||
DE LA DÉTENTE | ||
| ||
SIDE HANDLE | BOTON DE ENCENDIDO PERMANENTE | |
| ||
POIGNÉE LATÉRALE | TRIGGER SWITCH | |
MANGO LATERAL | ||
| INTERRUPTEUR À DÉTENTE | |
| GATILLO INTERRUPTOR | |
FIG. 3 | FIG. 4 |
FIG. 5 | FIG. 6 | FIG. 7 |
90 DAY MONEY BACK GUARANTEE
If you are not completely satisfied with the performance of your DEWALT Power Tool, Laser, or Nailer for any reason, you can return it within 90 days from the date of purchase with a receipt for a full refund – no questions asked.
LATIN AMERICA: This warranty does not apply to products sold in Latin America. For prod- ucts sold in Latin America, see country specific warranty information contained either in the packaging, call the local company or see website for warranty information.
RECONDITIONED PRODUCT: Reconditioned product is covered under the 1 Year Free Service Warranty. The 90 Day Money Back Guarantee and the Three Year Limited Warranty do not apply to reconditioned product.
FREE WARNING LABEL REPLACEMENT: If your warning labels become illegible or are missing, call
POUR TOUT RENSEIGNEMENT SUPPLÉMENTAIRE SUR CET OUTIL OU TOUT AUTRE OUTIL DEWALT, COMPOSER SANS FRAIS LE NUMÉRO: 1 800
Directives de sécurité importantes
AVERTISSEMENT : Lorsque vous utilisez des outils électriques, des précau- tions de base en matière de sécurité doivent être suivies afin de réduire le risque d’incendie, d’électrocution et de blessure corporelle, notamment les suivantes :
LIRE TOUTES LES DIRECTIVES.
Mesures de sécurité pour tous les outils
•BIEN DÉGAGER LA SURFACE DE TRAVAIL. Des surfaces et des établis encombrés peu- vent être la cause de blessures.
•TENIR COMPTE DU MILIEU DE TRAVAIL. Protéger les outils électriques de la pluie. Ne pas s’en servir dans des endroits humides ou mouillés. Bien éclairer la surface de travail. Ne pas se servir de l’outil en présence de liquides ou de vapeurs inflammables.
•SE PROTÉGER CONTRE LES SECOUSSES ÉLECTRIQUES. Éviter tout contact avec des objets mis à la terre, comme des tuyaux, radiateurs, cuisinières, réfrigérateurs et autres objets du genre.
•ÉLOIGNER LES ENFANTS. Tous les visiteurs doivent être tenus à l’écart de l’aire de travail et il faut les empêcher de toucher à l’outil ou au cordon de rallonge.
•RANGER LES OUTILS INUTILISÉS. Il faut ranger les outils dans un endroit sec, situé en hauteur ou fermé à clé, hors de la portée des enfants.
•NE JAMAIS FORCER L’OUTIL. Afin d’obtenir un rendement sûr et efficace, utiliser l’outil à son rendement nominal.