Getting Started
Inserting the Batteries
1 Press the thumb latch on the back of the stamper to remove the battery compartment cover.
2 Insert four AA batteries following the polarity markings (+ and
3 Using a coin, remove the lithium cell battery compartment cover.
4 Remove the safety ribbon and make sure the positive (+) side of the battery is facing up.
5 Replace the lithium cell battery compartment cover. Use a coin to lock the cover in place.
6 If the LCD display flashes
7 Replace the battery compartment cover.
Setting the Date and Time
1Press and hold the SET/EDIT button for 2 seconds.
The stamper enters Program mode and the Month (M) and Day (D) indicators begin flashing.
![]() If no keys are pressed for 10 seconds, the stamper returns to Normal mode.
If no keys are pressed for 10 seconds, the stamper returns to Normal mode.
2Press the LOCK button to cycle through the available date formats.
3Select one of the following date formats, and then press the SHIFT button.
•MM-DD-YY
•YY-MM-DD
•DD-MM-YY
4To set the value for the first field, do the following:
•To increase the value, press the LOCK button.
•To decrease the value, press and hold the LOCK and SHIFT buttons for 5 seconds, and then press the LOCK button to decrease the value.
5Press the SHIFT button to move to the next field.
6Repeat steps 4 and 5 to set the value for each field.
7Press the SET/EDIT button to return to Normal mode.
Selecting the Fields to Print
You can print any combination of the following fields:
Date Time
Message
You can also choose to print any of the two fields above and a
1Press and hold the PRINT SELECT button for 2 seconds.
The date field begins flashing.
2Press the SET/EDIT button to select or not select to print the field.
3Press the PRINT SELECT button to move to the next field.
4To select to print the date, do the following:
aPress the SET/EDIT button until a rectangle is displayed around DATE in the display.
bPress the PRINT SELECT button to move to the next field.
5Repeat step 4 for each remaining field.
6Press the ALARM MODE button to return to Normal mode.
Selecting the Message to Print
When you select to print the message field, you can also select which message to print.
`` Press the SHIFT button to select the message to print.
Each time you press the SHIFT button, the next available message is selected.
Printing
1Set the stamper on a clean, flat surface.
2Rock the stamper forward and push down on the top of the stamper.
The stamper prints the selected fields.
3When you hear that printing has finished, release pressure on the stamper.
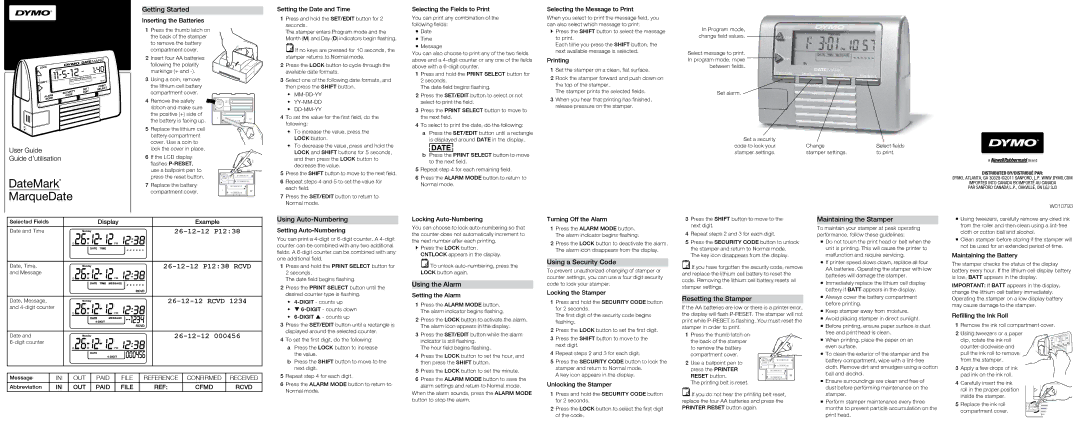
In Program mode, change field values.
Select message to print. In program mode, move between fields.
Set alarm. ![]()
Set a security |
|
|
code to lock your | Change | Select fields |
stamper settings. | stamper settings. | to print. |
DISTRIBUTED BY/DISTRIBUÉ PAR:
DYMO, ATLANTA, GA 30328 ©2011 SANFORD, L.P. WWW.DYMO.COM
IMPORTED INTO CANADA BY/IMPORTÉ AU CANADA
PAR SANFORD CANADA L.P., OAKVILLE, ON L6J 3J3
W010793
Selected Fields | Display | Example |
Date and Time |
| |
|
| |
Date, Time, |
| |
and Message |
| |
|
| |
Date, Message, |
| |
and |
| |
|
| |
Date and |
|
|
| ||
|
|
Message | IN | OUT | PAID | FILE | REFERENCE | CONFIRMED | RECEIVED |
|
|
|
|
|
|
|
|
Abbreviation | IN | OUT | PAID | FILE | REF: | CFMD | RCVD |
|
|
|
|
|
|
|
|
Using Auto-Numbering
Setting Auto-Numbering
You can print a
1Press and hold the PRINT SELECT button for 2 seconds.
The date field begins flashing.
2Press the PRINT SELECT button until the desired counter type is flashing.
•
•q
•
3Press the SET/EDIT button until a rectangle is displayed around the selected counter.
4To set the first digit, do the following:
aPress the LOCK button to increase the value.
bPress the SHIFT button to move to the next digit.
5Repeat step 4 for each digit.
6Press the ALARM MODE button to return to Normal mode.
Locking Auto-Numbering
You can choose to lock
`` Press the LOCK button. CNTLOCK appears in the display.
![]() To unlock
To unlock
Using the Alarm
Setting the Alarm
1Press the ALARM MODE button. The alarm indicator begins flashing.
2Press the LOCK button to activate the alarm. The alarm icon appears in the display.
3Press the SET/EDIT button while the alarm indicator is still flashing.
The hour field begins flashing.
4Press the LOCK button to set the hour, and then press the SHIFT button.
5Press the LOCK button to set the minute.
6Press the ALARM MODE button to save the alarm settings and return to Normal mode.
When the alarm sounds, press the ALARM MODE button to stop the alarm.
Turning Off the Alarm
1Press the ALARM MODE button. The alarm indicator begins flashing.
2Press the LOCK button to deactivate the alarm. The alarm icon disappears from the display.
Using a Security Code
To prevent unauthorized changing of stamper or counter settings, you can use a four digit security code to lock your stamper.
Locking the Stamper
1Press and hold the SECURITY CODE button for 2 seconds.
The first digit of the security code begins flashing.
2Press the LOCK button to set the first digit.
3Press the SHIFT button to move to the next digit.
4Repeat steps 2 and 3 for each digit.
5Press the SECURITY CODE button to lock the stamper and return to Normal mode.
A key icon appears in the display.
Unlocking the Stamper
1Press and hold the SECURITY CODE button for 2 seconds.
2Press the LOCK button to select the first digit of the code.
3Press the SHIFT button to move to the next digit.
4Repeat steps 2 and 3 for each digit.
5Press the SECURITY CODE button to unlock the stamper and return to Normal mode.
The key icon disappears from the display.
![]() If you have forgotten the security code, remove and replace the lithium cell battery to reset the code. Removing the lithium cell battery resets all stamper settings.
If you have forgotten the security code, remove and replace the lithium cell battery to reset the code. Removing the lithium cell battery resets all stamper settings.
Resetting the Stamper
If the AA batteries are low or there is a printer error, the display will flash
1Press the thumb latch on the back of the stamper to remove the battery compartment cover.
2Use a ballpoint pen to press the PRINTER RESET button.
The printing belt is reset.
![]() If you do not hear the printing belt reset, replace the four AA batteries and press the PRINTER RESET button again.
If you do not hear the printing belt reset, replace the four AA batteries and press the PRINTER RESET button again.
Maintaining the Stamper
To maintain your stamper at peak operating performance, follow these guidelines:
Do not touch the print head or belt when the unit is printing. This will cause the printer to malfunction and require servicing.
If printer speed slows down, replace all four
AAbatteries. Operating the stamper with low batteries will damage the stamper.
Immediately replace the lithium cell display battery if BATT appears in the display.
Always cover the battery compartment before printing.
Keep stamper away from moisture.
Avoid placing stamper in direct sunlight.
Before printing, ensure paper surface is dust free and print head is clean.
When printing, place the paper on an even surface.
To clean the exterior of the stamper and the battery compartment, wipe with a
Ensure surroundings are clean and free of dust before performing maintenance on the stamper.
Perform stamper maintenance every three months to prevent particle accumulation on the print head.
Using tweezers, carefully remove any dried ink from the roller and then clean using a
Clean stamper before storing if the stamper will not be used for an extended period of time.
Maintaining the Battery
The stamper checks the status of the display battery every hour. If the lithium cell display battery is low, BATT appears in the display.
IMPORTANT: If BATT appears in the display, change the lithium cell battery immediately. Operating the stamper on a low display battery may cause damage to the stamper.
Refilling the Ink Roll
1Remove the ink roll compartment cover.
2Using tweezers or a paper clip, rotate the ink roll
3Apply a few drops of ink pad ink on the ink roll.
4Carefully insert the ink roll in the proper position inside the stamper.
5Replace the ink roll compartment cover.