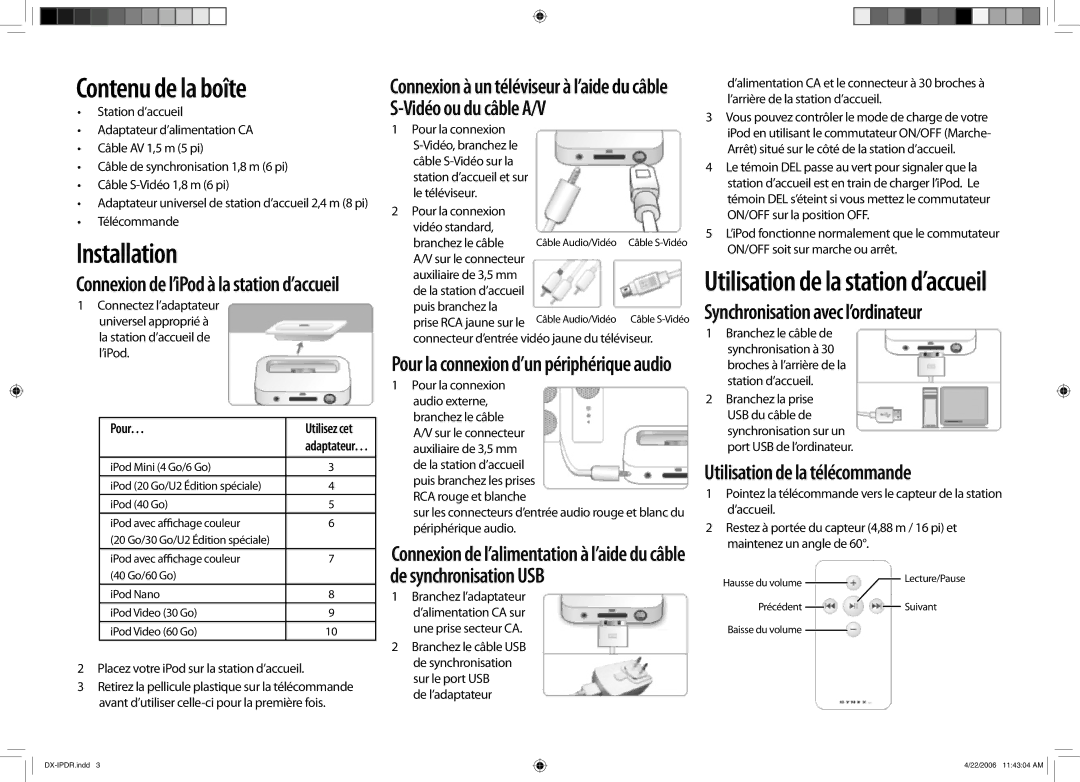
Câble Audio/Vidéo Câble S-Vidéo

Contenu de la boîte

Station d’accueil

Adaptateur d’alimentation CA

Câble AV 1,5 m (5 pi)

Câble de synchronisation 1,8 m (6 pi)

Câble S-Vidéo 1,8 m (6 pi)

Adaptateur universel de station d’accueil 2,4 m (8 pi)

Télécommande

Installation

Connexion de l’iPod à la station d’accueil

1Connectez l’adaptateur universel approprié à la station d’accueil de l’iPod.

Pour…

Utilisez cet


adaptateur…


iPod Mini (4 Go/6 Go)

3

iPod (20 Go/U2 Édition spéciale)

4

iPod (40 Go)

5

iPod avec affichage couleur

6

(20 Go/30 Go/U2 Édition spéciale)


iPod avec affichage couleur

7

(40 Go/60 Go)


iPod Nano

8

iPod Video (30 Go)

9

iPod Video (60 Go)

10

2Placez votre iPod sur la station d’accueil.

3Retirez la pellicule plastique sur la télécommande avant d’utiliser celle-ci pour la première fois.

Connexion à un téléviseur à l’aide du câble S-Vidéo ou du câble A/V

1Pour la connexion S-Vidéo, branchez le câble S-Vidéo sur la station d’accueil et sur le téléviseur.

2Pour la connexion vidéo standard,

branchez le câble A/V sur le connecteur auxiliaire de 3,5 mm de la station d’accueil puis branchez la prise RCA jaune sur le

connecteur d’entrée vidéo jaune du téléviseur.

Pour la connexion d’un périphérique audio

1Pour la connexion audio externe, branchez le câble A/V sur le connecteur auxiliaire de 3,5 mm de la station d’accueil puis branchez les prises RCA rouge et blanche

sur les connecteurs d’entrée audio rouge et blanc du périphérique audio.

Connexion de l’alimentation à l’aide du câble de synchronisation USB

1Branchez l’adaptateur d’alimentation CA sur une prise secteur CA.

2Branchez le câble USB de synchronisation sur le port USB

de l’adaptateur

d’alimentation CA et le connecteur à 30 broches à l’arrière de la station d’accueil.

3Vous pouvez contrôler le mode de charge de votre iPod en utilisant le commutateur ON/OFF (Marche- Arrêt) situé sur le côté de la station d’accueil.

4Le témoin DEL passe au vert pour signaler que la station d’accueil est en train de charger l’iPod. Le témoin DEL s’éteint si vous mettez le commutateur ON/OFF sur la position OFF.

5L’iPod fonctionne normalement que le commutateur ON/OFF soit sur marche ou arrêt.

Utilisation de la station d’accueil

Synchronisation avec l’ordinateur

1Branchez le câble de synchronisation à 30 broches à l’arrière de la station d’accueil.

2Branchez la prise USB du câble de synchronisation sur un port USB de l’ordinateur.

Utilisation de la télécommande

1Pointez la télécommande vers le capteur de la station d’accueil.

2Restez à portée du capteur (4,88 m / 16 pi) et maintenez un angle de 60°.

Hausse du volume


Lecture/Pause

Précédent


Suivant


Baisse du volume


DX-IPDR.indd 3

4/22/20064/22/2006 11:43:0411:43:04 AMAM

Page 3
Image 3
Dynex DX-IPDR Contenu de la boîte, Installation, Utilisation de la station d’accueil, Synchronisation avec l’ordinateur

DX-IPDR specifications

The Dynex DX-IPDR is an advanced power distribution unit designed to meet the demands of modern data centers and IT environments. This innovative device offers a comprehensive solution for efficient power management, ensuring that critical systems remain operational while optimizing energy consumption.

One of the standout features of the Dynex DX-IPDR is its high-capacity power distribution capabilities. With multiple output ports, the DX-IPDR can support a wide range of devices, making it ideal for handling the power needs of servers, networking equipment, and other essential hardware. Its robust design ensures reliable operation under varying load conditions, providing peace of mind for data center operators.

The DX-IPDR is equipped with advanced monitoring and management technologies that facilitate real-time tracking of power usage. This enables users to gain insights into their energy consumption patterns, identify potential areas for savings, and streamline operations. With built-in metering features, administrators can monitor voltage, current, and total power consumption at a granular level, enhancing their ability to make informed decisions regarding power allocation.

Security is also a top priority with the Dynex DX-IPDR. It includes features such as overload protection and surge suppression, safeguarding connected equipment from power disturbances. This level of protection is crucial for maintaining the integrity of sensitive IT infrastructure.

Another notable characteristic of the DX-IPDR is its scalability. As businesses grow and technology evolves, the need for additional power can arise. The Dynex unit is designed to be flexible, allowing for easy integration with existing systems while supporting future expansions. This adaptability benefits organizations looking to enhance their operational efficiency without the hassle of significantly overhauling their current setup.

Additionally, the Dynex DX-IPDR is compliant with the latest industry standards, which assures users of its reliability and performance. Its intelligent design ensures minimal footprint while delivering maximum functionality, making it a preferred choice for space-constrained environments.

In summary, the Dynex DX-IPDR stands out with its high-capacity power distribution, advanced monitoring capabilities, robust security features, scalability, and adherence to industry standards. These characteristics make it an essential tool for organizations aiming to optimize their power management strategies and ensure their critical systems remain operational. Whether in a small server room or a large data center, the DX-IPDR proves to be an invaluable asset in the quest for efficiency and reliability in power distribution.