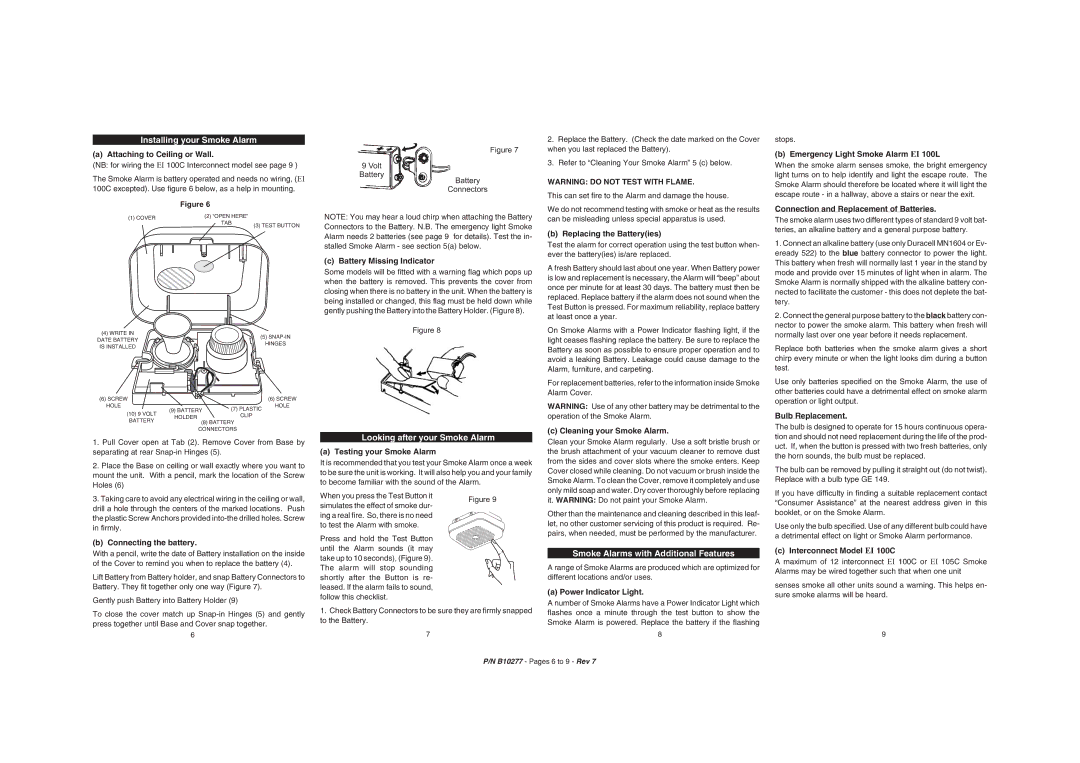
Installing your Smoke Alarm
(a) Attaching to Ceiling or Wall.
(NB: for wiring the EI 100C Interconnect model see page 9 )
The Smoke Alarm is battery operated and needs no wiring, (EI 100C excepted). Use figure 6 below, as a help in mounting.
Figure 6
(1) COVER | (2) “OPEN HERE” | |
TAB | |
| (3) TEST BUTTON |
| |
(4) WRITE IN
(5) SNAP-IN
DATE BATTERY
Figure 7
9Volt Battery
Battery
Connectors
NOTE: You may hear a loud chirp when attaching the Battery Connectors to the Battery. N.B. The emergency light Smoke Alarm needs 2 batteries (see page 9 for details). Test the in- stalled Smoke Alarm - see section 5(a) below.
(c) Battery Missing Indicator
Some models will be fitted with a warning flag which pops up when the battery is removed. This prevents the cover from closing when there is no battery in the unit. When the battery is being installed or changed, this flag must be held down while gently pushing the Battery into the Battery Holder. (Figure 8).
Figure 8
2.Replace the Battery. (Check the date marked on the Cover when you last replaced the Battery).
3.Refer to “Cleaning Your Smoke Alarm” 5 (c) below.
WARNING: DO NOT TEST WITH FLAME.
This can set fire to the Alarm and damage the house.
We do not recommend testing with smoke or heat as the results can be misleading unless special apparatus is used.
(b) Replacing the Battery(ies)
Test the alarm for correct operation using the test button when- ever the battery(ies) is/are replaced.
A fresh Battery should last about one year. When Battery power is low and replacement is necessary, the Alarm will “beep” about once per minute for at least 30 days. The battery must then be replaced. Replace battery if the alarm does not sound when the Test Button is pressed. For maximum reliability, replace battery at least once a year.
On Smoke Alarms with a Power Indicator flashing light, if the light ceases flashing replace the battery. Be sure to replace the
stops.
(b) Emergency Light Smoke Alarm EI 100L
When the smoke alarm senses smoke, the bright emergency light turns on to help identify and light the escape route. The Smoke Alarm should therefore be located where it will light the escape route - in a hallway, above a stairs or near the exit.
Connection and Replacement of Batteries.
The smoke alarm uses two different types of standard 9 volt bat- teries, an alkaline battery and a general purpose battery.
1.Connect an alkaline battery (use only Duracell MN1604 or Ev- eready 522) to the blue battery connector to power the light. This battery when fresh will normally last 1 year in the stand by mode and provide over 15 minutes of light when in alarm. The Smoke Alarm is normally shipped with the alkaline battery con- nected to facilitate the customer - this does not deplete the bat- tery.
2.Connect the general purpose battery to the black battery con- nector to power the smoke alarm. This battery when fresh will normally last over one year before it needs replacement.
Battery as soon as possible to ensure proper operation and to avoid a leaking Battery. Leakage could cause damage to the Alarm, furniture, and carpeting.
For replacement batteries, refer to the information inside Smoke Alarm Cover.
Replace both batteries when the smoke alarm gives a short chirp every minute or when the light looks dim during a button test.
Use only batteries specified on the Smoke Alarm, the use of other batteries could have a detrimental effect on smoke alarm
(6) SCREW | | | (6) SCREW |
HOLE | (9) BATTERY | (7) PLASTIC | HOLE |
| |
| (10) 9 VOLT | HOLDER | CLIP |
| BATTERY |
| |
| | (8) BATTERY |
| | |
| | | CONNECTORS |
1.Pull Cover open at Tab (2). Remove Cover from Base by separating at rear Snap-in Hinges (5).
2.Place the Base on ceiling or wall exactly where you want to mount the unit. With a pencil, mark the location of the Screw Holes (6)
3.Taking care to avoid any electrical wiring in the ceiling or wall, drill a hole through the centers of the marked locations. Push the plastic Screw Anchors provided into-the drilled holes. Screw in firmly.
(b) Connecting the battery.
With a pencil, write the date of Battery installation on the inside of the Cover to remind you when to replace the battery (4).
Lift Battery from Battery holder, and snap Battery Connectors to Battery. They fit together only one way (Figure 7).
Gently push Battery into Battery Holder (9)
To close the cover match up Snap-in Hinges (5) and gently press together until Base and Cover snap together.
6
Looking after your Smoke Alarm
(a) Testing your Smoke Alarm
It is recommended that you test your Smoke Alarm once a week to be sure the unit is working. It will also help you and your family to become familiar with the sound of the Alarm.
| When you press the Test Button it | Figure 9 |
| simulates the effect of smoke dur- |
| |
| ing a real fire. So, there is no need | |
| to test the Alarm with smoke. | |
Press and hold the Test Button until the Alarm sounds (it may take up to 10 seconds), (Figure 9). The alarm will stop sounding shortly after the Button is re- leased. If the alarm fails to sound, follow this checklist.
1.Check Battery Connectors to be sure they are firmly snapped to the Battery.
7
WARNING: Use of any other battery may be detrimental to the operation of the Smoke Alarm.
(c) Cleaning your Smoke Alarm.
Clean your Smoke Alarm regularly. Use a soft bristle brush or the brush attachment of your vacuum cleaner to remove dust from the sides and cover slots where the smoke enters. Keep Cover closed while cleaning. Do not vacuum or brush inside the Smoke Alarm. To clean the Cover, remove it completely and use only mild soap and water. Dry cover thoroughly before replacing it. WARNING: Do not paint your Smoke Alarm.
Other than the maintenance and cleaning described in this leaf- let, no other customer servicing of this product is required. Re- pairs, when needed, must be performed by the manufacturer.
Smoke Alarms with Additional Features
A range of Smoke Alarms are produced which are optimized for different locations and/or uses.
(a) Power Indicator Light.
A number of Smoke Alarms have a Power Indicator Light which flashes once a minute through the test button to show the Smoke Alarm is powered. Replace the battery if the flashing
8
operation or light output.
Bulb Replacement.
The bulb is designed to operate for 15 hours continuous opera- tion and should not need replacement during the life of the prod- uct. If, when the button is pressed with two fresh batteries, only the horn sounds, the bulb must be replaced.
The bulb can be removed by pulling it straight out (do not twist). Replace with a bulb type GE 149.
If you have difficulty in finding a suitable replacement contact “Consumer Assistance” at the nearest address given in this booklet, or on the Smoke Alarm.
Use only the bulb specified. Use of any different bulb could have a detrimental effect on light or Smoke Alarm performance.
(c) Interconnect Model EI 100C
A maximum of 12 interconnect EI 100C or EI 105C Smoke Alarms may be wired together such that when one unit
senses smoke all other units sound a warning. This helps en- sure smoke alarms will be heard.
9