LAMP UNIT (LAMP/CAGE MODULE)
FOR PROJECTOR
MODEL AH-55001
INSTALLATION MANUAL
CAUTION:
•Potential hazard of glass particles if lamp ruptures. Please have an EIKI Authorized Dealer or Service Center replace lamp if rupture occurs.
•Do not remove the lamp unit directly after operation of the projector. The lamp may be extremely hot. Wait at least one hour after the power cord is disconnected to allow the surface of the lamp unit to fully cool before removing the lamp unit.
■It is recommended that the lamp be replaced when the remaining lamp life becomes 5% or less, or when you notice a signifi- cant deterioration in the picture and color quality. The lamp life (percentage) can be checked with the
Hg LAMP CONTAINS MERCURY For State Lamp Disposal Information |
|
www.lamprecycle.org or | U.S.A. ONLY |
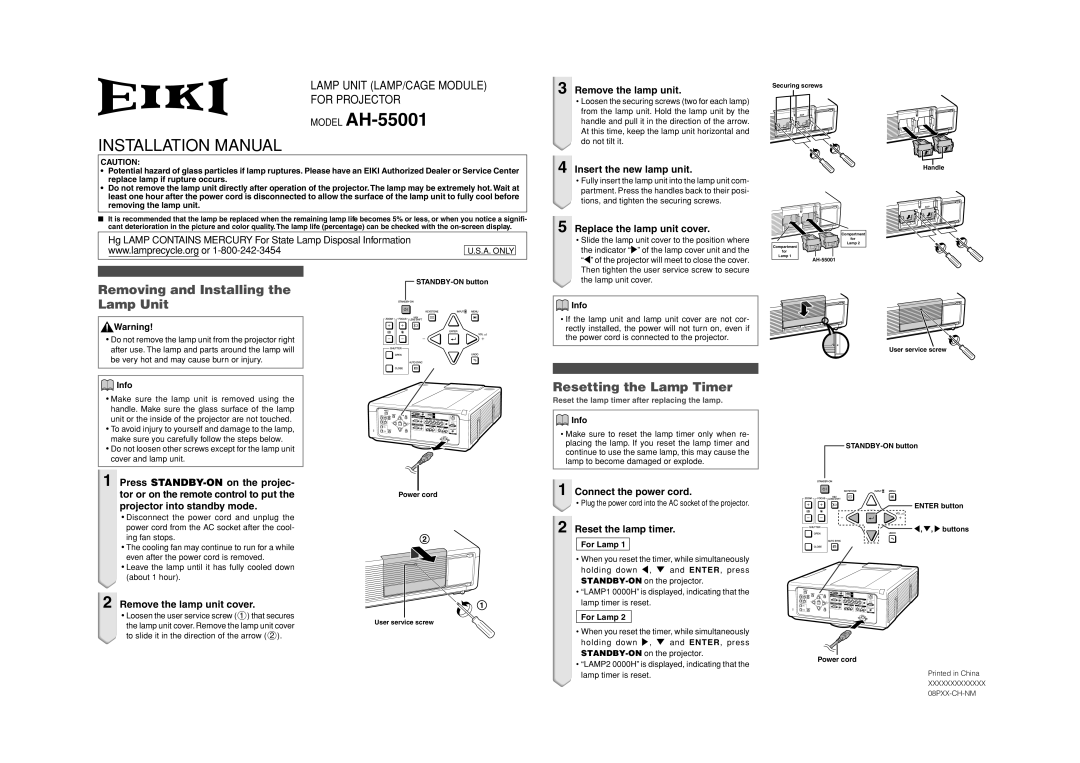
3 Remove the lamp unit.
•Loosen the securing screws (two for each lamp) from the lamp unit. Hold the lamp unit by the handle and pull it in the direction of the arrow. At this time, keep the lamp unit horizontal and do not tilt it.
4 Insert the new lamp unit.
•Fully insert the lamp unit into the lamp unit com- partment. Press the handles back to their posi- tions, and tighten the securing screws.
5 Replace the lamp unit cover.
• Slide the lamp unit cover to the position where |
the indicator “” of the lamp cover unit and the |
“\” of the projector will meet to close the cover. |
Then tighten the user service screw to secure |
Securing screws
Handle
Compartment
for
Lamp 2
Compartment
for
Lamp 1
Removing and Installing the Lamp Unit
![]() Warning!
Warning!
•Do not remove the lamp unit from the projector right after use. The lamp and parts around the lamp will be very hot and may cause burn or injury.
![]()
the lamp unit cover. |
 Info
Info
• If the lamp unit and lamp unit cover are not cor- rectly installed, the power will not turn on, even if the power cord is connected to the projector.
User service screw
![]() Info
Info
•Make sure the lamp unit is removed using the handle. Make sure the glass surface of the lamp unit or the inside of the projector are not touched.
•To avoid injury to yourself and damage to the lamp, make sure you carefully follow the steps below.
•Do not loosen other screws except for the lamp unit cover and lamp unit.
Resetting the Lamp Timer
Reset the lamp timer after replacing the lamp.
![]() Info
Info
•Make sure to reset the lamp timer only when re- placing the lamp. If you reset the lamp timer and continue to use the same lamp, this may cause the lamp to become damaged or explode.
![]()
1 Press
•Disconnect the power cord and unplug the power cord from the AC socket after the cool- ing fan stops.
•The cooling fan may continue to run for a while even after the power cord is removed.
•Leave the lamp until it has fully cooled down (about 1 hour).
2 Remove the lamp unit cover.
•Loosen the user service screw (1) that secures the lamp unit cover. Remove the lamp unit cover to slide it in the direction of the arrow (2).
Power cord
2
1
User service screw
1 Connect the power cord.
• Plug the power cord into the AC socket of the projector.
2 Reset the lamp timer.
For Lamp 1
•When you reset the timer, while simultaneously holding down \ , " and ENTER, press
•“LAMP1 0000H” is displayed, indicating that the lamp timer is reset.
For Lamp 2
•When you reset the timer, while simultaneously holding down , " and ENTER, press
•“LAMP2 0000H” is displayed, indicating that the lamp timer is reset.
![]() ENTER button
ENTER button
![]() \ , ", buttons
\ , ", buttons
Power cord
Printed in China
XXXXXXXXXXXXX